
Understanding Domestic Wiring in Australia
Safety Considerations for Domestic Wiring

Components of a Domestic Wiring System
- A domestic wiring system comprises several components that work together to deliver electricity throughout the house. These components include:
- Main Switchboard: The main switchboard is the central hub of the electrical system, housing circuit breakers, safety switches, and other control devices.
- Circuit Breakers: Circuit breakers protect the electrical circuits from overloading and short circuits by interrupting the flow of electricity when an abnormal condition occurs.
- Safety Switches: Safety switches (also known as residual current devices or RCDs) monitor the flow of electricity and quickly cut off the power supply in the event of a leakage or imbalance, reducing the risk of electric shock.
- Power Outlets and Switches: Power outlets and switches provide access to electricity and allow users to control the flow of power to different appliances and lighting fixtures.
- Electrical Wiring: Electrical wiring consists of conductive wires that carry electricity from the main switchboard to various outlets, switches, and appliances.

Types of Domestic Wiring
- Surface Wiring: Surface wiring involves running electrical cables along the surface of walls, ceilings, or skirting boards. It is a practical solution for properties where concealment is challenging or not preferred.
- Concealed Wiring: Concealed wiring refers to routing electrical cables inside the walls, floors, or ceilings, hiding them from view. It offers a neater and more aesthetically pleasing appearance.
- Flexible Wiring: Flexible wiring utilizes flexible cords, commonly known as flex, to connect appliances or devices that require movement or repositioning.
**Single-Phase vs. Three-Phase
Single-Phase vs. Three-Phase Power Supply
Circuit Breakers and Safety Switches
Electrical Cable Types and Sizes
- Twin and Earth Cable: This cable consists of two insulated active wires (usually colored red and black) and a non-insulated earth wire (green or green/yellow). It is commonly used for power outlets, lighting, and general-purpose wiring.
- Flat TPS Cable: Flat TPS (Thermoplastic-Sheathed) cable features multiple active wires and an earth wire, encased in a flat PVC sheath. It is often used for concealed wiring in walls or under floors.
- Flexible Cord: Flexible cords, also known as flex, are used for connecting portable appliances or devices that require flexibility and movement. They are typically covered in a durable sheath and come in various lengths and plug configurations.
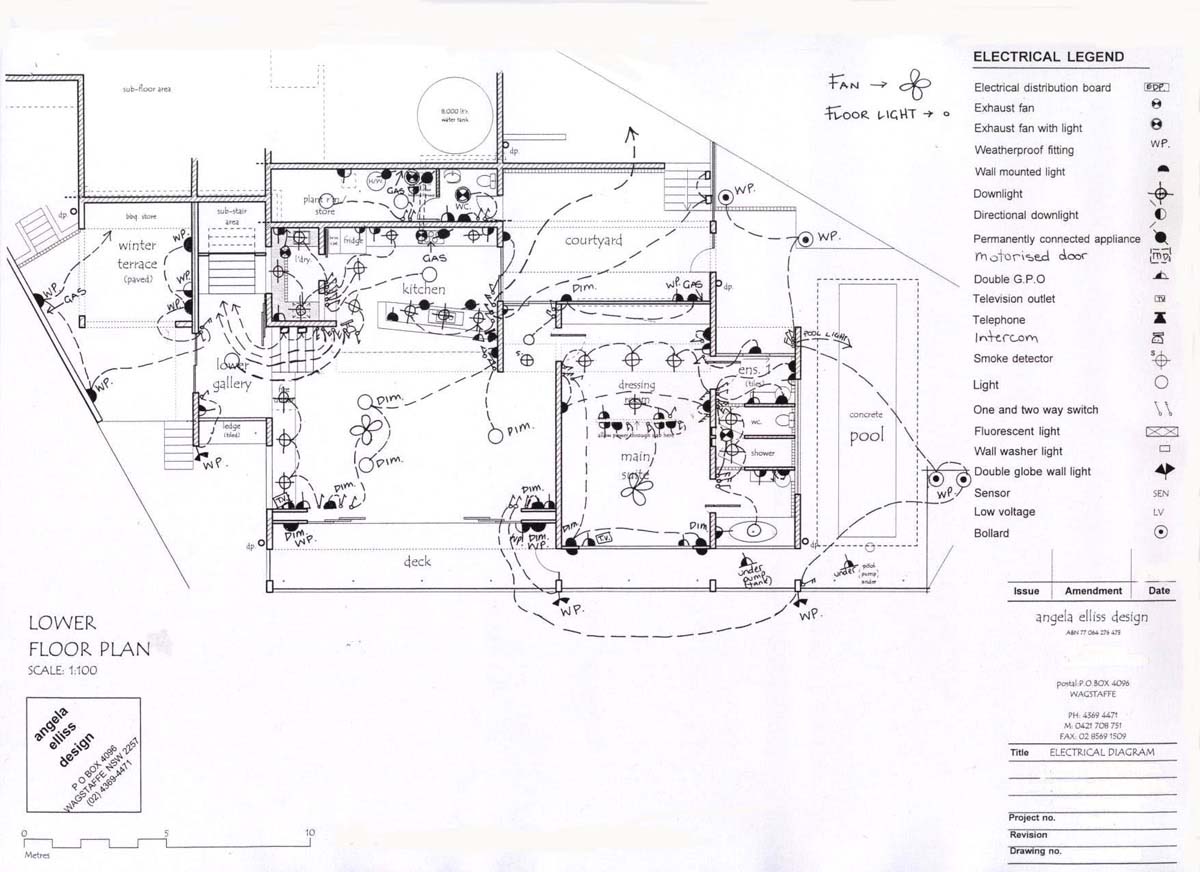
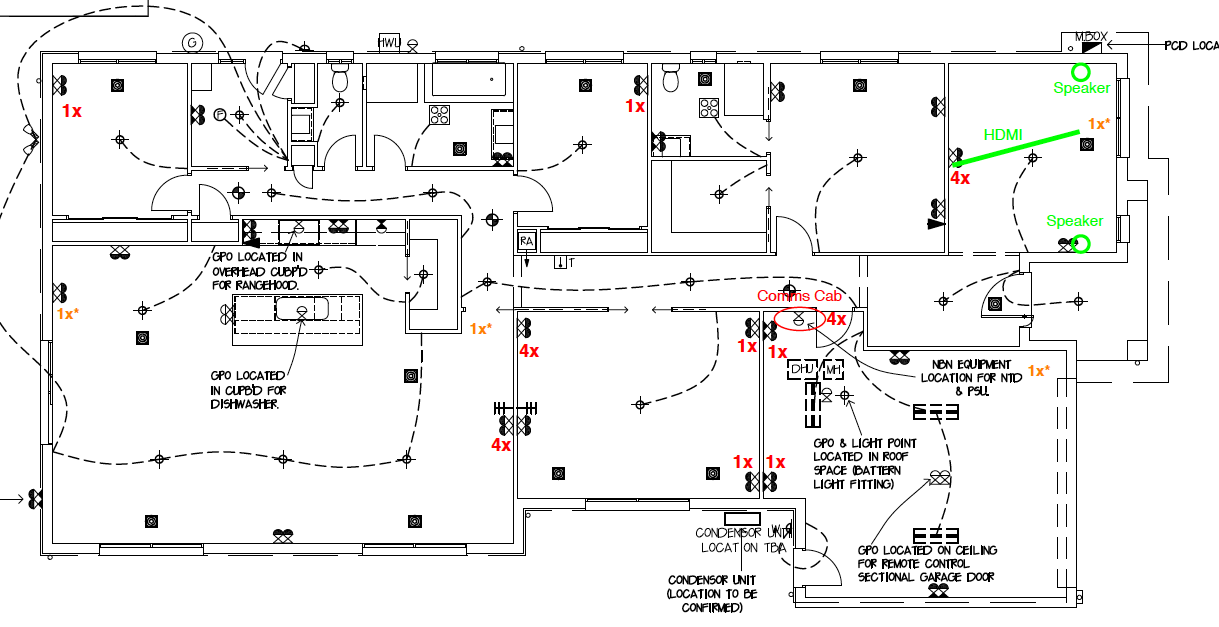
Wiring Diagram Symbols
- Outlets: Depicted by a circle with two or more lines, indicating the number of power outlets.
- Lights: Represented by a circle with a cross or a lightning bolt symbol.
- Earth/ground connections: Shown as a horizontal line intersected by a diagonal line.
- Circuit Breakers: Illustrated as a rectangle with a line through it, symbolizing the interruption of electrical flow.
Planning and Designing Domestic Wiring
- Determine the electrical requirements: Assess the power needs of the property, including the number of outlets, lighting fixtures, and appliances that will be connected to the system. This will help determine the load requirements and the number of circuits needed.
- Create a wiring diagram: Develop a detailed wiring diagram that outlines the placement of outlets, switches, and lighting fixtures. This diagram will serve as a guide during the installation process and help identify potential issues or conflicts.
- Calculate cable lengths: Measure the distances between the main switchboard and various outlets to determine the required cable lengths. It is essential to ensure that cables are not excessively long to prevent voltage drop.
- Select appropriate cables and accessories: Based on the electrical load and requirements, choose the correct type and size of cables, as well as switches, outlets, and other accessories needed for the installation.
- Consider future needs: Anticipate future electrical needs, such as room expansions or the addition of new appliances, and plan the wiring system accordingly. This will help avoid the need for major modifications in the future.
- Adhere to regulations and standards: Ensure that the planned wiring system complies with local electrical regulations and safety standards, such as the Australian Wiring Rules (AS/NZS 3000). This includes considerations for clearances, insulation, and appropriate protection devices.

Step-by-Step Guide to Domestic Wiring Installation
- Gather necessary tools and materials: Collect all the required tools, such as wire cutters, screwdrivers, and electrical tape, as well as the cables, outlets, switches, and other components.
- Ensure safety: Before starting any electrical work, switch off the main power supply and use appropriate personal protective equipment (PPE) such as insulated gloves and safety glasses.
- Install the main switchboard: Begin by installing the main switchboard, ensuring proper grounding and connection to the incoming power supply.
- Route the cables: Run the cables from the switchboard to the desired outlets, switches, and lighting fixtures. Use appropriate methods, such as concealed or surface wiring, depending on the chosen wiring system.
- Make connections: Strip the ends of the cables and make secure connections to the outlets, switches, and fixtures following the wiring diagram. Ensure proper color coding and use appropriate connectors.
- Install circuit breakers and safety switches: Mount the circuit breakers and safety switches in the switchboard and connect them to the corresponding circuits. Set the appropriate ratings for each circuit based on the electrical load.
- Test the wiring: Once the installation is complete, conduct thorough testing to ensure proper functionality and safety. Test each circuit, outlet, and switch for correct wiring and use a socket tester to verify polarity and grounding.
- Label the circuits: Clearly label each circuit in the switchboard to facilitate easy identification and future maintenance.
Testing and Inspecting Domestic Wiring
- Visual inspection: Conduct a thorough visual inspection of the entire wiring system, looking for any signs of damage, loose connections, or improper installations. Ensure that all cables are properly secured and protected.
- Insulation resistance test: Use a specialized insulation resistance tester to measure the insulation resistance of the wiring system. This test helps identify any insulation breakdowns or leaks that could result in electrical hazards.
- Polarity and continuity test: Verify the correct polarity and continuity of all outlets, switches, and lighting fixtures. This ensures that the wiring is properly connected and functioning as intended.
- Earth resistance test: Measure the earth resistance of the grounding system to ensure that it meets the required standards. A low earth resistance is essential for the proper functioning of safety switches and effective protection against electrical faults.
- Circuit testing: Test each circuit individually to ensure that it is correctly wired and has the expected voltage levels. Use a circuit tester or multimeter to check for proper functioning and identify any abnormalities.
- Functional testing: Test all outlets, switches, and lighting fixtures to ensure that they operate correctly. Verify that all circuits are supplying power as intended and that there are no issues with flickering lights, overheating outlets, or non-responsive switches.
- Safety switch testing: Test the functionality of safety switches by using the test button or performing a simulated fault. This ensures that the safety switches are capable of quickly disconnecting the power in the event of a leakage or imbalance.
- Certificate of Compliance: Upon successful testing and inspection, obtain a Certificate of Compliance from a licensed electrician. This certificate confirms that the wiring system complies with relevant regulations and standards.

Upgrading and Renovating Existing Wiring Systems
- Inspection and assessment: Conduct a thorough inspection of the existing wiring system to identify any outdated components, faulty wiring, or safety concerns. Assess the load requirements and determine if the current system can accommodate the electrical needs of the renovated space.
- Plan the upgrades: Based on the assessment, create a detailed plan for the necessary upgrades. This may include replacing old cables, adding new circuits, upgrading outlets and switches, or installing safety devices such as RCDs.
- Consider future needs: Anticipate future electrical requirements and plan the upgrades accordingly. This will help ensure that the wiring system can accommodate any future expansions or additions without the need for further modifications.
- Obtain permits: Check with the local authorities to determine if permits are required for the wiring upgrades or renovations. Adhering to the necessary permits and regulations will help ensure a safe and compliant installation.
- Hire a licensed electrician: Upgrading or renovating a wiring system is a complex task that requires the expertise of a licensed electrician. Engage a qualified professional who has experience in domestic wiring and can ensure the upgrades are done correctly and safely.
- Follow safety procedures: During the upgrade process, adhere to safety procedures such as switching off the power supply, using appropriate PPE, and following electrical codes and standards. This will minimize the risk of accidents or electrical hazards.
- Test and inspect: Once the upgrades are completed, perform thorough testing and inspection to verify the safety and functionality of the renovated wiring system. Test all circuits, outlets, switches, and safety devices to ensure they are working correctly.
- Document the changes: Keep a record of the upgrades and renovations, including the wiring diagram, permits, and any certifications obtained. This documentation will be valuable for future reference and potential resale of the property.
Conclusion
Electrical Wiring Diagram For A House - Domestic Wiring Diagram Australia

Light Wiring Diagram Australia Nilza - Domestic Wiring Diagram Australia
Screen Shot At Pm - Domestic Wiring Diagram Australia
House Wiring Diagram Of A Typical Circuit Buscar Con Google - Domestic Wiring Diagram Australia

Australian House Wiring Diagram Nilza Net - Domestic Wiring Diagram Australia

Basic House Wiring Diagram Electrical In Residential Guide Pdf Wiring Diagram - Domestic Wiring Diagram Australia
Home Electrical Wiring Color Code Nilza - Domestic Wiring Diagram Australia
Wiring Of The Distribution Board With Rcd Single Phase From Energy Meter To The Main Distribution Board Fuse Board Connection Electrical Technology - Domestic Wiring Diagram Australia
House Wiring Diagram In India Schematics And Diagrams - Domestic Wiring Diagram Australia
Domestic Switchboard Wiring Diagram Australia Diagrams - Domestic Wiring Diagram Australia
You're in homewiringdiagram.blogspot.com, you're on page that contains wiring diagrams and wire scheme associated with Domestic Wiring Diagram Australia. If the images produced less suitable way you can look for it using the search box.


