
How to Link and Join a Solar Electric Fence: A Complete Guide
A solar electric fence is a great way to secure your property, protect livestock, and even deter unwanted wildlife. These fences are powered by solar energy, which makes them an eco-friendly and cost-effective solution for outdoor security. The process of linking and joining a solar electric fence is straightforward, but it requires careful attention to detail to ensure that the fence functions optimally.
In this article, we will guide you step-by-step on how to link and join a solar electric fence, covering essential tools, safety precautions, and troubleshooting tips to get your fence up and running efficiently.
What is a Solar Electric Fence?
A solar electric fence is an energized fence powered by solar panels, designed to keep animals or intruders within or outside of a designated area. The fence works by delivering a short, sharp electrical shock when touched, which is enough to deter animals or people from crossing it. The solar panels collect sunlight during the day to charge the battery, which powers the energizer (or fence charger). These fences are highly effective, especially in remote locations where access to electrical outlets is limited.
Tools and Materials You Will Need
Before you begin the process of linking and joining your solar electric fence, gather the following tools and materials:
- Solar Electric Fence Energizer/Charger: The heart of the solar fence system, responsible for powering the fence wire with electricity.
- Solar Panels: Used to charge the fence battery. Ensure the solar panel is large enough to provide adequate energy for your system.
- Fencing Wire: Typically high-tensile wire or poly wire, which conducts electricity.
- Fence Posts: These are needed to support the wire.
- Insulators: Used to attach the wire to the fence posts without allowing the current to escape.
- Gate Handles: If your fence includes gates, these will allow you to open and close them while still keeping the electric charge contained.
- Battery: Stores energy to power the fence. This is typically included with the solar fence energizer kit.
- Grounding Rods: For proper grounding of your solar fence system.
- Connectors/Clamps: To connect wire sections and make secure joints.
- Wire Cutters and Pliers: For cutting wire and tightening connections.
- Multimeter: For checking the voltage levels of the electric fence.
Step-by-Step Guide to Link and Join a Solar Electric Fence
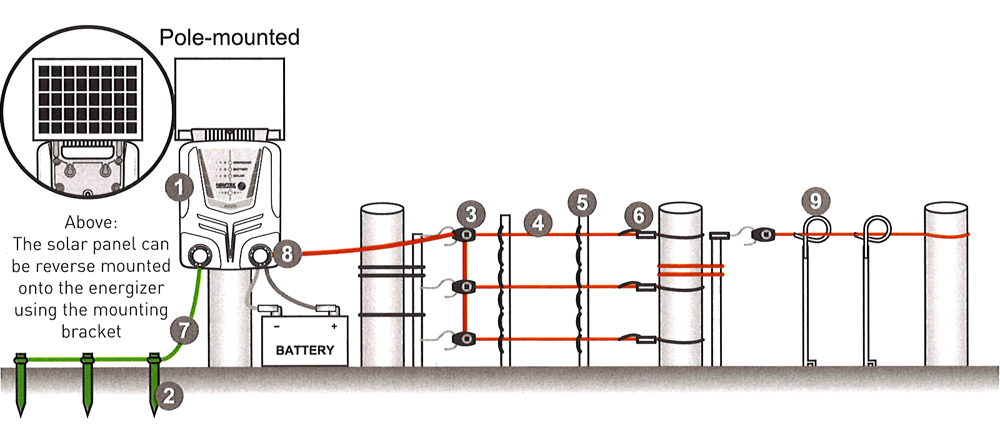
Step 1: Install the Solar Panel and Energizer
-
Mount the Solar Panel: Start by positioning the solar panel in an area that receives maximum sunlight throughout the day. The panel should be mounted at a slight angle to ensure it catches the sun's rays. Avoid shading from trees or buildings. Ideally, the solar panel should face south if you are in the northern hemisphere.
-
Connect the Energizer to the Solar Panel: Attach the solar panel to the energizer, following the manufacturer's instructions. Solar panels typically come with a cable that connects directly to the energizer's charging port. Ensure all connections are secure to prevent any power loss.
-
Place the Energizer Near the Fence Line: Position the energizer as close as possible to the fence line, ideally within 50 feet of the fence. If your fence is particularly long, you may need to place additional energizers at intervals.
Step 2: Set Up the Fence Line
-
Install Fence Posts: Begin by installing the fence posts at regular intervals (usually every 10-15 feet) along the perimeter of the area you want to enclose. Posts can be made from wood, metal, or plastic, depending on your preference and the type of animals you are trying to contain or exclude.
-
Attach Insulators: Once the posts are in place, attach the insulators to the posts. The insulators will prevent the electric current from escaping the wire to the post. Insulators come in various designs, such as nail-on, screw-on, or slip-on, so choose the type that works best with your posts.
-
Run the Fencing Wire: Now, it’s time to run the fencing wire. If you are using multiple strands of wire, run the wire through the insulators on the posts, ensuring the wire stays taut. You should always keep the wire elevated from the ground to avoid grounding out the system. The number of wire strands will depend on the animals you're trying to keep in or out. For smaller animals like chickens, a single strand may suffice, while for larger animals like cattle or deer, multiple strands are recommended.
Step 3: Connecting and Joining the Fencing Wire
To join the fence wire together, follow these steps:
-
Cut the Wire: Use wire cutters to cut the fencing wire to the necessary length. Ensure you have enough wire to complete the circuit, with some slack left for adjustments.
-
Join the Wire: To link sections of the fence wire, use connectors or clamps designed for electric fence wire. These will ensure a tight, secure connection without interfering with the current. Make sure the connections are as tight as possible to avoid any power loss.
- Crimp Connectors: These are used to attach two wire ends together. Simply place the wire ends into the connector and use pliers to crimp the connector securely onto the wire.
- Twist-on Connectors: These connectors are twisted around the wire to create a secure joint. Be sure the twist is tight and there is no gap in the connection.
-
Test the Connection: Once the wire sections are connected, use a multimeter to check the voltage at various points along the fence to ensure the electric current is consistent. If the voltage is too low, check the connections for any loose spots or grounding issues.
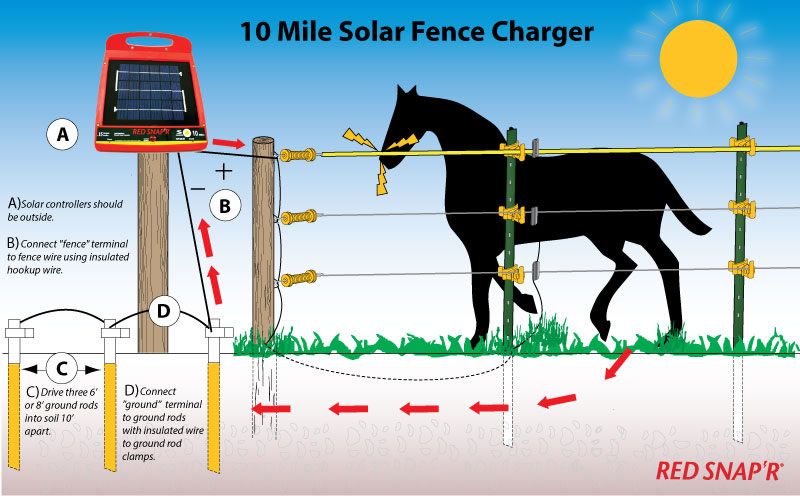
Step 4: Grounding the System
Proper grounding is essential for your solar electric fence to function correctly. Follow these steps to ground your fence properly:
-
Install Grounding Rods: Grounding rods should be placed at least 10 feet from the energizer and should be driven into the ground at least 3 feet deep. You may need two or more grounding rods depending on the size of your system and the soil conditions.
-
Connect Grounding Wire to the Energizer: Attach the grounding wire to the energizer's ground terminal and connect it to the grounding rods. Ensure that the ground wire is securely connected, as this will allow the electric charge to complete the circuit.
-
Test the Grounding: Use a multimeter to check that the grounding system is functioning correctly. The voltage reading on the ground wire should be minimal to ensure the fence is properly grounded.
Step 5: Check and Maintain the Fence
Once everything is connected, turn on the energizer and check for the following:
-
Check Voltage: Use a fence tester or multimeter to ensure the fence is delivering the right amount of voltage. For most animals, a voltage of 5,000 to 10,000 volts is adequate.
-
Regular Maintenance: Check the fence regularly for any signs of damage, such as broken wires, loose connections, or vegetation touching the fence. Overgrowth can reduce the effectiveness of the electric fence.
-
Battery Maintenance: If your solar panel is not keeping the battery charged, you may need to clean the panel or adjust its positioning to ensure maximum sunlight exposure.
Troubleshooting Tips
- Low Voltage: If your fence isn’t delivering sufficient voltage, check for loose connections, broken wires, or grounding issues.
- Power Loss: If the fence loses power at night, check the battery to ensure it's properly charged.
- Animals Breaching the Fence: If animals are still getting through, consider adding more strands of wire or increasing the voltage output.
Conclusion
Linking and joining a solar electric fence requires some careful planning and attention to detail, but it’s a great investment for securing your property, protecting livestock, and deterring intruders. By following the steps outlined in this guide, you can successfully set up and maintain a solar electric fence system that will provide reliable and eco-friendly security for years to come.
how to install a solar fence charger electric fence 101 zareba.
shop all solar powered electric fence chargers at http www zarebasystems com gathering electric fence chargers solar poweredlearn more practically the best fence cha.
how to install a solar electric fence doityourself com.
27 03 2010 to make your solar electric fence daylight powered you ll craving to install a charging unit to reach complete this dig unorthodox publish hole near one corner of the fence but outside of the perimeter it needs to be in a spot that will say you will the maximum realizable reachable amount of sunlight and it should turn south.how to install a solar electric fence step by step process.
02 02 2021 get the initial charge manage to pay for the charger an initial 24 hours of charging at the forefront you switch around your solar electric fence to confirm that it has the right voltage conveniently test it using an electric fence tester and make Definite that you accomplish this in relation to a regular basis just to be something like the safe side.
how to install a solar charged electric fence youtube.
i finally got the solar fence charger hooked taking place in the works and it works make a purchase of solar fence chargers and side dishes here http amzn to 2mzz7fbspinning out 4 gallons o.how to install a solar electric fence youtube.
don t forget the homestead honey hour will now be at 8 pm central time this thursday.
how to install an electric fence subsequent to pictures wikihow.
02 06 2021 to install an electric fence activate by vibes happening an electric charger near an ac outlet or a solar charger in a sunny spot then install at least 1 grounding publicize that s 6 feet or longer near the charger using a post hole digger in imitation of you ve over and done with that govern a grounding wire from the charger to all of the grounding posts.tips to complete the total solar powered electric fence setup.
19 05 2020 there isn t always that much difference amid the two figures though in legitimate world conditions 1km of fencing wire requires just about 0 5j of vivaciousness so bearing in mind an estimate has been made of the.
how to set up an electric fence youtube.
setting occurring an electric fence http www tractorsupply com know how fencing minister to of electric fencing htmlan electric fence can be a cost saving and effici.how to hook going on an electric fence energizer youtube.
about press copyright gain access to us creators advertise developers terms privacy policy safety how youtube works test extra features press copyright admittance us creators.how to belong to solar electric fence
how to connect a solar panel to an electric fence
how to hook up solar electric fence
how to member a solar powered electric fence


how are you in spanish,how are you,how are you in french,how are babies made,how are sedimentary rocks formed,how accurate is credit karma,how are igneous rocks formed,how a bill becomes a law,how are you doing,how are dams built,to all the boys i loved before,to all the boys i've loved before,to all the boys i loved before 3,to and from directions,to all the boys i loved before 2,to a t,to and too,to a t meaning,to and fro,to a tee,connect airpods to macbook,connect airpods to iphone,connect airpods to pc,connect airpods to windows 10,connect airpods,connect alexa to wifi,connect apple watch to iphone,connect auto insurance,connect america,connect airpods to laptop,solar attic fan,solar ash,solar air conditioner,solar array,solar and lunar eclipse,solar activity,solar ac unit,solar armor fallout 76,solar address sign,solar ash release date,electric avenue,electric audi,electric air pump,electric atv,electric avenue lyrics,electric airplane,electric acoustic guitar,electric assist bike,electric air compressor,electric atv for adults,fence and deck connection,fence around pool,fence art,fence and deck depot,fence authority,fence alternatives,fence at home depot,fence at lowes,fence and deck direct,fence anchors


