
Honda Civic 2001 Alternator Wiring Diagram: A Complete Guide
The alternator is a crucial component in any vehicle’s electrical system, including the 2001 Honda Civic. It is responsible for generating electrical power to charge the battery and power various electrical components of the vehicle when the engine is running. Understanding the alternator wiring diagram can help you diagnose issues, whether you are replacing the alternator, troubleshooting electrical problems, or performing general maintenance.
In this article, we will explore the alternator wiring diagram for the 2001 Honda Civic, explain the purpose of each wire, and provide troubleshooting tips for common alternator-related issues.
What Is the Alternator, and How Does It Work?
Before diving into the wiring diagram, it’s important to understand the role of the alternator. The alternator is driven by the engine’s crankshaft via a belt. When the engine is running, the alternator converts mechanical energy into electrical energy using a rotating magnetic field to generate alternating current (AC). This AC is then converted into direct current (DC) to charge the car’s battery and supply power to the vehicle’s electrical systems, such as lights, radio, and power windows.
The alternator is designed to charge the battery while maintaining the electrical system voltage at a consistent level, typically around 14.4 volts. If the alternator fails, the car’s battery will no longer charge, and the vehicle will eventually lose power, causing a breakdown.
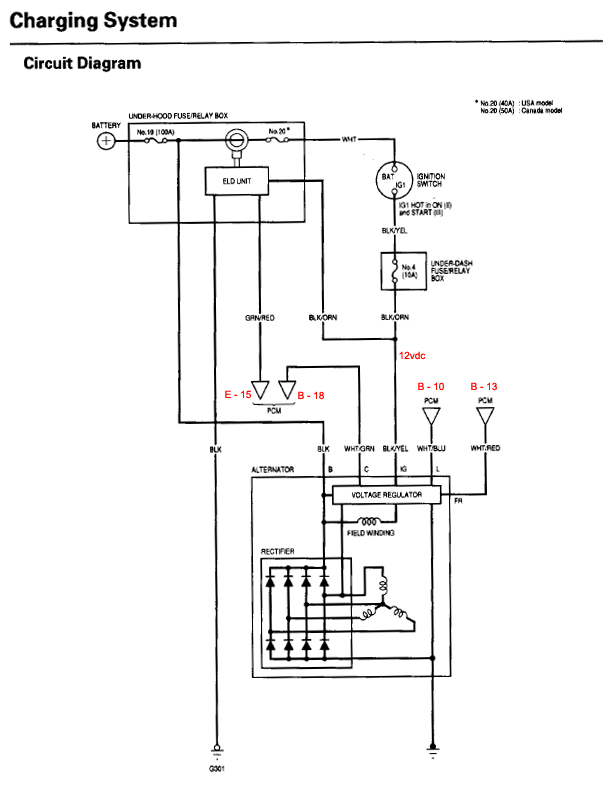
The 2001 Honda Civic Alternator Wiring Diagram
The alternator in the 2001 Honda Civic has several important wiring components that connect it to the rest of the electrical system. Let’s break down the key wiring connections found in the diagram:
1. Main Power Wire (B+ Terminal)
- Wire Color: Typically Red or Brown
- Function: This is the main power supply wire coming from the alternator. It connects directly to the battery and the vehicle’s electrical system. When the alternator is charging, it sends electrical current through this wire to recharge the battery and supply power to the vehicle’s electrical components.
The B+ terminal is connected to the alternator’s output terminal and ensures that power is distributed to the battery and other electrical components. A faulty connection here can result in no charging power reaching the battery.
2. Alternator Signal Wire (S Terminal)
- Wire Color: Green/Yellow or Green
- Function: This wire carries the voltage signal from the alternator to the engine control unit (ECU) or charging system. It helps the ECU or charging control module monitor the alternator's performance and charging status. If the alternator is not providing adequate voltage, the system will detect the issue.
This wire plays a key role in regulating the alternator’s output voltage and preventing overcharging or undercharging. If this signal wire is damaged, it could lead to inaccurate readings and potentially cause the charging system to malfunction.
3. Alternator Warning Light (L Terminal)
- Wire Color: Black/White
- Function: The L terminal wire connects the alternator to the dashboard warning light, which alerts the driver when there’s a problem with the alternator or the charging system. When the alternator is functioning properly, the warning light on the dashboard should remain off. However, if the alternator is not charging or there’s a wiring issue, the light will turn on to warn the driver.
If the warning light is illuminated, it indicates that there may be an issue with the alternator, such as a faulty diode, belt tension problem, or wiring issue.
4. Field Wire (F Terminal)
- Wire Color: Blue/White
- Function: This wire controls the field current, which helps regulate the alternator’s output voltage. The field wire is connected to the alternator’s field coil, which in turn controls the rotor’s magnetism to produce the required charging voltage.
This wire is responsible for controlling the alternator’s charging capacity. If the F terminal wire is disconnected or damaged, the alternator may not be able to properly regulate the voltage output.
5. Ground Wire
- Wire Color: Black
- Function: The alternator also requires a solid ground connection to complete the electrical circuit. The ground wire typically connects to the alternator housing and provides a path for excess electrical current to flow safely to the vehicle’s chassis.
A poor or loose ground connection can result in erratic charging behavior, low voltage output, or even alternator failure.
Detailed Wiring Breakdown for the 2001 Honda Civic Alternator
Here’s a more detailed look at the specific components and their wiring connections for the alternator system:
-
Main Power (B+) Terminal
- Connected directly to the positive terminal of the battery.
- Provides 12V or higher voltage from the alternator to power the vehicle's electrical systems and charge the battery.
-
Alternator Signal (S) Terminal
- Provides input to the Engine Control Module (ECM) or voltage regulator to monitor alternator performance.
- Ensures the system adjusts the alternator’s output to maintain optimal charging.
-
Alternator Warning Light (L) Terminal
- A warning signal sent to the dashboard light to notify the driver of charging system malfunctions.
- A lit warning light indicates issues like a bad alternator, broken belt, or faulty wiring.
-
Field (F) Terminal
- Used to regulate the alternator’s output voltage.
- This wire is responsible for controlling the magnetism of the rotor.
-
Ground Wire
- Provides a return path for the electrical current generated by the alternator.
- A properly grounded alternator ensures safe and reliable electrical operation.
Troubleshooting the Alternator Wiring
If your 2001 Honda Civic is experiencing issues with the alternator or charging system, here are some common problems and how to troubleshoot them:
1. Battery Not Charging
-
Check the Main Power Wire (B+): Ensure that the B+ terminal wire is securely connected to both the alternator and the battery’s positive terminal. A loose or corroded connection can prevent the battery from charging.
-
Inspect the Alternator Belt: If the alternator belt is loose or worn out, it may not turn the alternator properly. This can lead to insufficient charging power. Make sure the belt has proper tension.
2. Alternator Warning Light Illuminated
-
Test the L Terminal Wire: If the alternator warning light is on, the L terminal wire may be malfunctioning. Check for continuity between the alternator and the warning light. Ensure that the wire is not damaged and properly connected.
-
Test the Alternator: A malfunctioning alternator could be the root cause of the warning light. Use a multimeter to check the alternator's output voltage. It should be around 14.4 volts when the engine is running. If it’s below this range, the alternator may need to be replaced.
3. Erratic Charging or Voltage Fluctuations
-
Check the Signal Wire (S Terminal): A loose or faulty signal wire could cause the charging voltage to fluctuate. Inspect the wire for any signs of wear, corrosion, or disconnection.
-
Check the Ground Wire: A poor ground connection can lead to erratic voltage output. Ensure the ground wire is securely connected to the alternator housing and the vehicle chassis.
4. Low Alternator Output
- Inspect the Field (F Terminal): If the alternator is not producing enough power, the field wire may not be supplying the necessary current to the rotor. Inspect the wiring for damage or disconnections.
Conclusion
Understanding the alternator wiring diagram for the 2001 Honda Civic is essential when troubleshooting charging system problems or replacing the alternator. The alternator plays a vital role in powering the vehicle’s electrical systems and ensuring the battery remains charged. By familiarizing yourself with the different wires and their functions, you can easily identify and resolve issues that may arise with the alternator.
When performing electrical repairs, always use caution and ensure all connections are secure to prevent further damage to the system. If you are not comfortable working with your vehicle’s electrical system, it’s always a good idea to consult with a professional mechanic or technician.
I hope this detailed guide on the Honda Civic 2001 alternator wiring diagram helps you! If you have any further questions or need clarification, feel free to ask!
2001 honda civic alternator wiring diagram autocardesign.
01 11 2019 2001 honda civic alternator wiring diagram wiring diagram is a simplified enjoyable pictorial representation of an electrical circuit it shows the components of the circuit as simplified shapes and the capacity and signal contacts surrounded by the devices.
2001 honda civic alternator wiring diagram.
18 04 2020 2001 honda civic alternator wiring diagram figure 2 note you can augment the image in the image viewer to pull off a satisfying view of the location of the number 4 fuse the take aim is the same getting from factor a to determination b figure 4 taking into account these pieces fail the electrical current will not get the proper components which results in ignition.2001 honda civic wiring diagram wiring diagram assist manual.
27 10 2009 identifying wiring diagrams symbols 2001 honda civic facility distribution circuit 2001 honda civic sports ground distribution circuit 2001 honda civic in opposition to theft circuit 2001 honda civic body computer circuit 2001 honda civic computer data lines 2001 honda civic wiring diagram civic except gx hx 1 7l download 2001 honda civic wiring diagram below.
wiring diagramse club civic quebec.
j system wiring diagrams distribution circuit 3 of 4 2001 honda civic ell l page 1 monday may 05 2003 01 28pm.part 2 how to test the alternator 2001 2005 1 7l honda civic.
21 09 2013 1 reconnect the battery to its negative battery cable that you disconnected in the previous test 2 locate the alternator fuse which will be located in the numb dash fuse relay box inside your honda civic the alternator fuse of the out cold asleep dash fuse relay box is the number 4 fuse 3.2001 honda civic charging pain i replaced the alternator on.
i replaced the alternator something like my 2001 civic ex a year ago and just got a additional battery and the belts and connections seem to be in order like i start the car after it s been sitting for several hours the battery roomy flashes for roughly more or less 10 minutes and electrical components are not at full strength the headlights and dashboard lights are helpfully dimmer than normal.how to install honda civic alternator to t ford.
03 05 2007 we use cookies to provide you the best possible experience almost our website by continuing to use this site you agree to the use of cookies in relation to your device as described in our cookie policy unless you have disabled them.
technology articles for students.
09 09 2019 2001 honda civic alternator wiring diagram 2001 vw golf radio wiring diagram 2002 cadillac deville engine diagram 2002 nissan sentra relay box diagram.2001 jeep grand cherokee parts diagram pdf complete.
2001 honda civic alternator wiring diagram pdf kindle 2001 honda civic directory transmission fluid type pdf download 2001 honda civic gift way in lock fuse pdf online free.
2003 honda shadow spirit 750 carburetor diagram.
05 06 2019 2001 honda civic alternator wiring diagram 2001 honda civic assistant diagram 2001 honda civic ex engine diagram 2001 honda civic interior fuse box diagram 2001 honda civic rack and pinion diagram 2001 honda civic timing ornament diagram 2001 honda civic wiring harness diagram 2001 honda crv ornament diagram 2001 honda crv ignition wiring diagram.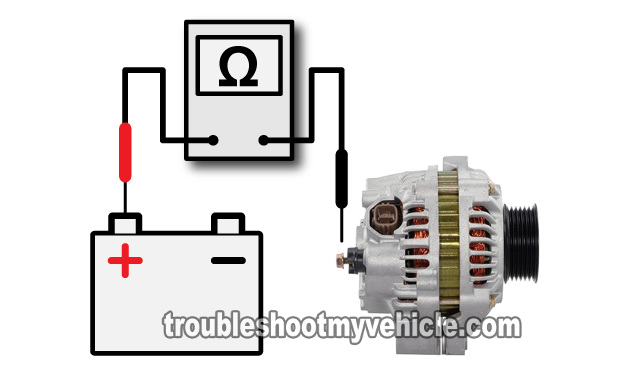


2001 a space odyssey,2001 a space odyssey explained,2001 acura integra,2001 audi tt,2001 a space odyssey book,2001 acura tl,2001 anthrax attacks,2001 acura mdx,2001 audi a4,2001 audi s4,honda accord,honda accord sport,honda atv,honda accord for sale,honda accord 2018,honda accord 2020,honda africa twin,honda accord coupe,honda accord 2022,honda accessories,civic auditorium,civic arena,civic action,civic activities,civic alliance,civic awd,civic association,civic affairs,civic at frisco square,civic action project,alternator autozone,alternator apex,alternator and starter repair,alternator and starter,alternator amperage,alternator and battery,alternator and starter repair near me,alternator advance auto,alternator and battery tester,alternator and starter repair shop,wiring a light switch,wiring a 3 way switch,wiring an outlet,wiring a gfci outlet,wiring a ceiling fan,wiring a switch,wiring a plug,wiring a doorbell,wiring a receptacle,wiring a 4 way switch,diagram a sentence,diagram a sentence for me,diagram app,diagram a sentence online,diagram as code,diagram and label a section of dna,diagram architecture,diagram art,diagram and explain the endosymbiotic theory,diagram anatomy


