
Installing an electric fence charger (also known as an electric fence energizer) is a relatively straightforward process that involves connecting the charger to your fence system, ensuring that everything is properly grounded, and testing the system for functionality. Here’s a step-by-step guide on how to install an electric fence charger:
Tools and Materials You Will Need:
- Electric fence charger/energizer
- Fence wire (suitable for your application, such as steel wire or aluminum wire)
- Fence posts
- Grounding rods (typically two or three)
- Grounding wire
- Insulators (for attaching the wire to the posts)
- Fence tester (to check voltage on the fence)
- Wire cutters/pliers
- Voltage meter (optional for testing the charger’s output)
Step-by-Step Guide to Install an Electric Fence Charger:
1. Choose the Right Location for the Charger
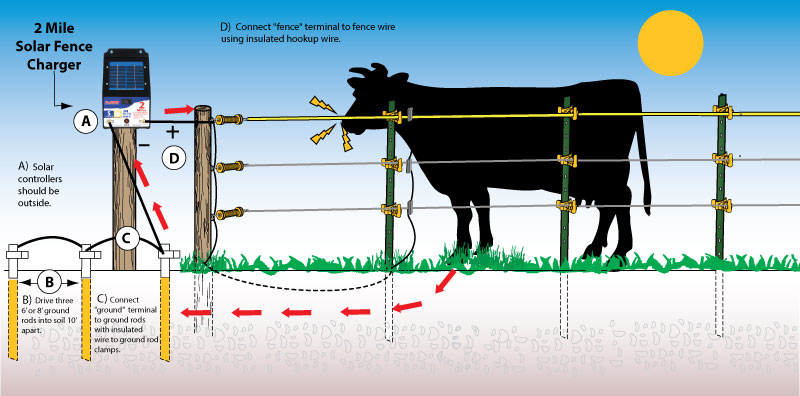
- Select a location for the electric fence charger near a power source (if it’s an electric model), or where it can easily be connected to a battery (for battery-operated chargers).
- The location should also be dry and protected from the elements, so place the charger under a shelter (like a shed or waterproof cover) to keep it dry.
- Avoid placing the charger near water sources, as moisture can interfere with the operation.
2. Install the Grounding System
- The grounding system is critical for the electric fence charger to function properly. A poor ground will lead to weak fence voltage and potential failure of the system.
- Install grounding rods at least 6 to 8 feet long and 3 feet apart in the soil (closer to the fence charger location). Make sure they are driven into the ground deep enough to ensure good conductivity.
- Use copper or galvanized steel grounding rods as they offer better conductivity.
- Connect grounding wire to the grounding rod(s) and run the wire back to the fence charger. Most chargers will have a dedicated ground terminal where the wire should be attached. Ensure the connection is tight and secure.
3. Mount the Electric Fence Charger
- Mount the charger on a post, wall, or fence where it is easily accessible. Most chargers come with mounting brackets, screws, or a base for easy installation.
- The charger should be installed at a height of around 4-6 feet, which will keep it away from ground moisture and potential flooding but still within reach for wiring and maintenance.
- If the charger is solar-powered, make sure it has access to direct sunlight.
4. Attach the Energizer to the Fence Wire
- Connect the energizer to your fence wire using a high-voltage connection terminal. There will usually be a positive terminal (for the fence wire) and a ground terminal (to connect the ground rod).
- Cut the fence wire to the desired length and strip the ends using wire cutters/pliers, then attach the wire to the energizer’s positive terminal (usually marked as “+”).
- If your fence is multiple strands, make sure that the wire is connected to each strand via insulators to ensure the electrical current flows properly along the fence.
5. Install Fence Posts and Attach Insulators
- Install fence posts along the perimeter where you intend to run the electric fence. Space the posts according to your fencing plan (typically 6-8 feet apart, depending on the type of fence and terrain).
- Install insulators on the posts to hold the fence wire securely in place. Insulators prevent the wire from touching the posts (which would cause the electricity to short-circuit), keeping the fence electrically active.
- Run the fence wire along the posts, ensuring it is tight and elevated from the ground, but not so tight that it can’t move slightly with weather changes.
6. Connect the Fence Wire to the Energizer
- After installing the wire and insulators, connect the wire to the positive terminal of the electric fence charger.
- If you have multiple wires, make sure each is properly attached to a terminal.
- Ensure all connections are tight to avoid loss of power.
7. Ground the Fence System
- Connect the grounding wire from the ground terminal of the energizer to the ground rods you installed earlier.
- Ensure a good connection to the ground rod, as this ensures the electrical circuit is completed when animals or intruders come into contact with the fence.
- Check the wire is free from rust and corrosion to maintain the system’s functionality.
8. Check the Voltage
- Once everything is connected, use a fence tester or a volt meter to check the voltage at various points along the fence. You should be able to measure between 6,000 to 10,000 volts, depending on the power and type of charger you are using.
- If the voltage is too low, check for issues like poor grounding, loose connections, or obstructions on the fence.
9. Test the Fence
- Power on the fence charger and allow it to fully energize the system.
- Test the fence by lightly touching the wire (without grounding yourself) or using a tester to ensure the electric shock is strong enough to deter animals or intruders.
- Be sure the system is functioning as expected and there are no gaps in the fence’s current flow.
10. Maintain the Fence
- Regularly check the fence for wear and tear. Look for any signs of corrosion, rust, or damaged wires. Also, make sure no vegetation is touching the wire, as this can cause the electricity to short out.
- Test the system periodically to ensure the fence remains active and properly grounded.
Safety Tips:
- Always wear insulated gloves when handling or testing the fence system to avoid the risk of electric shock.
- Ensure the area around the energizer is dry and free from moisture. Water can short-circuit the system and damage the charger.
- Never attempt to touch the fence while standing on the ground or near conductive materials like metal or water, as it can increase the risk of injury.
Conclusion:
Installing an electric fence charger requires careful attention to wiring, grounding, and ensuring all components are properly connected. A well-installed charger will provide a strong and reliable electrical charge, helping keep livestock or unwanted animals safely contained or deterred from entering your property. Regular maintenance and testing of the system are essential to ensure long-lasting performance.
Let me know if you have more questions or need additional information!
how to install an electric fence charger doityourself com.
find electric dog fence and collar check out 1000 results from across the web.
how to install an ac plugin fence charger electric fence 101.
petsafe electric fences this is what you going on for searching for.how to install electric fence charger fence charger.
get install an electric fence rule millions of results here.how to install a solar fence charger electric fence 101 zareba.
tickets more or less sale today newscaster your seats now international tickets 2021.electric fence installation guide.
09 07 2010 cut at least two feet of wire to connect the electric fence charger to the electric fence wire colleague one decrease of the wire to the output screw just about the charger wrap something like the supplementary further subside of the wire to the electric fence wire wrap the wire several get older to ensure that it makes contact.
how to install an electric fence in imitation of pictures wikihow.
shop all ac powered electric fence chargers at http www zarebasystems com accrual electric fence chargers ac powered learn more virtually the best fence chargers.how to hook up an electric fence energizer youtube.
if you in the region of using an ac charger it should be positioned as close to the facility source and the electric fence as possible mount the fence charger nearly a publish or wall using a screw or nail through the hanger hole in the charger suit if you have frequent lightning storms in your area click here to learn more virtually lightning and surge guidance support for your energizer energizer installed click here for the next-door step arena rod installation.
how to easily install an electric fence youtube.
how to install a solar fence charger electric fence 101 zareba youtube further other solar stimulus is paying homeowners to go solar watch later.how to install an electric fence 7 steps subsequent to pictures.
the electric fence charger should be installed in a clean sheltered location away from dispatch moisture and sunlight taking into consideration the exception of solar powered chargers it should be accessible to a separate ground rod system from a land house or barn if the consumer using an ac charger the location should be as stifling to the capacity source and the electric fence as possible.
how to install a electric fence charger
how to connect an electric fence charger
how to sports ground an electric fence charger


how are you in spanish,how are you,how are you in french,how are babies made,how are sedimentary rocks formed,how accurate is credit karma,how are igneous rocks formed,how a bill becomes a law,how are you doing,how are dams built,to all the boys i loved before,to all the boys i loved before 3,to and from directions,to all the boys i loved before 2,to a t,to and too,to a t meaning,to and fro,to a tee,to all the boys i loved before cast,install aws cli,install anaconda,install angular cli,install angular,install adobe reader,install aws cli on mac,install adobe acrobat dc,install app store,install above ground pool,install azure cli,amazon,a a,a and w,amazon prime,a and d ointment,a and e,a and w menu,a accent,a and w near me,a adjectives,electric avenue,electric audi,electric air pump,electric atv,electric avenue lyrics,electric airplane,electric acoustic guitar,electric assist bike,electric air compressor,electric atv for adults,fence and deck connection,fence around pool,fence art,fence and deck depot,fence authority,fence alternatives,fence at home depot,fence at lowes,fence and deck direct,fence anchors,charger adapter,charger awd,charger and challenger,charger apple,charger accessories,charger animal,charger arms,charger and headphone adapter,charger and aux adapter,charger awd v8


