“DIY solar wiring with step-by-step instructions”
Introduction to Solar Wiring
Before we dive into the instructions, it’s essential to understand the basics of solar wiring. A typical solar power system consists of solar panels, an inverter, a mounting system, and wiring. The solar panels convert sunlight into DC (direct current) electricity, which is then sent to the inverter. The inverter converts the DC electricity into AC (alternating current) electricity, which is what most homes and businesses use. The wiring connects the solar panels to the inverter and ultimately to the grid.
Safety Precautions
Before starting any DIY project, it’s crucial to take necessary safety precautions. When working with electrical systems, there is a risk of electrical shock, which can be fatal. To minimize this risk, follow these essential safety precautions:
- Turn off the power: Before starting the wiring process, ensure that the power to the solar system is turned off. Verify that the inverter and all other electrical components are disconnected from the grid.
- Wear protective gear: Wear protective gear, including gloves, safety glasses, and a hard hat, to prevent injuries from falling objects or electrical shock.
- Use proper tools: Use proper tools, such as wire strippers, pliers, and screwdrivers, to avoid damaging the wiring or electrical components.
- Follow local electrical codes: Familiarize yourself with local electrical codes and regulations to ensure that your wiring meets the necessary standards.
Step-by-Step Instructions
Now that we’ve covered the basics and safety precautions, let’s move on to the step-by-step instructions for DIY solar wiring.
Step 1: Plan Your Wiring
Before starting the wiring process, plan your system’s electrical configuration. Determine the number of solar panels, the inverter size, and the type of wiring you’ll need. Make sure to consult the manufacturer’s instructions and local electrical codes to ensure compliance.
- Determine the wiring size: Calculate the required wiring size based on the solar panel’s voltage and current output. A larger wiring size is required for higher voltage and current outputs.
- Choose the wiring type: Select the appropriate wiring type, such as copper or aluminum, and the insulation type, such as PVC or Teflon.

Step 2: Prepare the Wiring
Prepare the wiring by stripping the insulation and preparing the ends for connection.
- Strip the insulation: Use wire strippers to remove the insulation from the wiring ends. Be careful not to damage the conductor.
- Prepare the ends: Use pliers to shape the wiring ends into a loop or a point, depending on the connection type.
Step 3: Connect the Solar Panels
Connect the solar panels to the wiring.
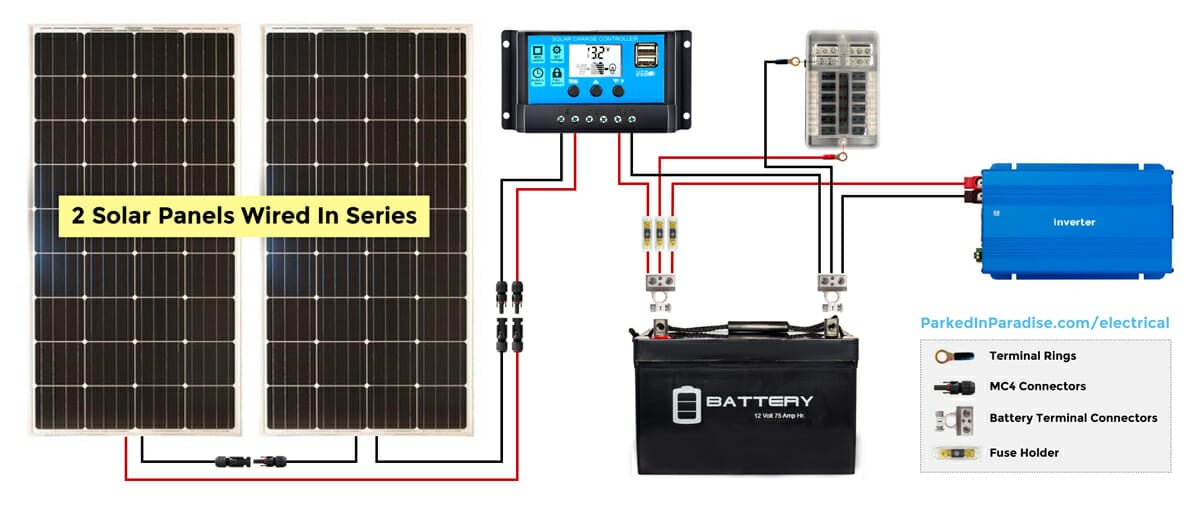
- Series or parallel connection: Determine whether you’ll connect the solar panels in series or parallel. Series connections increase the voltage, while parallel connections increase the current.
- Connect the positive and negative terminals: Connect the positive terminal of one solar panel to the negative terminal of the next solar panel, and so on.
Step 4: Connect the Inverter
Connect the inverter to the wiring.
- Inverter input: Connect the wiring to the inverter’s input terminal. Ensure that the wiring is compatible with the inverter’s input requirements.
- Grounding: Connect the grounding wire to the inverter’s grounding terminal.
Step 5: Connect the Grid
Connect the inverter to the grid.
- Grid connection: Connect the inverter’s output terminal to the grid. Ensure that the wiring meets local electrical codes and regulations.
- Breaker box: Connect the wiring to the breaker box. Ensure that the breaker box is rated for the solar system’s output.
Step 6: Test the System
Test the solar system to ensure it’s functioning correctly.
- Voltage and current test: Use a multimeter to test the voltage and current output of the solar panels and inverter.
- System monitoring: Use a system monitoring device to track the solar system’s performance and identify any issues.
Common Mistakes to Avoid
When doing DIY solar wiring, it’s essential to avoid common mistakes that can compromise the system’s safety and performance. Here are some common mistakes to avoid:
- Incorrect wiring size: Using a wiring size that’s too small can lead to overheating and reduced system performance.
- Poor connections: Poor connections can lead to electrical shock, fires, and system failure.
- Inadequate grounding: Inadequate grounding can lead to electrical shock and system failure.
Conclusion
DIY solar wiring can be a rewarding and cost-effective experience, but it requires careful planning, attention to detail, and adherence to safety precautions. By following the step-by-step instructions outlined in this article, you can ensure a safe and successful solar wiring installation. Remember to always follow local electrical codes and regulations, and consult the manufacturer’s instructions for specific guidance on your solar system. With the right knowledge and preparation, you can harness the power of the sun and enjoy the benefits of renewable energy.
Additional Resources
For further guidance and support, here are some additional resources:
- National Electrical Code (NEC): The NEC provides guidelines for electrical installations, including solar power systems.
- Local electrical codes: Familiarize yourself with local electrical codes and regulations to ensure compliance.
- Manufacturer’s instructions: Consult the manufacturer’s instructions for specific guidance on your solar system.
- Online forums and communities: Join online forums and communities to connect with other DIY solar enthusiasts and experts.
By following the instructions and guidelines outlined in this article, you can successfully complete your DIY solar wiring project and enjoy the benefits of renewable energy. Remember to always prioritize safety and take necessary precautions to avoid electrical shock and system failure. Happy wiring!


