“Home solar panel wiring diagram”
Introduction to Solar Panel Wiring Diagrams
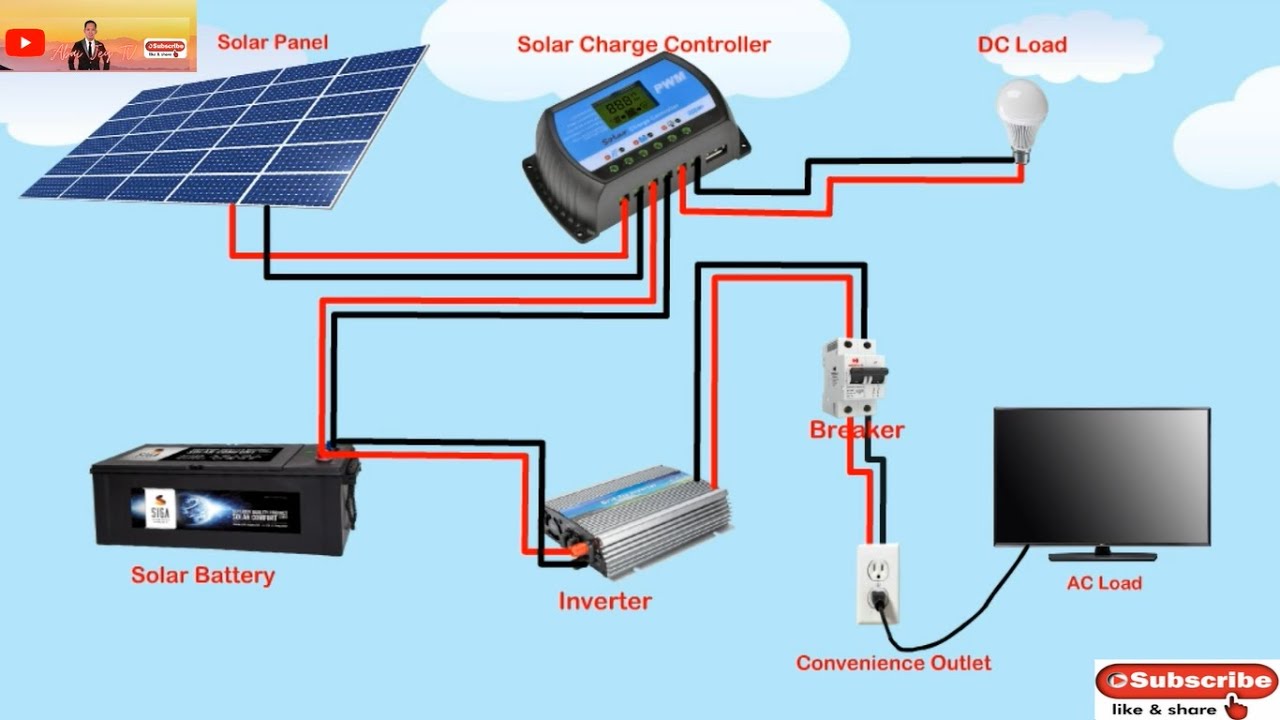
A solar panel wiring diagram is a visual representation of the electrical connections between solar panels, inverters, batteries, and other components in a solar panel system. It provides a roadmap for electricians and solar installers to follow, ensuring that the system is installed correctly and functions as intended. A good wiring diagram should be clear, concise, and easy to understand, taking into account the specific requirements of the solar panel system.
Components of a Solar Panel Wiring Diagram
A typical solar panel wiring diagram consists of the following components:
- Solar Panels: These are the photovoltaic (PV) panels that convert sunlight into electrical energy.
- Inverters: These devices convert the DC power generated by the solar panels into AC power, which can be used by household appliances.
- Batteries: These are optional components that store excess energy generated by the solar panels for later use.
- Charge Controllers: These devices regulate the flow of energy between the solar panels, batteries, and inverters.
- Mounting Systems: These are the structures that support the solar panels and keep them secure.
- Electrical Panels: These are the main distribution points for the electrical power generated by the solar panels.
- Grounding Systems: These are the systems that provide a safe path to ground for electrical currents.
Types of Solar Panel Wiring Diagrams
There are several types of solar panel wiring diagrams, each with its own unique characteristics and applications:
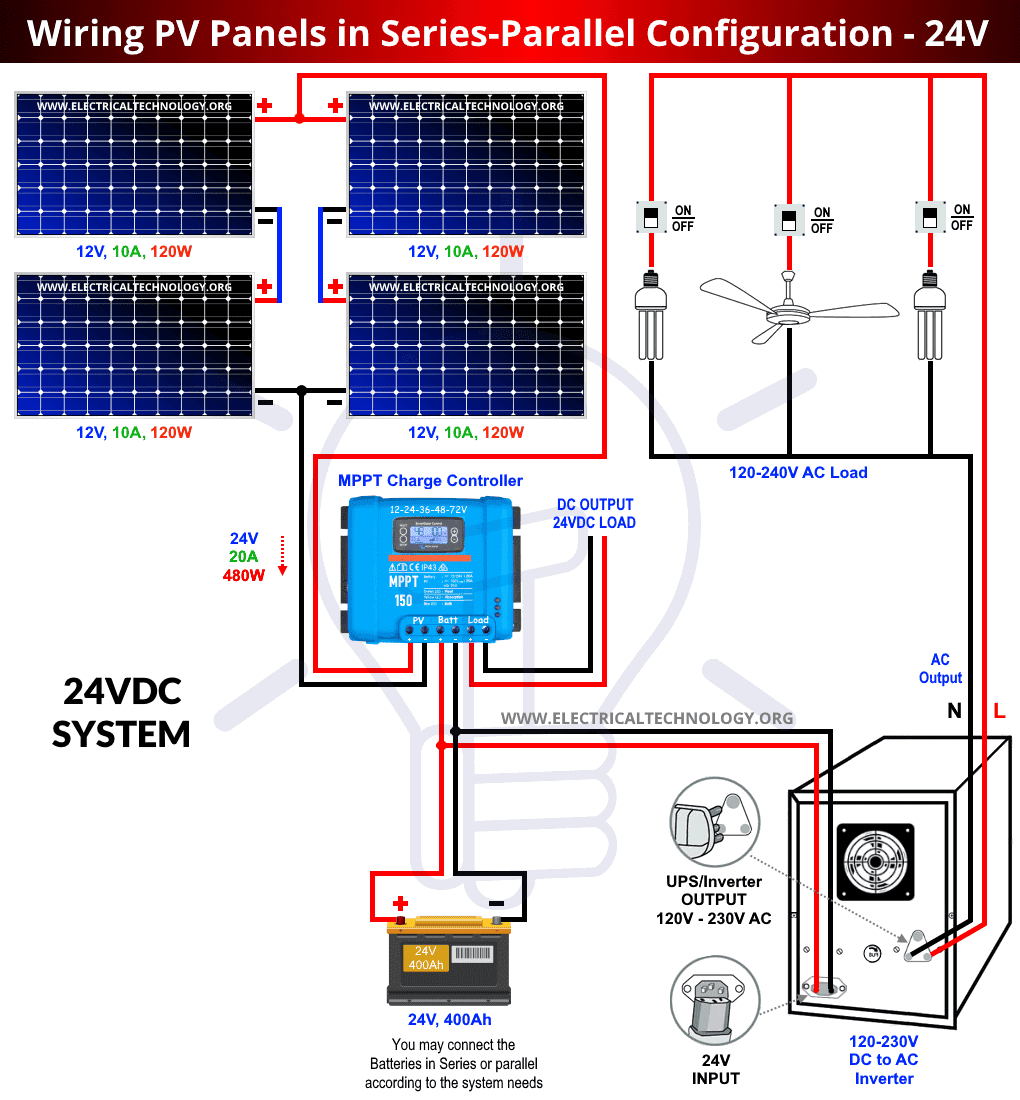
- Series Wiring Diagram: In this type of diagram, solar panels are connected in series, with each panel connected to the next in a single string.
- Parallel Wiring Diagram: In this type of diagram, solar panels are connected in parallel, with each panel connected to a separate string.
- Combination Wiring Diagram: This type of diagram combines series and parallel connections to create a hybrid system.
- Microinverter Wiring Diagram: This type of diagram uses microinverters, which are small inverters that connect to each solar panel individually.

Creating a Solar Panel Wiring Diagram
Creating a solar panel wiring diagram requires careful planning and attention to detail. Here are some steps to follow:
- Determine the System Size: Calculate the total wattage required by the household and determine the number of solar panels needed to meet that demand.
- Choose the Components: Select the solar panels, inverters, batteries, and other components that will be used in the system.
- Design the System Layout: Determine the physical layout of the system, including the location of the solar panels, inverters, and electrical panels.
- Create the Wiring Diagram: Use specialized software or consult with a professional to create a detailed wiring diagram that shows the electrical connections between all components.
- Review and Refine: Review the wiring diagram carefully and refine it as needed to ensure that it is accurate and complete.
Best Practices for Solar Panel Wiring Diagrams
To ensure a safe and effective solar panel system, follow these best practices when creating a wiring diagram:
- Use Standardized Symbols: Use standardized symbols and notation to represent components and connections.
- Keep it Simple: Avoid over-complicating the wiring diagram with unnecessary components or connections.
- Use Clear Labels: Use clear and concise labels to identify components and connections.
- Include Safety Features: Include safety features such as grounding systems and surge protectors.
- Comply with Local Regulations: Comply with local building codes and regulations when designing and installing the solar panel system.
Common Mistakes to Avoid
When creating a solar panel wiring diagram, avoid the following common mistakes:
- Insufficient Grounding: Failing to provide a safe path to ground for electrical currents.
- Incorrect Wire Sizing: Using wire that is too small or too large for the application.
- Inadequate Overcurrent Protection: Failing to provide adequate overcurrent protection for the system.
- Incorrect Component Selection: Selecting components that are not compatible with each other or with the system requirements.
- Poor System Design: Designing a system that is not efficient or effective.
Conclusion
A well-designed solar panel wiring diagram is essential for a safe and effective solar panel system. By understanding the components, types, and best practices for creating a wiring diagram, homeowners and solar installers can ensure that their system meets the highest standards of quality and reliability. Remember to always follow local regulations and safety guidelines when designing and installing a solar panel system, and don’t hesitate to seek professional help if needed. With the right knowledge and expertise, you can harness the power of the sun to reduce your energy costs and carbon footprint.
Additional Resources
For those looking to learn more about solar panel wiring diagrams, here are some additional resources:
- National Electrical Code (NEC): The NEC provides guidelines for electrical wiring and safety in the United States.
- International Electrotechnical Commission (IEC): The IEC provides international standards for electrical safety and performance.
- Solar Energy Industries Association (SEIA): The SEIA provides resources and guidance for the solar industry, including information on solar panel wiring diagrams.
- Online Courses and Tutorials: There are many online courses and tutorials available that can provide training and guidance on solar panel wiring diagrams and system design.
By following the guidelines and best practices outlined in this article, you can create a reliable and effective solar panel wiring diagram that will help you harness the power of the sun for years to come.