“How to wire solar panels for home use”
Understanding the Basics
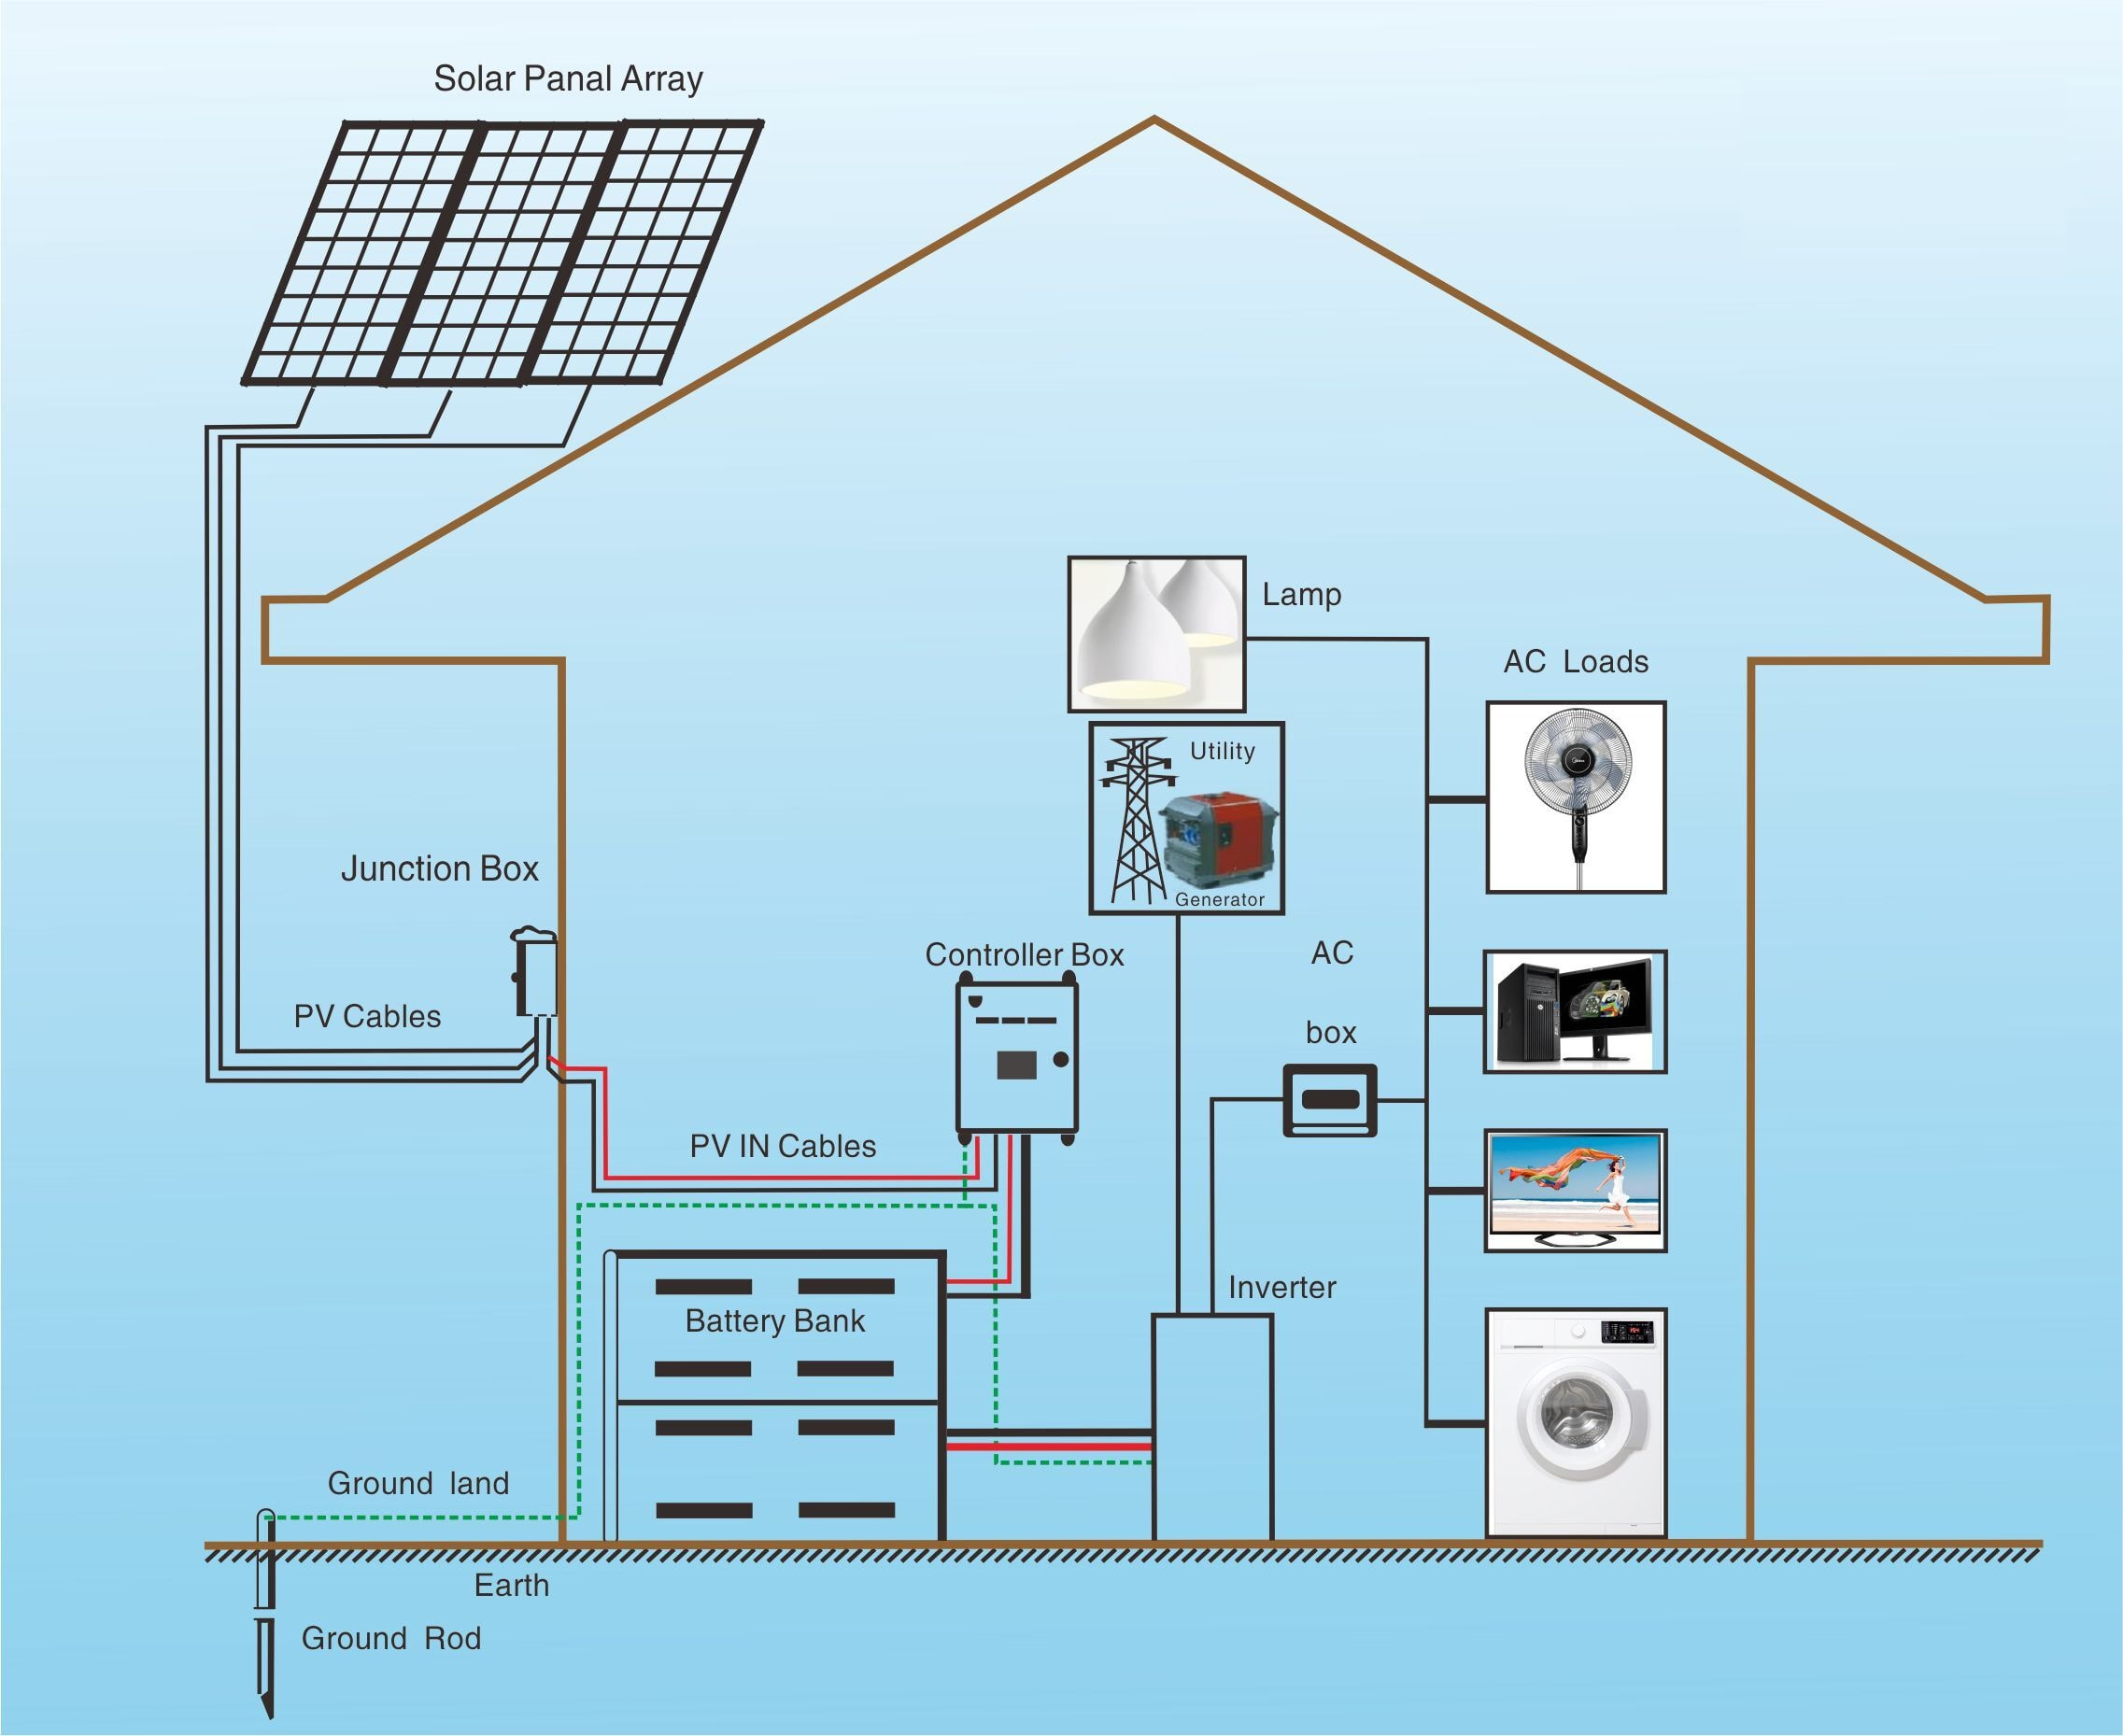
Before we dive into the nitty-gritty of wiring solar panels, it’s essential to understand the basic components of a solar panel system. A typical solar panel system consists of:
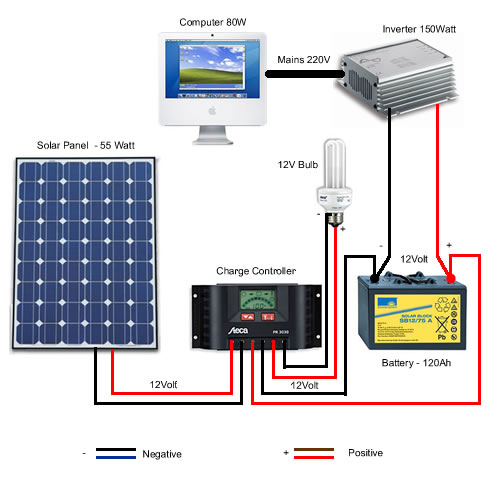
- Solar Panels: These are the photovoltaic (PV) panels that convert sunlight into electrical energy.
- Charge Controller: This device regulates the flow of energy from the solar panels to the battery bank, preventing overcharging and ensuring the batteries are charged efficiently.
- Battery Bank: This is a collection of deep cycle batteries that store the energy generated by the solar panels for later use.
- Inverter: This device converts the DC (direct current) energy from the battery bank into AC (alternating current) energy, which is usable in your home.
- Mounting System: This is the framework that supports the solar panels and secures them to your roof or ground mount.
Wiring Solar Panels: Step-by-Step
Now that we have covered the basics, let’s move on to the step-by-step guide on how to wire solar panels for home use.
Step 1: Prepare the Wiring Components
Before you start wiring, ensure you have the following components:
- Solar panel cables (usually 10 AWG or 12 AWG)
- Connectors (MC4 or similar)
- Fuses or circuit breakers
- Wire nuts or connectors
- Grounding equipment (grounding rod, grounding wire, and grounding clips)
Step 2: Connect the Solar Panels
To connect the solar panels, follow these steps:
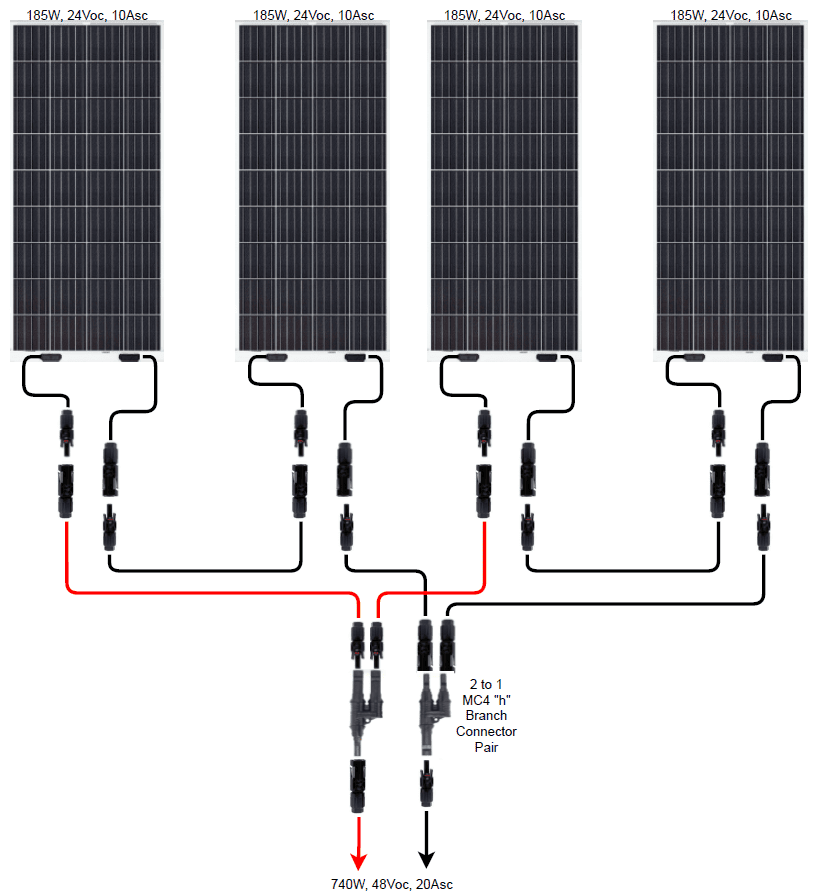
- Series Connection: Connect the positive terminal of one solar panel to the negative terminal of the next solar panel. This is known as a series connection. Repeat this process for all the solar panels in your array.
- Parallel Connection: If you have multiple strings of solar panels, connect the positive terminal of one string to the positive terminal of the next string, and the negative terminal of one string to the negative terminal of the next string. This is known as a parallel connection.
Step 3: Connect the Charge Controller
Once you have connected the solar panels, connect the charge controller to the solar panel array. The charge controller will regulate the flow of energy from the solar panels to the battery bank.
- Connect the Solar Panel Array to the Charge Controller: Connect the positive and negative terminals of the solar panel array to the corresponding terminals on the charge controller.
- Set the Charge Controller Parameters: Set the charge controller parameters according to the manufacturer’s instructions, including the battery type, voltage, and charging current.
Step 4: Connect the Battery Bank
Next, connect the battery bank to the charge controller.
- Connect the Charge Controller to the Battery Bank: Connect the positive and negative terminals of the charge controller to the corresponding terminals on the battery bank.
- Connect the Batteries in Series and Parallel: Connect the batteries in series and parallel to achieve the desired voltage and capacity.
Step 5: Connect the Inverter
Now, connect the inverter to the battery bank.
- Connect the Battery Bank to the Inverter: Connect the positive and negative terminals of the battery bank to the corresponding terminals on the inverter.
- Set the Inverter Parameters: Set the inverter parameters according to the manufacturer’s instructions, including the input voltage, output voltage, and frequency.
Step 6: Connect the Load
Finally, connect the load (your home) to the inverter.
- Connect the Inverter to the Load: Connect the output terminals of the inverter to the corresponding terminals on the load center (main electrical panel).
- Ensure Proper Grounding: Ensure proper grounding of the system by connecting the grounding wire to the grounding rod and the grounding clips.
Safety Precautions
When wiring solar panels, it’s essential to follow safety precautions to avoid injury or damage to the system. Some key safety precautions include:
- Use Personal Protective Equipment (PPE): Wear PPE, including gloves, safety glasses, and a hard hat, when working with electrical systems.
- Ensure Proper Lockout/Tagout: Ensure proper lockout/tagout procedures to prevent accidental start-up of the system.
- Use Proper Wiring and Connectors: Use proper wiring and connectors to prevent electrical shock or fire.
- Follow Manufacturer’s Instructions: Follow the manufacturer’s instructions for all components, including the solar panels, charge controller, battery bank, and inverter.
Common Mistakes to Avoid
When wiring solar panels, it’s essential to avoid common mistakes that can lead to system failure or safety hazards. Some common mistakes to avoid include:
- Incorrect Wiring: Incorrect wiring can lead to system failure or safety hazards.
- Insufficient Grounding: Insufficient grounding can lead to electrical shock or fire.
- Inadequate Overcurrent Protection: Inadequate overcurrent protection can lead to system failure or fire.
- Incorrect Component Selection: Incorrect component selection can lead to system failure or reduced efficiency.
Conclusion
Wiring solar panels for home use requires careful planning, attention to detail, and adherence to safety precautions. By following the step-by-step guide outlined in this article, you can ensure a safe and efficient installation of your solar panel system. Remember to always follow the manufacturer’s instructions and consult with a professional if you are unsure about any aspect of the installation. With proper installation and maintenance, your solar panel system can provide you with clean, renewable energy for years to come.
Additional Resources
For more information on wiring solar panels, we recommend the following resources:
- National Electric Code (NEC): The NEC provides guidelines for electrical wiring, including solar panel systems.
- International Association of Electrical Inspectors (IAEI): The IAEI provides resources and training for electrical inspectors and contractors.
- Solar Energy Industries Association (SEIA): The SEIA provides resources and guidelines for solar panel installation, including wiring and safety precautions.
By following the guidelines outlined in this article and consulting with the additional resources provided, you can ensure a safe and efficient installation of your solar panel system. Happy wiring!