“How to wire solar panels for an RV”

Understanding Solar Panel Systems
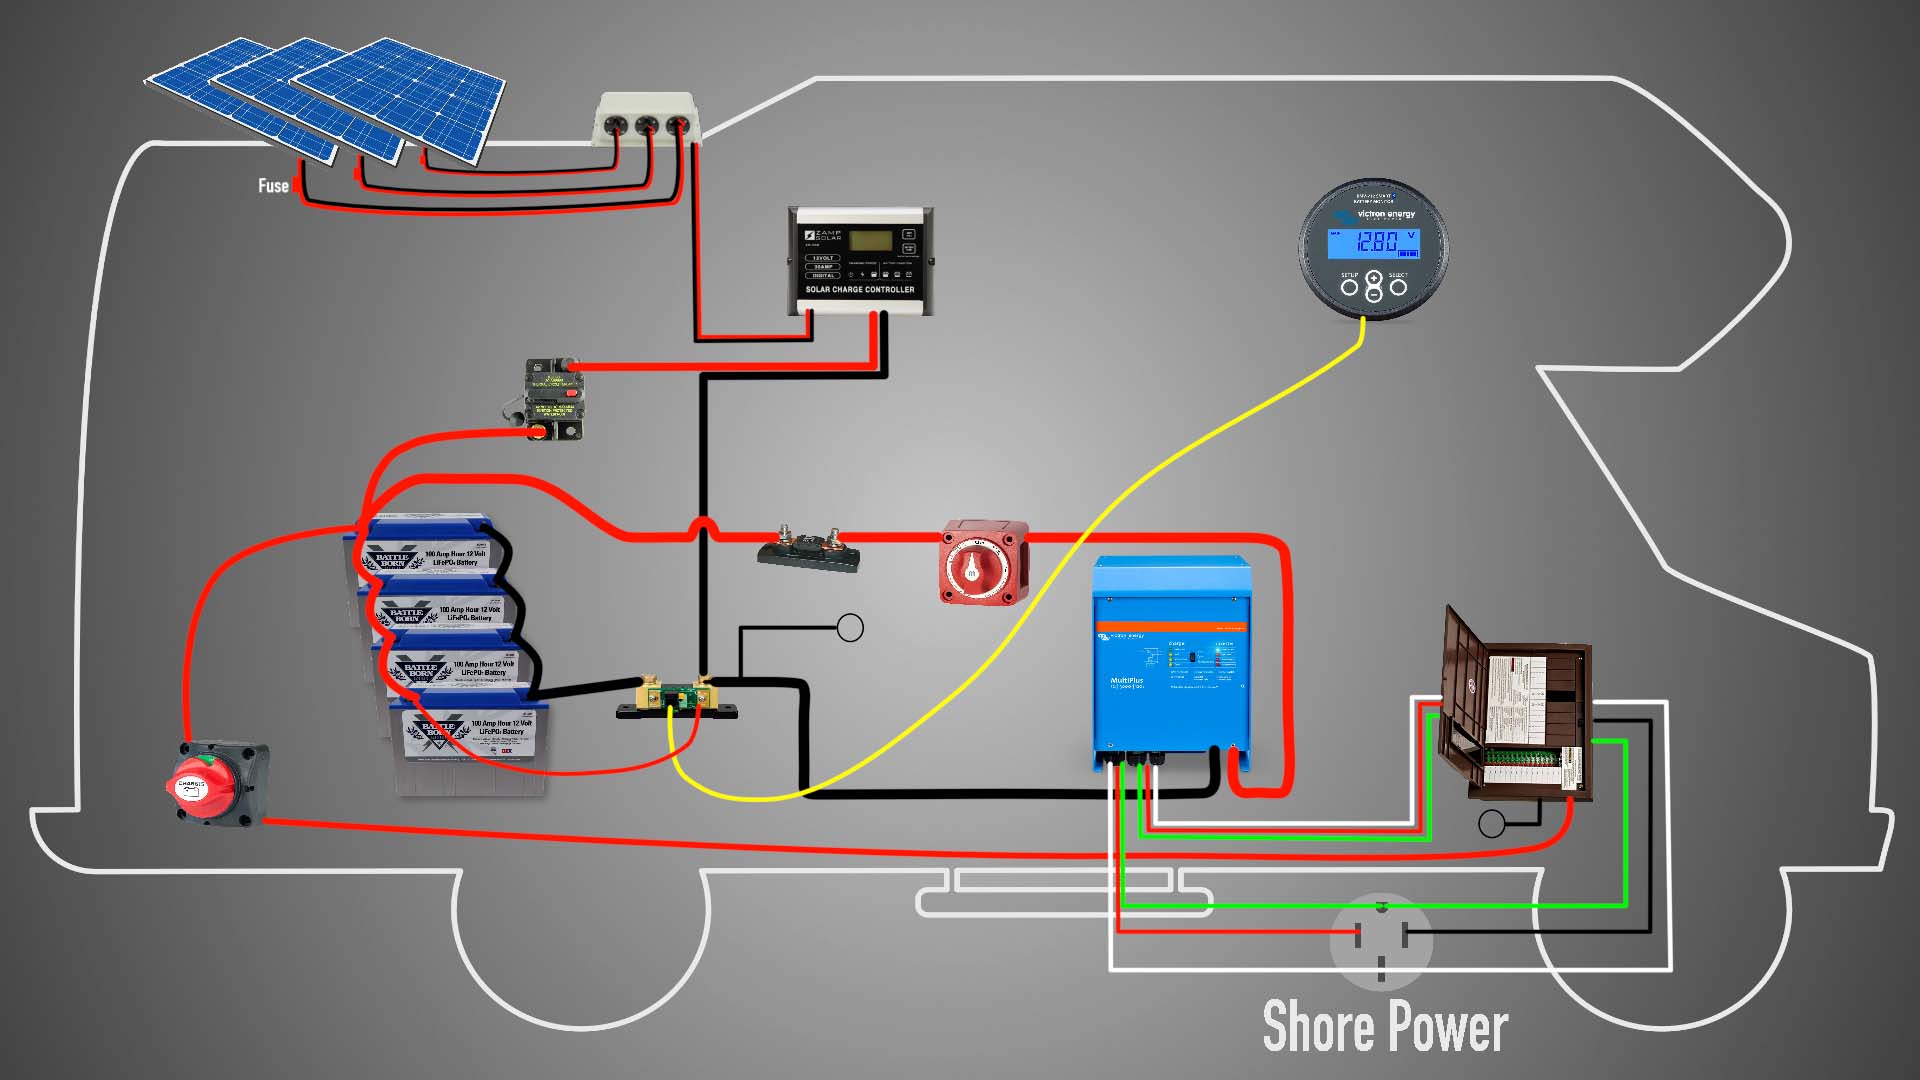
Before we dive into the wiring process, it’s essential to understand the basics of solar panel systems. A solar panel system consists of several components:
- Solar Panels: These are the photovoltaic (PV) panels that convert sunlight into electrical energy.
- Charge Controller: This device regulates the flow of energy from the solar panels to the battery, preventing overcharging and ensuring safe charging.
- Battery: This is the energy storage system that stores excess energy generated by the solar panels for later use.
- Inverter: This device converts the DC power from the battery into AC power, which is compatible with most RV appliances.
- Mounting Hardware: This includes the frames, clamps, and brackets that secure the solar panels to the RV roof.
Safety Considerations
When working with electrical systems, safety is paramount. Before starting the wiring process, ensure you take the following precautions:
- Turn off all power sources: Switch off the main electrical panel and any other power sources, including the engine and generator.
- Use personal protective equipment: Wear gloves, safety glasses, and a face mask to prevent injury from electrical shock and debris.
- Ensure proper ventilation: Work in a well-ventilated area to prevent inhalation of fumes and chemicals.
- Follow manufacturer instructions: Read and follow the manufacturer’s instructions for each component, including the solar panels, charge controller, and inverter.
Preparing the RV Roof
Before installing the solar panels, prepare the RV roof by:
- Cleaning the roof: Remove any debris, dirt, or wax from the roof surface to ensure a secure mount.
- Inspecting the roof: Check for any damage, leaks, or weak spots that could compromise the solar panel installation.
- Marking the mounting points: Use a marker to identify the locations where the solar panels will be mounted.
Wiring the Solar Panels
Now that we’ve covered the basics and safety considerations, let’s move on to the wiring process:
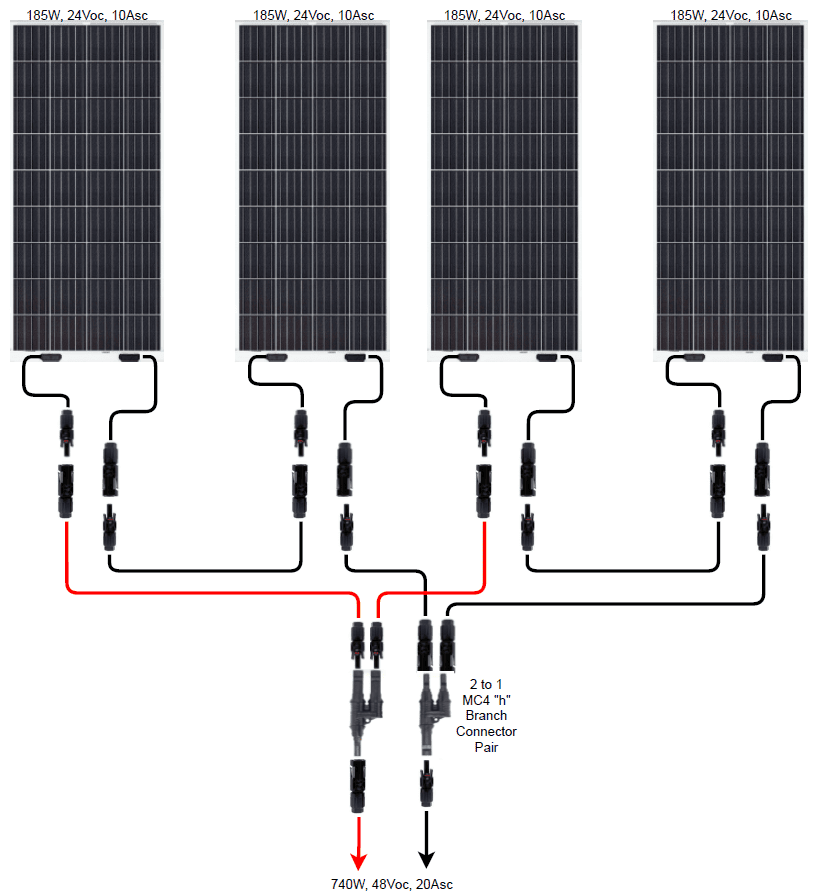
- Connect the solar panels in series or parallel: Depending on your system design, you may need to connect multiple solar panels in series or parallel to achieve the desired voltage and current.
- Use MC4 connectors: MC4 connectors are the industry standard for solar panel connections. Ensure you use the correct connectors and follow the manufacturer’s instructions for connection.
- Route the wiring: Run the wiring from the solar panels to the charge controller, ensuring it is secure and protected from damage.
- Connect the charge controller: Connect the charge controller to the battery, following the manufacturer’s instructions for wiring and configuration.
- Connect the inverter: Connect the inverter to the battery and AC panel, ensuring it is properly configured and wired.
Configuring the Charge Controller
The charge controller is a critical component in the solar panel system, regulating the flow of energy from the solar panels to the battery. To configure the charge controller:
- Set the voltage and current limits: Set the voltage and current limits according to the manufacturer’s instructions and your system design.
- Configure the charging modes: Configure the charging modes, such as bulk, absorption, and float, to ensure proper charging and maintenance of the battery.
- Monitor the system: Monitor the system performance using the charge controller’s display or remote monitoring software.
Testing and Commissioning
Once the wiring is complete, test and commission the system to ensure it is functioning correctly:
- Check the voltage and current: Verify the voltage and current output from the solar panels, charge controller, and inverter.
- Test the battery charging: Test the battery charging function to ensure the charge controller is regulating the energy flow correctly.
- Check the AC power output: Verify the AC power output from the inverter, ensuring it is within the expected range.
Best Practices and Maintenance
To ensure the longevity and performance of your solar panel system, follow these best practices and maintenance tips:
- Regularly clean the solar panels: Clean the solar panels every 2-3 months to maintain optimal energy output.
- Monitor system performance: Regularly monitor system performance using the charge controller’s display or remote monitoring software.
- Check the battery water levels: Check the battery water levels every 3-6 months, if applicable.
- Perform annual inspections: Perform annual inspections to identify and address any issues or damage to the system.
Conclusion
Wiring solar panels for an RV requires careful planning, attention to detail, and adherence to safety protocols. By following the steps outlined in this article, you can create a reliable and efficient solar panel system that meets your energy needs on the go. Remember to always follow manufacturer instructions, safety guidelines, and best practices to ensure the longevity and performance of your system. With a properly installed and maintained solar panel system, you can enjoy the freedom and convenience of renewable energy on your RV adventures.


