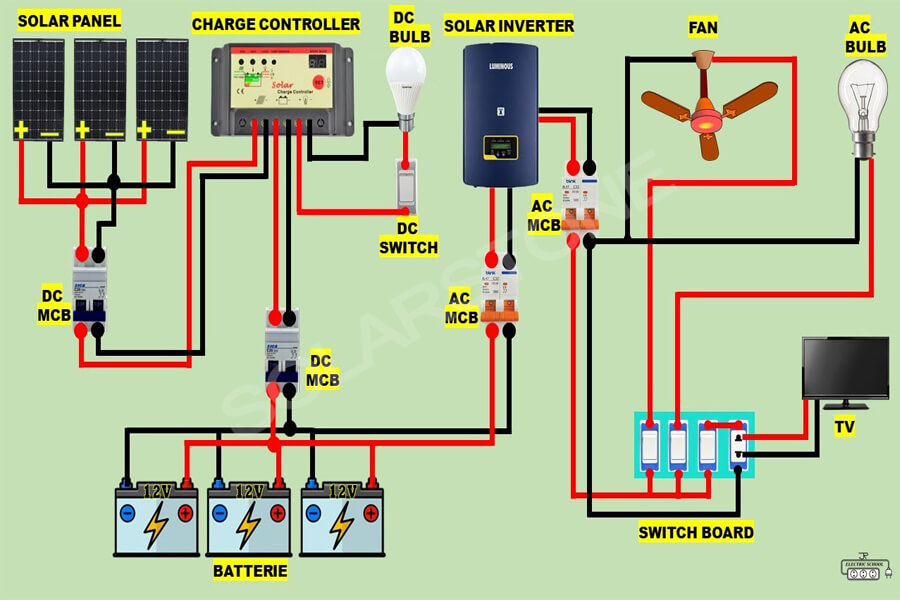
“Solar panel battery wiring for RV”
Understanding the Basics
Before we dive into the specifics of solar panel battery wiring, it’s essential to understand the basic components involved in an RV’s solar panel system. These include:
- Solar Panels: These are the panels that convert sunlight into electrical energy. They are typically mounted on the roof of the RV and come in various sizes and wattage ratings.
- Charge Controller: This device regulates the flow of energy from the solar panels to the batteries, ensuring that the batteries are not overcharged or undercharged.
- Batteries: These are the energy storage devices that hold the electrical energy generated by the solar panels. Deep cycle batteries are commonly used in RV solar panel systems.
- Inverter/Charger: This device converts the DC power from the batteries into AC power, which is usable by the RV’s appliances.
- Wiring and Connectors: These are the components that connect the various devices in the system, allowing energy to flow between them.
Wiring Considerations

When it comes to wiring a solar panel system for an RV, there are several considerations to keep in mind:
- Gauge and Type of Wire: The gauge and type of wire used can significantly impact the performance of the system. Thicker wires (lower gauge) are better suited for high-current applications, while thinner wires (higher gauge) are more suitable for lower-current applications. Copper wire is the most common type used in solar panel systems.
- Wire Length and Routing: Wire length and routing can affect the overall efficiency of the system. Longer wires can result in voltage drop, reducing the system’s overall performance. It’s essential to keep wires as short as possible and route them in a way that minimizes voltage drop.
- Connectors and Terminals: Connectors and terminals must be suitable for the application and able to withstand the elements. Corrosion-resistant connectors and terminals are a must in RV solar panel systems.
- Fusing and Protection: Fuses and circuit breakers must be installed to protect the system from overcurrent conditions. These devices will help prevent damage to the components in the event of a fault.

System Design
When designing a solar panel system for an RV, it’s essential to consider the following factors:
- Power Requirements: Determine the power requirements of the RV, including the appliances and devices that will be using the solar panel system.
- Solar Panel Size and Wattage: Choose solar panels that meet the power requirements of the RV. The wattage rating of the solar panels will determine the size of the system.
- Charge Controller and Inverter/Charger: Select a charge controller and inverter/charger that are compatible with the solar panels and batteries.
- Battery Bank: Determine the size and type of battery bank required to meet the power requirements of the RV.

Wiring Diagrams
To help illustrate the wiring process, let’s take a look at a simple wiring diagram for an RV solar panel system:
Diagram 1: Simple RV Solar Panel System Wiring Diagram
- Solar Panels -> Charge Controller -> Battery Bank -> Inverter/Charger -> AC Appliances
In this diagram, the solar panels are connected to the charge controller, which regulates the flow of energy to the battery bank. The battery bank is then connected to the inverter/charger, which converts the DC power to AC power for the RV’s appliances.
Advanced Wiring Considerations
For more complex RV solar panel systems, there are additional wiring considerations:
- Parallel and Series Wiring: Solar panels can be wired in parallel or series to increase the overall power output of the system.
- Battery Monitoring: Installing a battery monitoring system can help track the state of charge of the batteries and prevent overcharging or undercharging.
- Generator and Shore Power Integration: Integrating a generator or shore power into the system can provide a backup power source and allow for charging the batteries from an external power source.
Installation Best Practices
When installing a solar panel system on an RV, it’s essential to follow best practices to ensure safe and efficient operation:
- Mounting Solar Panels: Mount solar panels securely to the roof of the RV, taking care to seal any gaps or holes to prevent water intrusion.
- Wiring and Connections: Keep wiring and connections clean, dry, and secure to prevent damage and corrosion.
- Grounding: Ensure that the system is properly grounded to prevent electrical shock.
- Testing and Maintenance: Regularly test and maintain the system to ensure proper operation and extend the lifespan of the components.
Conclusion
Solar panel battery wiring for RVs can seem complex, but with a thorough understanding of the components and wiring considerations, it’s possible to create a safe and efficient system. By following the guidelines and best practices outlined in this article, RV owners can harness the power of the sun and enjoy the freedom and flexibility that comes with it. Whether you’re a seasoned RV owner or just starting out, a well-designed solar panel system can provide a reliable and renewable source of energy for your adventures on the road.
Recommendations
For those looking to install a solar panel system on their RV, we recommend:
- Consulting with a Professional: If you’re not experienced with electrical systems, consider consulting with a professional to ensure a safe and efficient installation.
- Using High-Quality Components: Invest in high-quality components, including solar panels, charge controllers, and inverters, to ensure reliable operation and extend the lifespan of the system.
- Regular Maintenance: Regularly inspect and maintain the system to prevent damage and ensure proper operation.
By following these recommendations and guidelines, RV owners can create a solar panel system that meets their power needs and provides a reliable source of energy for their adventures on the road.


