“Wiring diagram for solar inverter connection”
Introduction to Solar Inverters
A solar inverter is an electronic device that converts the DC power generated by solar panels into AC power, which is then fed into the electrical grid or used to power electrical appliances. The inverter plays a critical role in maximizing the energy output of a solar power system, as it optimizes the performance of the solar panels and ensures that the energy generated is used efficiently.
Types of Solar Inverters
There are several types of solar inverters available, including:
- String Inverters: These inverters are connected to a string of solar panels and convert the DC power generated by the panels into AC power.
- Microinverters: These inverters are connected to individual solar panels and convert the DC power generated by each panel into AC power.
- Power Optimizers: These inverters are connected to individual solar panels and optimize the energy output of each panel, before converting the DC power into AC power.
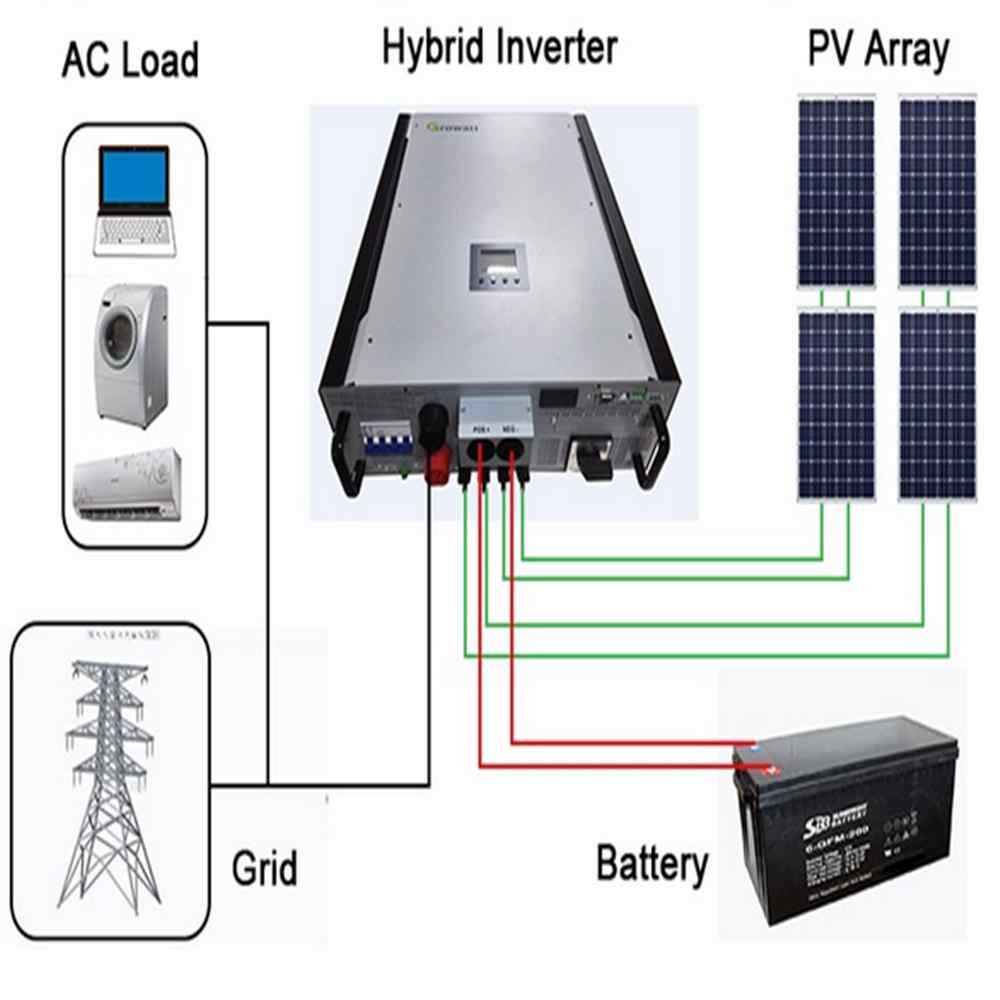
Wiring Diagram for Solar Inverter Connection
The wiring diagram for solar inverter connection involves several components, including:
- Solar Panels: These are the photovoltaic (PV) panels that generate DC power from sunlight.
- Inverter: This is the electronic device that converts the DC power generated by the solar panels into AC power.
- AC Panel: This is the electrical panel that distributes the AC power generated by the inverter to the electrical grid or to electrical appliances.
- Grounding System: This is the system that provides a safe path to ground for electrical currents and helps to prevent electrical shock.
- Circuit Breakers: These are the devices that protect the electrical circuit from overloads and short circuits.
Step-by-Step Wiring Diagram
Here is a step-by-step wiring diagram for solar inverter connection:
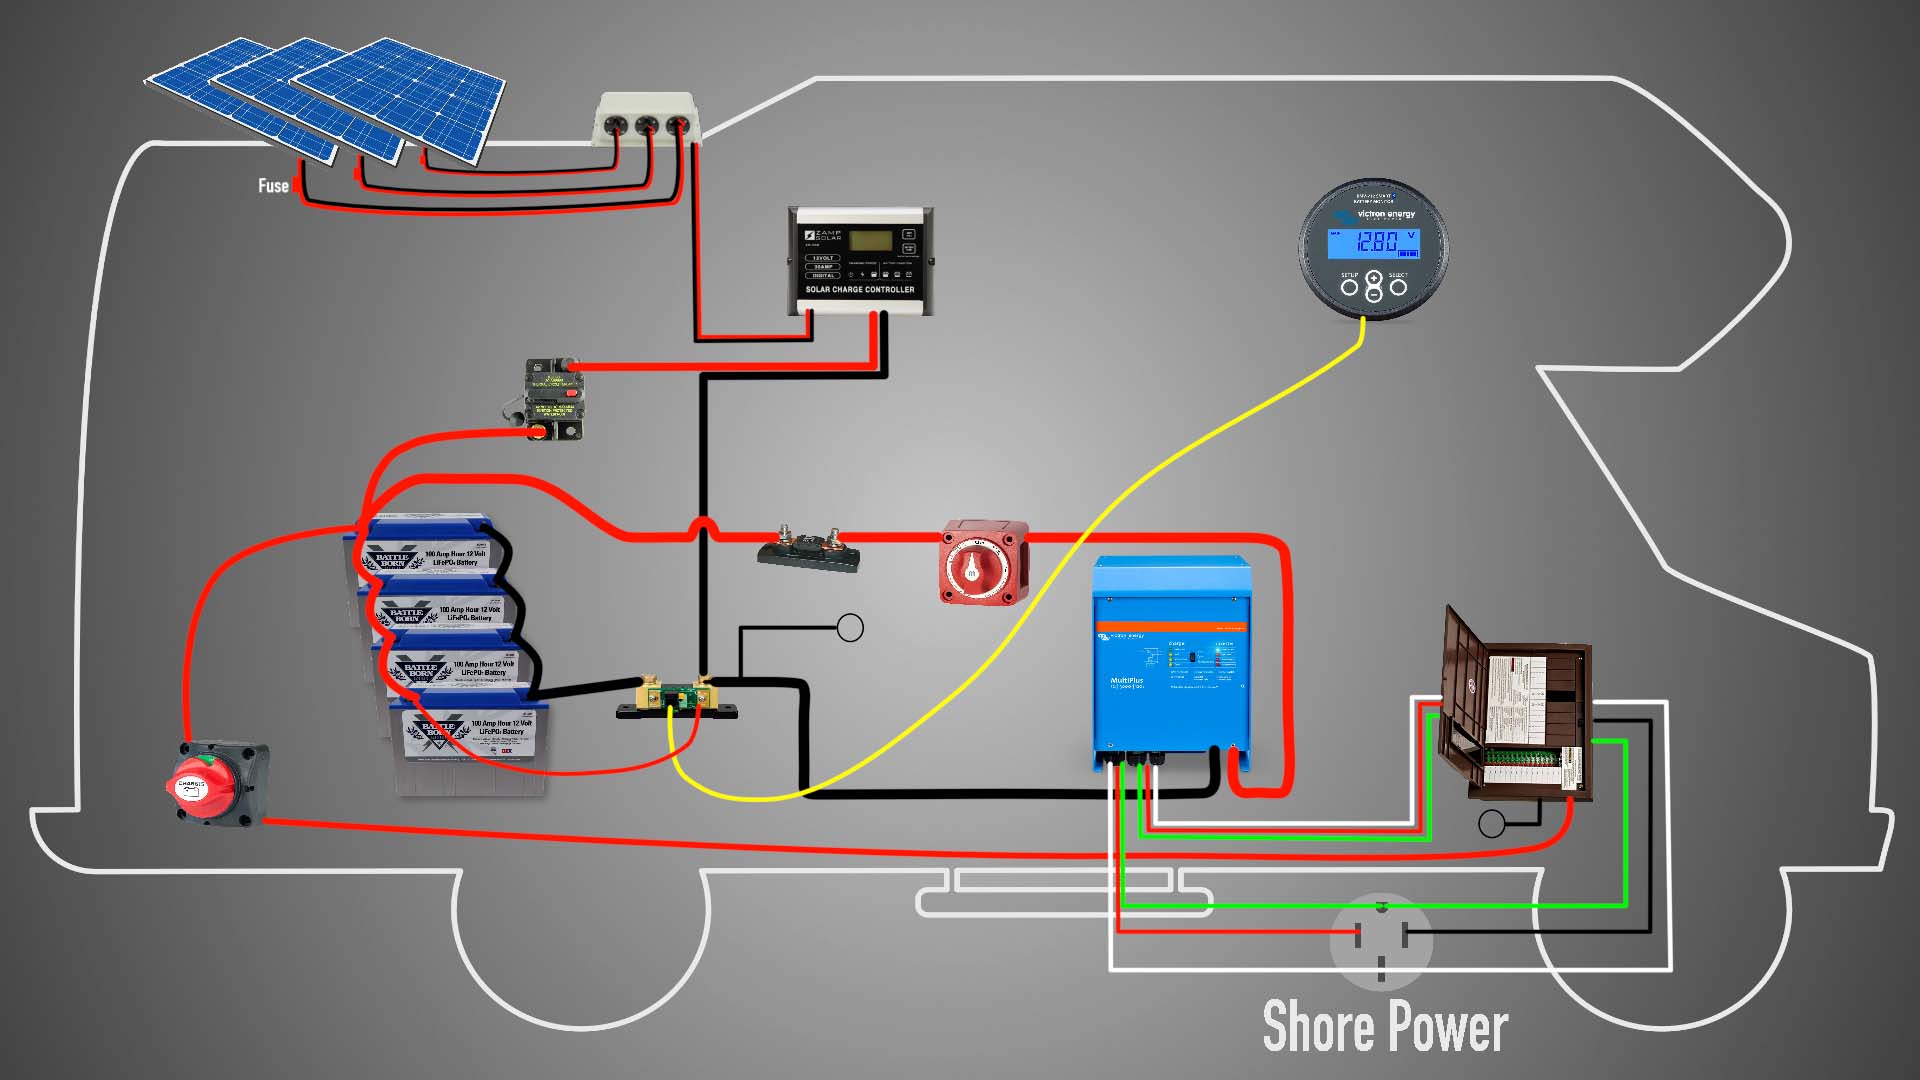
- Connect the Solar Panels: Connect the positive and negative terminals of the solar panels to the DC input terminals of the inverter. Ensure that the polarity of the connections is correct, as incorrect polarity can damage the inverter.
- Connect the Inverter to the AC Panel: Connect the AC output terminals of the inverter to the AC panel. Ensure that the voltage and frequency of the inverter output match the requirements of the AC panel.
- Connect the Grounding System: Connect the grounding system to the inverter and the AC panel, ensuring that the system provides a safe path to ground for electrical currents.
- Connect the Circuit Breakers: Connect the circuit breakers to the AC panel, ensuring that they provide protection against overloads and short circuits.
- Test the System: Test the system to ensure that it is functioning correctly and that the energy output is optimized.
Safety Precautions
When installing a solar inverter connection, it is essential to follow safety precautions to prevent electrical shock and ensure a safe working environment. Some of the safety precautions include:
- Wear Personal Protective Equipment (PPE): Wear PPE, such as gloves and safety glasses, to protect yourself from electrical shock and other hazards.
- Disconnect the Power Source: Disconnect the power source before starting work on the system, to prevent electrical shock.
- Use Insulated Tools: Use insulated tools to prevent electrical shock and ensure a safe working environment.
- Follow Manufacturer Instructions: Follow the manufacturer instructions for the inverter and other components, to ensure that the system is installed and operated correctly.
Troubleshooting
If you encounter problems with your solar inverter connection, here are some troubleshooting steps to follow:
- Check the Connections: Check the connections to ensure that they are secure and not loose.
- Check the Inverter: Check the inverter to ensure that it is functioning correctly and that the energy output is optimized.
- Check the AC Panel: Check the AC panel to ensure that it is functioning correctly and that the voltage and frequency of the inverter output match the requirements of the panel.
- Check the Grounding System: Check the grounding system to ensure that it provides a safe path to ground for electrical currents.
Conclusion
In conclusion, a wiring diagram for solar inverter connection is a critical component of a solar power system, as it ensures that the energy generated by the solar panels is converted into AC power and used efficiently. By following the step-by-step wiring diagram and safety precautions outlined in this article, you can ensure a safe and efficient installation of your solar inverter connection. Additionally, by troubleshooting any problems that may arise, you can ensure that your solar power system operates at optimal levels and provides a reliable source of renewable energy.
Recommended Tools and Materials
Here are some recommended tools and materials for installing a solar inverter connection:
- Wire Stripper: A wire stripper is used to strip the insulation from the wires.
- Pliers: Pliers are used to grip and bend the wires.
- Screwdrivers: Screwdrivers are used to tighten and loosen screws and bolts.
- Multimeter: A multimeter is used to measure the voltage and current of the system.
- Inverter: The inverter is the electronic device that converts the DC power generated by the solar panels into AC power.
- AC Panel: The AC panel is the electrical panel that distributes the AC power generated by the inverter to the electrical grid or to electrical appliances.
- Grounding System: The grounding system provides a safe path to ground for electrical currents.
- Circuit Breakers: Circuit breakers protect the electrical circuit from overloads and short circuits.
Appendix
Here is a list of abbreviations and acronyms used in this article:
- AC: Alternating Current
- DC: Direct Current
- PV: Photovoltaic
- PPE: Personal Protective Equipment
- PVC: Polyvinyl Chloride
By following the guidelines outlined in this article, you can ensure a safe and efficient installation of your solar inverter connection, and enjoy the benefits of renewable energy for years to come.


