To ensure that these installations operate at maximum efficiency, it is crucial to understand the importance of MPPT (Maximum Power Point Tracking) controller wiring. In this article, we will delve into the world of MPPT controllers, exploring their role in solar panel installations, and providing a step-by-step guide on how to wire them correctly.

What is an MPPT Controller?
An MPPT controller is an electronic device that plays a vital role in solar panel installations. Its primary function is to track the maximum power point of a solar panel array, ensuring that the energy generated is optimized and used efficiently. The MPPT controller acts as an intermediary between the solar panel array and the battery bank, regulating the flow of energy and preventing overcharging or undercharging.
MPPT controllers are designed to operate within a specific voltage range, typically between 12V and 48V. They are available in various sizes, ranging from small, 10A units to large, 60A units, making them suitable for a wide range of solar panel installations, from small residential systems to large commercial projects.
Benefits of MPPT Controllers
The use of MPPT controllers in solar panel installations offers several benefits, including:
- Increased Energy Efficiency: MPPT controllers optimize energy production by tracking the maximum power point of the solar panel array, resulting in up to 30% more energy generated compared to traditional PWM (Pulse Width Modulation) controllers.
- Improved Battery Life: By regulating the flow of energy and preventing overcharging or undercharging, MPPT controllers help extend the lifespan of the battery bank.
- Flexibility: MPPT controllers can be used with a variety of solar panel configurations, including series and parallel connections.
- Monitoring and Control: Many modern MPPT controllers come with built-in monitoring and control features, allowing users to track energy production and adjust settings remotely.

MPPT Controller Wiring: A Step-by-Step Guide
Wiring an MPPT controller requires careful planning and attention to detail. The following steps will guide you through the process:
- Prepare the Solar Panel Array: Before connecting the MPPT controller, ensure that the solar panel array is properly configured and secured. Check the voltage and current ratings of the solar panels and ensure that they match the specifications of the MPPT controller.
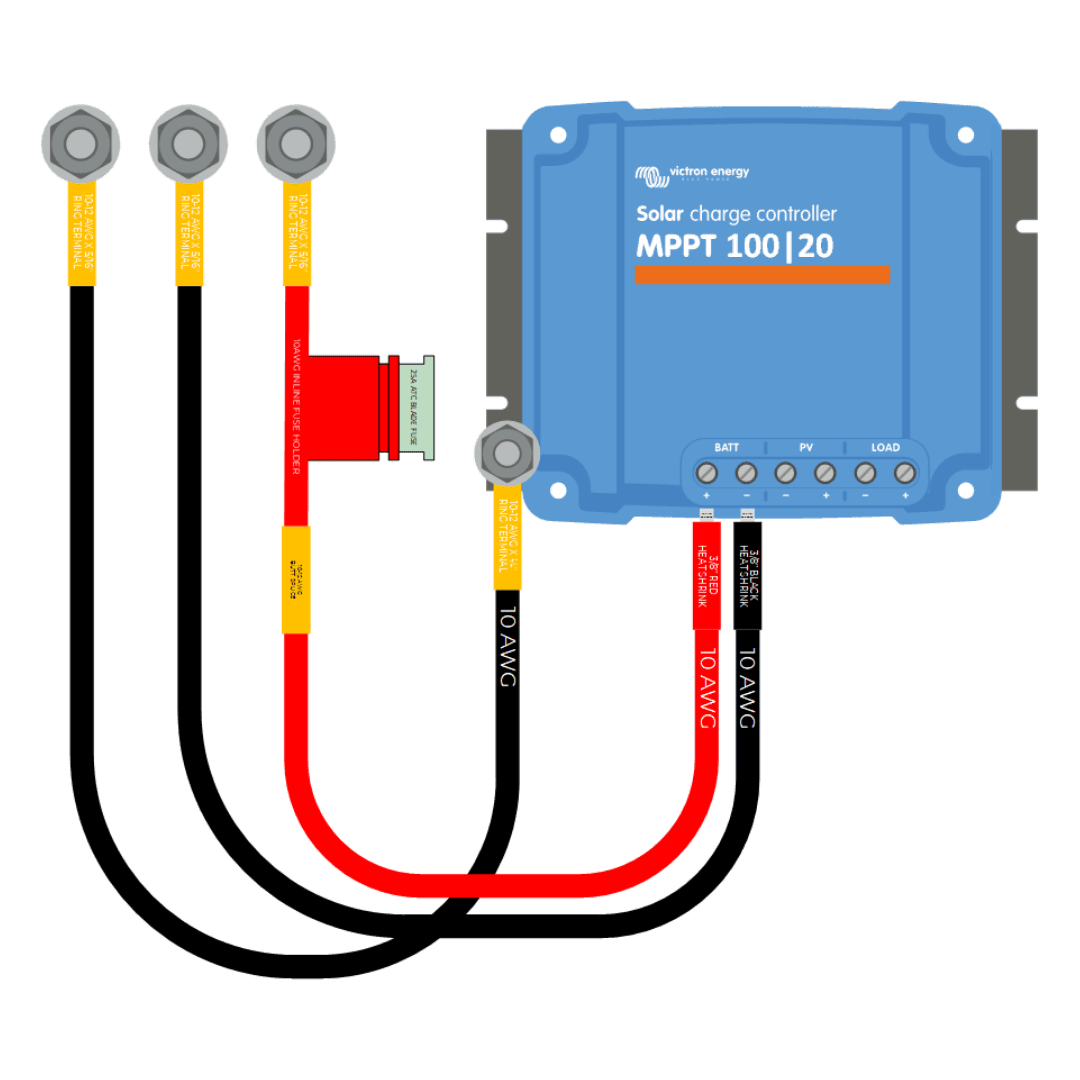
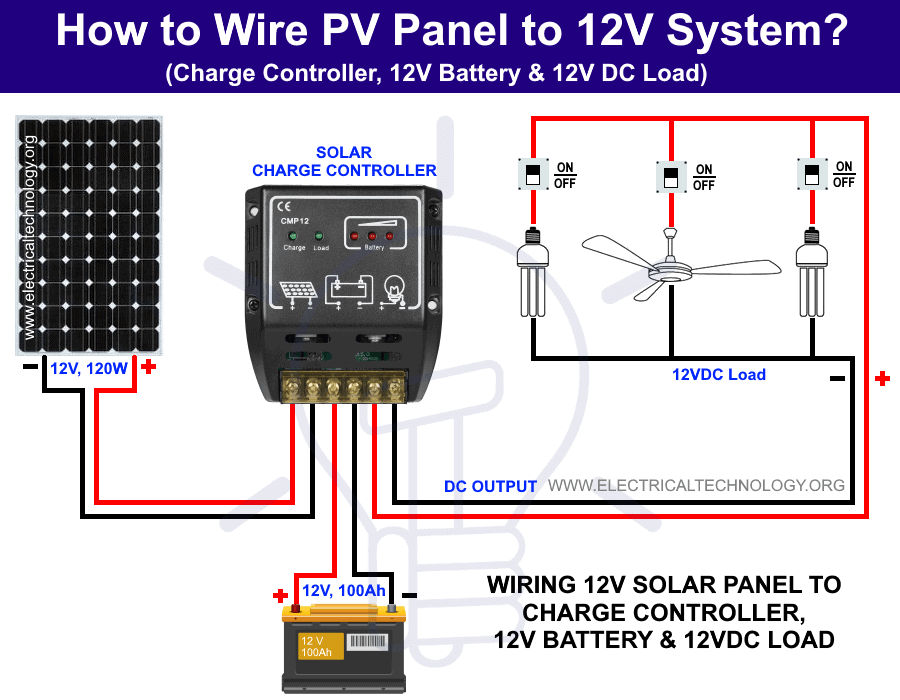
- Connect the Solar Panel Array to the MPPT Controller: Use a suitable gauge wire ( typically 10AWG or 12AWG) to connect the positive and negative terminals of the solar panel array to the corresponding terminals on the MPPT controller. Ensure that the connections are secure and free from corrosion.
- Connect the Battery Bank to the MPPT Controller: Connect the positive and negative terminals of the battery bank to the corresponding terminals on the MPPT controller. Use a suitable gauge wire (typically 10AWG or 12AWG) and ensure that the connections are secure and free from corrosion.
- Configure the MPPT Controller Settings: Consult the manufacturer's instructions to configure the MPPT controller settings, including the voltage, current, and temperature compensation settings.
- Connect the Load to the MPPT Controller: Connect the load (e.g., inverter, lighting, or appliances) to the output terminals of the MPPT controller. Ensure that the load is compatible with the MPPT controller's output voltage and current ratings.
- Grounding and Bonding: Ensure that the MPPT controller, solar panel array, and battery bank are properly grounded and bonded to prevent electrical shock and ensure safe operation.

Best Practices for MPPT Controller Wiring
To ensure safe and efficient operation of the MPPT controller, follow these best practices:
- Use suitable gauge wire: Use wire that is suitable for the voltage and current ratings of the solar panel array and battery bank.
- Keep connections secure and free from corrosion: Use connectors and terminals that are designed for outdoor use and can withstand the elements.
- Label and document connections: Label and document all connections to ensure that they can be easily identified and traced.
- Follow manufacturer's instructions: Consult the manufacturer's instructions for specific guidance on wiring and configuration.
- Test and verify: Test and verify the MPPT controller wiring and configuration to ensure that it is operating correctly and efficiently.
Common Mistakes to Avoid
When wiring an MPPT controller, avoid the following common mistakes:
- Incorrect wire gauge: Using wire that is too small or too large for the application can lead to inefficiencies and safety hazards.
- Poor connections: Loose or corroded connections can lead to energy loss and safety hazards.
- Inadequate grounding and bonding: Failure to properly ground and bond the MPPT controller, solar panel array, and battery bank can lead to electrical shock and safety hazards.
- Incorrect configuration: Failure to configure the MPPT controller settings correctly can lead to inefficient energy production and premature wear on the system components.
Conclusion
In conclusion, MPPT controllers play a vital role in maximizing the efficiency of solar panel installations. By following the step-by-step guide and best practices outlined in this article, you can ensure that your MPPT controller is wired correctly and operating efficiently. Remember to consult the manufacturer's instructions and follow local electrical codes and regulations to ensure safe and efficient operation. With proper installation and maintenance, an MPPT controller can help you get the most out of your solar panel installation and reduce your reliance on traditional energy sources.
Additional Resources
For further information on MPPT controllers and solar panel installations, consult the following resources:
- Manufacturer's instructions: Consult the manufacturer's instructions for specific guidance on wiring and configuration.
- Local electrical codes and regulations: Familiarize yourself with local electrical codes and regulations to ensure compliance.
- Online forums and communities: Join online forums and communities to connect with other solar panel enthusiasts and professionals.
- Training and certification programs: Consider enrolling in training and certification programs to enhance your knowledge and skills.
By following the guidelines and best practices outlined in this article, you can ensure that your MPPT controller is wired correctly and operating efficiently, maximizing the potential of your solar panel installation.