One of the key components of a solar power system is the Maximum Power Point Tracking (MPPT) solar controller. An MPPT solar controller is designed to optimize the energy output of a solar panel array by tracking the maximum power point of the panels and adjusting the charge voltage and current accordingly. In this article, we will provide a detailed guide on MPPT solar controller installation wiring diagram to help you understand the process and ensure a safe and efficient installation.

What is an MPPT Solar Controller?
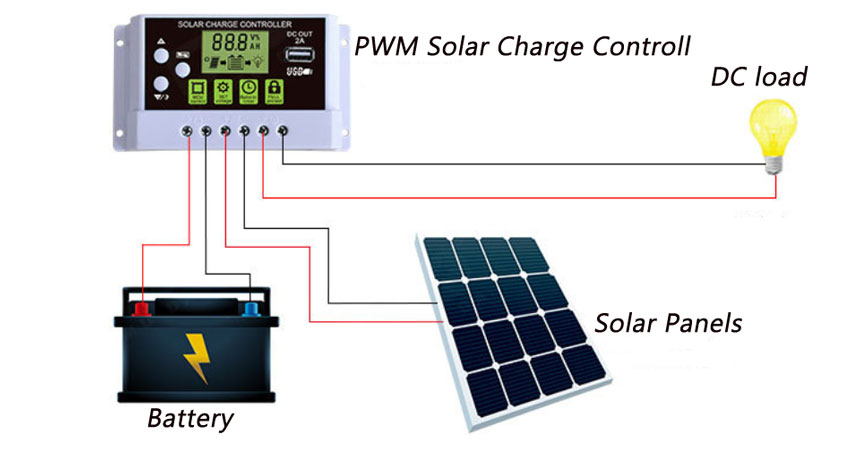
An MPPT solar controller is a device that regulates the flow of energy from a solar panel array to a battery or load. Its primary function is to maximize the energy output of the solar panels by tracking the maximum power point (MPP) of the panels and adjusting the charge voltage and current to match the battery or load requirements. MPPT solar controllers are more efficient than traditional pulse width modulation (PWM) controllers, as they can extract up to 30% more energy from the solar panels.
Components of an MPPT Solar Controller Installation
Before we dive into the wiring diagram, let's take a look at the components involved in an MPPT solar controller installation:
- Solar Panels: The solar panels are the primary source of energy for the system. They convert sunlight into DC power.
- MPPT Solar Controller: The MPPT solar controller is the brain of the system, responsible for tracking the maximum power point of the solar panels and regulating the energy flow to the battery or load.
- Battery Bank: The battery bank stores excess energy generated by the solar panels for later use.
- Load: The load is the device or system that uses the energy stored in the battery bank, such as a home or business.
- Grounding System: The grounding system provides a safe path for electrical currents to ground, protecting the system and users from electrical shock.

MPPT Solar Controller Installation Wiring Diagram
The wiring diagram for an MPPT solar controller installation is relatively straightforward. Here's a step-by-step guide to help you understand the process:
Step 1: Connect the Solar Panels to the MPPT Solar Controller

- Connect the positive (+) terminal of the solar panel array to the PV+ terminal on the MPPT solar controller.
- Connect the negative (-) terminal of the solar panel array to the PV- terminal on the MPPT solar controller.
- Ensure that the solar panels are properly connected in series and/or parallel to achieve the desired voltage and current output.
Step 2: Connect the MPPT Solar Controller to the Battery Bank
- Connect the positive (+) terminal of the MPPT solar controller to the positive (+) terminal of the battery bank.
- Connect the negative (-) terminal of the MPPT solar controller to the negative (-) terminal of the battery bank.
- Ensure that the battery bank is properly configured and matched to the MPPT solar controller's specifications.
Step 3: Connect the Load to the Battery Bank
- Connect the positive (+) terminal of the load to the positive (+) terminal of the battery bank.
- Connect the negative (-) terminal of the load to the negative (-) terminal of the battery bank.
- Ensure that the load is properly matched to the battery bank's voltage and current output.
Step 4: Grounding the System
- Connect the grounding terminal of the MPPT solar controller to a grounding point, such as a grounding rod or a grounding busbar.
- Connect the grounding terminal of the battery bank to the same grounding point.
- Ensure that all metal components, including the solar panels, MPPT solar controller, and battery bank, are properly grounded to prevent electrical shock.
Wiring Diagram
Here is a simplified wiring diagram for an MPPT solar controller installation:
Solar Panels (PV+) -> MPPT Solar Controller (PV+)
Solar Panels (PV-) -> MPPT Solar Controller (PV-)
MPPT Solar Controller (BAT+) -> Battery Bank (BAT+)
MPPT Solar Controller (BAT-) -> Battery Bank (BAT-)
Battery Bank (BAT+) -> Load (BAT+)
Battery Bank (BAT-) -> Load (BAT-)
MPPT Solar Controller (GND) -> Grounding Point
Battery Bank (GND) -> Grounding Point
Safety Precautions
When working with electrical systems, it's essential to take safety precautions to avoid electrical shock or injury. Here are some safety tips to keep in mind:
- Always turn off the power to the system before making any connections or repairs.
- Use proper personal protective equipment, such as gloves and safety glasses, when working with electrical systems.
- Ensure that all connections are secure and meet the manufacturer's specifications.
- Never touch electrical components or wiring with your bare hands.
- Always follow the manufacturer's instructions and guidelines for installation and maintenance.
Conclusion
In conclusion, installing an MPPT solar controller requires careful planning and attention to detail to ensure a safe and efficient installation. By following the steps outlined in this article and consulting the manufacturer's instructions, you can create a reliable and efficient solar power system that meets your energy needs. Remember to always follow safety precautions when working with electrical systems, and consider seeking professional help if you're unsure about any aspect of the installation process.
Additional Tips and Considerations
- Always choose an MPPT solar controller that is compatible with your solar panel array and battery bank.
- Consider the maximum power point tracking (MPPT) efficiency of the controller when selecting a model.
- Ensure that the controller has the necessary features, such as overcharge protection, short-circuit protection, and reverse polarity protection.
- Regularly inspect and maintain the system to ensure optimal performance and longevity.
- Consider installing a monitoring system to track the performance of your solar power system.
By following these tips and guidelines, you can create a reliable and efficient solar power system that meets your energy needs and helps reduce your carbon footprint. Remember to always follow safety precautions and consult the manufacturer's instructions for specific guidance on installation and maintenance.


