One crucial component in a solar power system is the Maximum Power Point Tracking (MPPT) controller, which ensures that the solar panels produce the maximum amount of power possible. In this article, we will delve into the world of MPPT controllers and provide a step-by-step guide on how to wire one to your solar panels and battery.

What is an MPPT Controller?
An MPPT controller is a device that tracks the maximum power point of a solar panel array and converts it to a voltage that is suitable for charging a battery. The maximum power point is the point at which the solar panel produces the most power, usually around 70-80% of the panel's voltage rating. The MPPT controller uses complex algorithms to constantly monitor the solar panel's output and adjust the charging voltage to ensure that the battery is charged at the optimal rate.
Benefits of Using an MPPT Controller
Using an MPPT controller in your solar power system has several benefits, including:
- Increased Efficiency: MPPT controllers can increase the efficiency of your solar panel array by up to 30%, allowing you to generate more power from the same panel.
- Improved Charging: MPPT controllers ensure that your battery is charged at the optimal rate, prolonging its lifespan and improving overall system performance.
- Flexibility: MPPT controllers can be used with a wide range of solar panels and batteries, making them a versatile choice for any solar power system.
Components Needed

Before we begin wiring the MPPT controller, make sure you have the following components:
- MPPT Controller: Choose an MPPT controller that matches your solar panel array's voltage and current ratings.
- Solar Panels: Ensure that your solar panels are compatible with the MPPT controller and are installed correctly.
- Battery: Select a battery that is compatible with the MPPT controller and has the correct voltage and capacity for your system.
- Wiring and Connectors: Use high-quality wiring and connectors to ensure safe and reliable connections.
- Fuse and Breaker: Install a fuse and breaker to protect your system from overcurrent and short circuits.
Wiring the MPPT Controller to Solar Panels
To wire the MPPT controller to your solar panels, follow these steps:
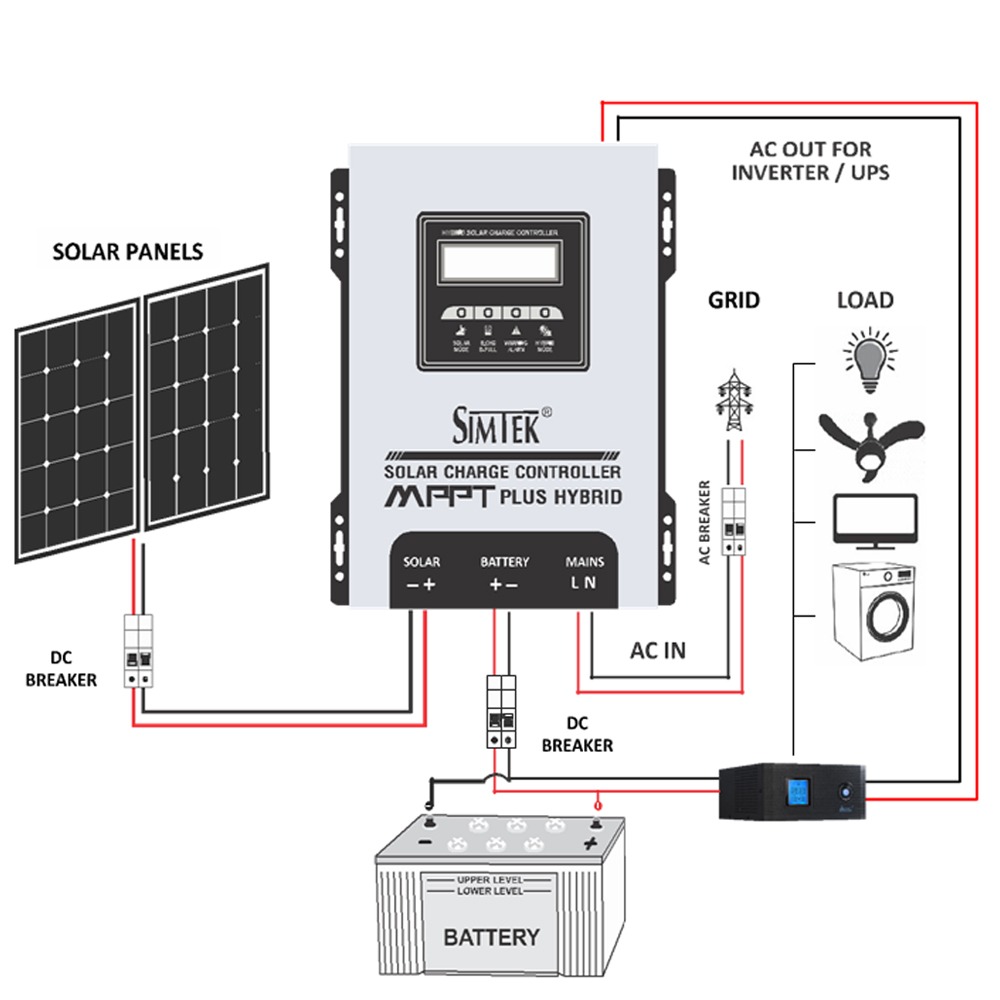
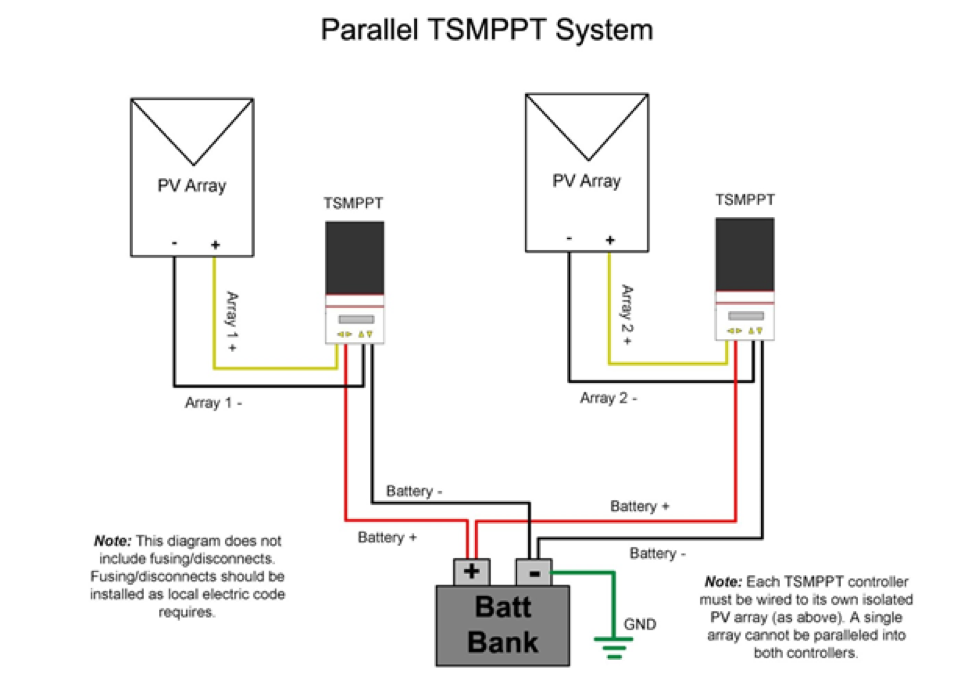
- Connect the Solar Panel Array: Connect the positive and negative terminals of your solar panel array to the MPPT controller's input terminals. Make sure the polarity is correct, as incorrect polarity can damage the MPPT controller.
- Set the Input Voltage: Set the input voltage of the MPPT controller to match the voltage of your solar panel array. This is usually done using a dip switch or a configuration menu.
- Connect the Ground Wire: Connect the ground wire from the solar panel array to the MPPT controller's ground terminal. This ensures that the system is properly grounded and safe.
Wiring the MPPT Controller to the Battery
To wire the MPPT controller to your battery, follow these steps:
- Connect the Battery: Connect the positive and negative terminals of your battery to the MPPT controller's output terminals. Make sure the polarity is correct, as incorrect polarity can damage the battery.
- Set the Output Voltage: Set the output voltage of the MPPT controller to match the voltage of your battery. This is usually done using a dip switch or a configuration menu.
- Connect the Sense Wires: Connect the sense wires from the MPPT controller to the battery terminals. These wires allow the MPPT controller to monitor the battery's voltage and adjust the charging current accordingly.
Configuring the MPPT Controller
Once the MPPT controller is wired to the solar panels and battery, configure the device according to the manufacturer's instructions. This may involve:
- Setting the Charge Parameters: Set the charge parameters, such as the bulk charge voltage, absorption charge voltage, and float charge voltage.
- Configuring the Load Control: Configure the load control settings, such as the load voltage and current limits.
- Monitoring the System: Monitor the system's performance using the MPPT controller's display or remote monitoring software.
Safety Precautions
When working with electrical systems, it's essential to take safety precautions to avoid injury or damage. Always:
- Turn Off the Power: Turn off the power to the system before making any connections or adjustments.
- Use Protective Gear: Wear protective gear, such as gloves and safety glasses, when working with electrical systems.
- Follow Manufacturer's Instructions: Follow the manufacturer's instructions for the MPPT controller, solar panels, and battery.
Troubleshooting
If you encounter any issues with your MPPT controller or solar power system, refer to the troubleshooting guide below:
- Check the Connections: Check the connections between the MPPT controller, solar panels, and battery to ensure they are secure and correct.
- Check the Voltage and Current: Check the voltage and current output of the solar panels and battery to ensure they are within the specified range.
- Consult the Manual: Consult the user manual or manufacturer's website for troubleshooting guides and technical support.
Conclusion
Wiring an MPPT controller to your solar panels and battery requires careful planning and attention to detail. By following the steps outlined in this article and taking safety precautions, you can ensure a reliable and efficient solar power system. Remember to consult the manufacturer's instructions and troubleshooting guides if you encounter any issues. With the right MPPT controller and proper installation, you can harness the power of the sun and enjoy a sustainable and renewable energy source.


