One of the most efficient ways to harness solar energy is by using a Maximum Power Point Tracking (MPPT) controller, which optimizes energy production from your solar panels. In this article, we will provide a step-by-step guide on how to connect solar panels to an MPPT controller for home use, ensuring a safe and efficient solar power system.

Introduction to MPPT Controllers
Before we dive into the connection process, it's essential to understand what an MPPT controller is and how it works. An MPPT controller is an electronic device that tracks the maximum power point of a solar panel array and adjusts the output voltage to match the battery bank or load, maximizing energy production. MPPT controllers are more efficient than traditional Pulse Width Modulation (PWM) controllers, as they can extract up to 30% more energy from the solar panels.
Components Required
To connect solar panels to an MPPT controller, you will need the following components:
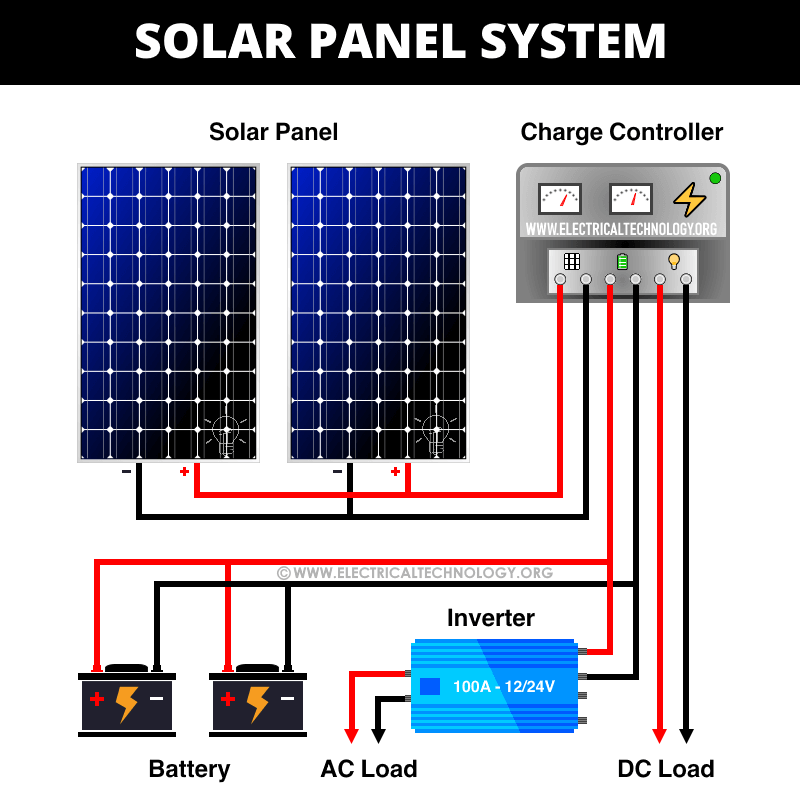
- Solar Panels: These are the photovoltaic (PV) panels that convert sunlight into electrical energy. Ensure that the solar panels are compatible with the MPPT controller and have the correct voltage and current ratings.
- MPPT Controller: This is the brain of the solar power system, responsible for tracking the maximum power point of the solar panels and adjusting the output voltage.
- Battery Bank: This is the energy storage system that stores excess energy generated by the solar panels during the day for use at night or during power outages.
- Load: This refers to the appliances or devices that will be powered by the solar power system, such as lights, refrigerators, or computers.
- Wiring and Connectors: These are the cables and connectors used to connect the solar panels, MPPT controller, battery bank, and load.

Step-by-Step Connection Process
Now that we have the necessary components, let's proceed with the step-by-step connection process:
Step 1: Connect the Solar Panels

- Connect the positive (+) and negative (-) terminals of each solar panel to the corresponding terminals of the next panel in the series, using the recommended wiring and connectors. Ensure that the panels are connected in the correct configuration (series or parallel) to achieve the desired voltage and current.
- Use a multimeter to measure the voltage and current output of the solar panel array to ensure it matches the specifications of the MPPT controller.
Step 2: Connect the Solar Panel Array to the MPPT Controller

- Connect the positive (+) and negative (-) terminals of the solar panel array to the corresponding input terminals of the MPPT controller. Ensure that the polarity is correct to avoid damage to the controller or solar panels.
- Use the recommended wiring and connectors to secure the connections.
Step 3: Connect the Battery Bank to the MPPT Controller
- Connect the positive (+) and negative (-) terminals of the battery bank to the corresponding output terminals of the MPPT controller. Ensure that the battery bank is fully charged before connecting it to the controller.
- Set the battery type and configuration on the MPPT controller, if applicable.
Step 4: Connect the Load to the MPPT Controller
- Connect the positive (+) and negative (-) terminals of the load to the corresponding output terminals of the MPPT controller. Ensure that the load is compatible with the output voltage and current of the MPPT controller.
- Use the recommended wiring and connectors to secure the connections.
Step 5: Configure the MPPT Controller
- Consult the user manual of the MPPT controller to configure the settings, such as the battery type, charge voltage, and load control. Ensure that the settings match the specifications of your solar power system.
- Set the maximum power point tracking (MPPT) parameters, such as the tracking voltage and current, to optimize energy production.
Step 6: Test the System
- Turn on the solar power system and monitor the output voltage and current of the MPPT controller to ensure it is working correctly.
- Use a multimeter to measure the voltage and current output of the solar panel array, MPPT controller, and load to ensure they are within the recommended specifications.
- Test the system under different lighting conditions to ensure it is producing energy efficiently.
Safety Precautions
When working with electrical systems, it's essential to take necessary safety precautions to avoid injuries or damage to the equipment:
- Wear protective gear: Wear protective gear, such as gloves, safety glasses, and a hard hat, when working with electrical systems.
- Disconnect the system: Disconnect the system from the grid or load before performing any maintenance or repairs.
- Use proper wiring and connectors: Use proper wiring and connectors to avoid short circuits or electrical shocks.
- Follow manufacturer instructions: Follow the manufacturer instructions for the MPPT controller, solar panels, and battery bank to ensure safe and efficient operation.
Conclusion
Connecting solar panels to an MPPT controller is a relatively straightforward process, but it requires attention to detail and adherence to safety precautions. By following the steps outlined in this article, you can create a safe and efficient solar power system for your home, reducing your reliance on the grid and minimizing your carbon footprint. Remember to consult the user manual of the MPPT controller and seek professional help if you are unsure about any aspect of the connection process.
Additional Tips and Recommendations
- Monitor the system: Regularly monitor the performance of the solar power system to ensure it is producing energy efficiently and identify any issues or faults.
- Maintain the system: Perform regular maintenance tasks, such as cleaning the solar panels and checking the battery bank, to ensure the system operates at optimal levels.
- Upgrade the system: Consider upgrading the system to include additional features, such as energy storage or grid tie functionality, to enhance its performance and versatility.
- Seek professional help: If you are unsure about any aspect of the connection process or require assistance with maintenance or repairs, seek professional help from a qualified solar installer or electrician.
By following these guidelines and taking the necessary precautions, you can create a reliable and efficient solar power system that meets your energy needs and contributes to a sustainable future.