However, installing and wiring an off-grid solar power system can be a complex and daunting task, especially for those without prior experience. In this article, we will provide a step-by-step guide on how to install and wire an off-grid solar power system, helping you to navigate the process with confidence.
Understanding the Basics of Off-Grid Solar Power Systems
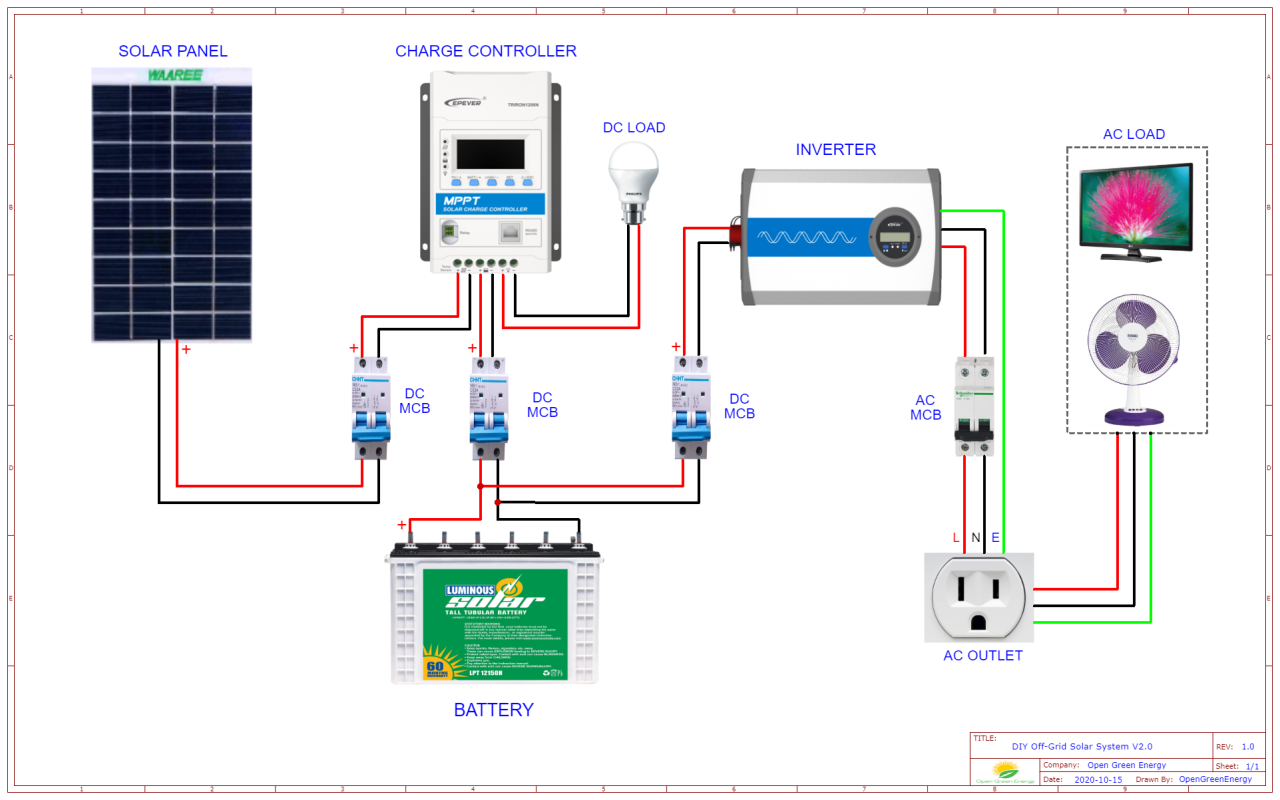
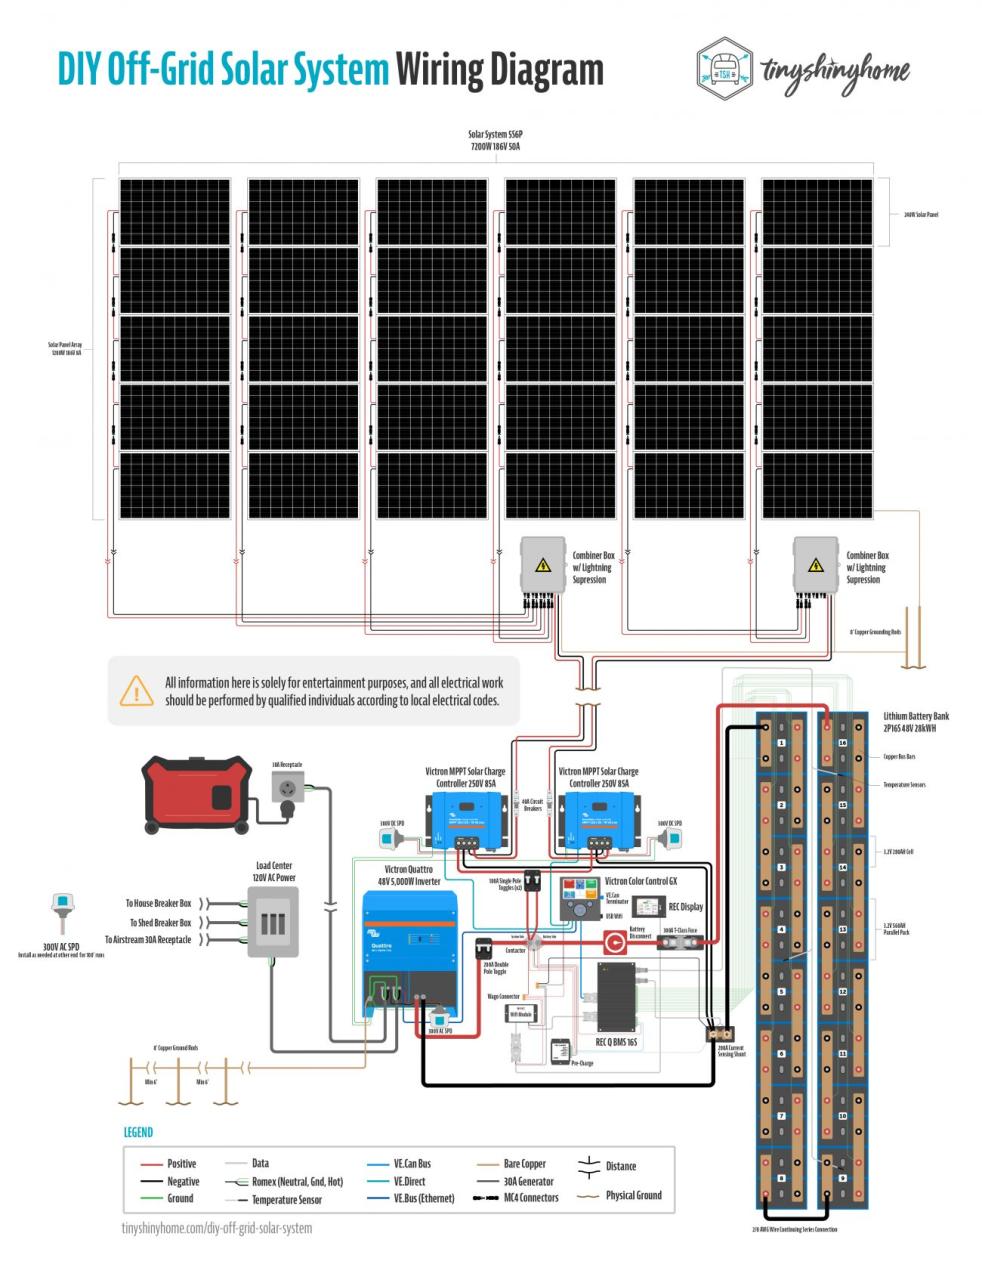
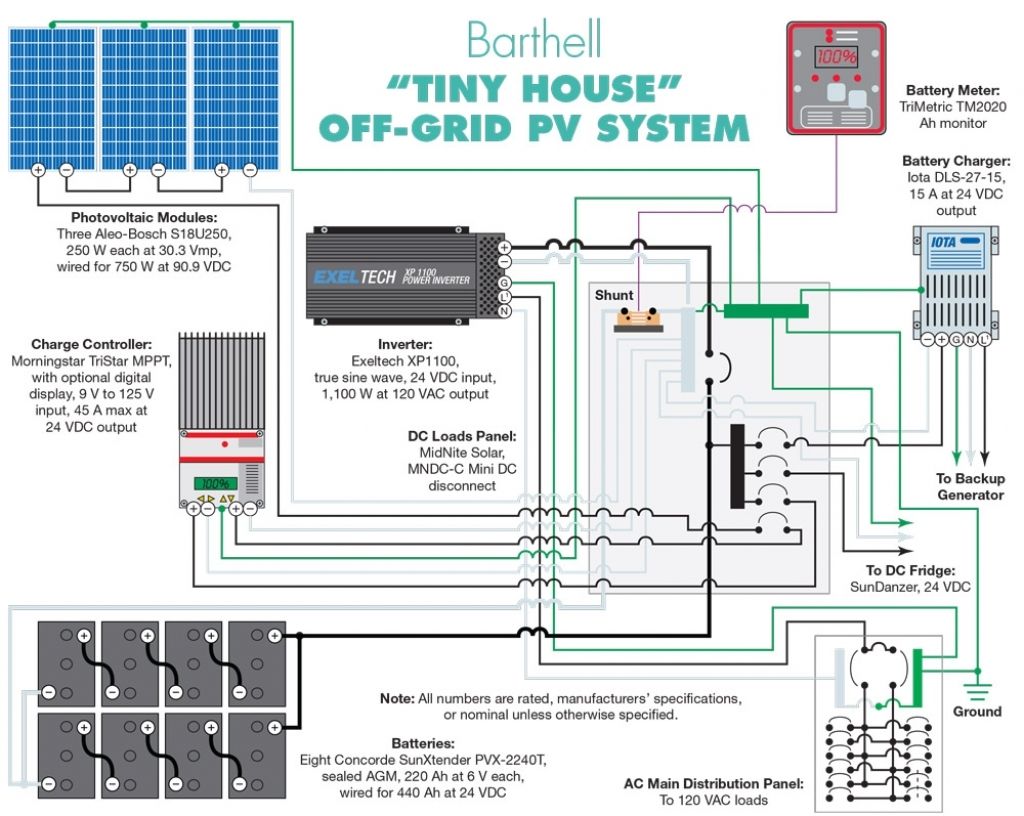
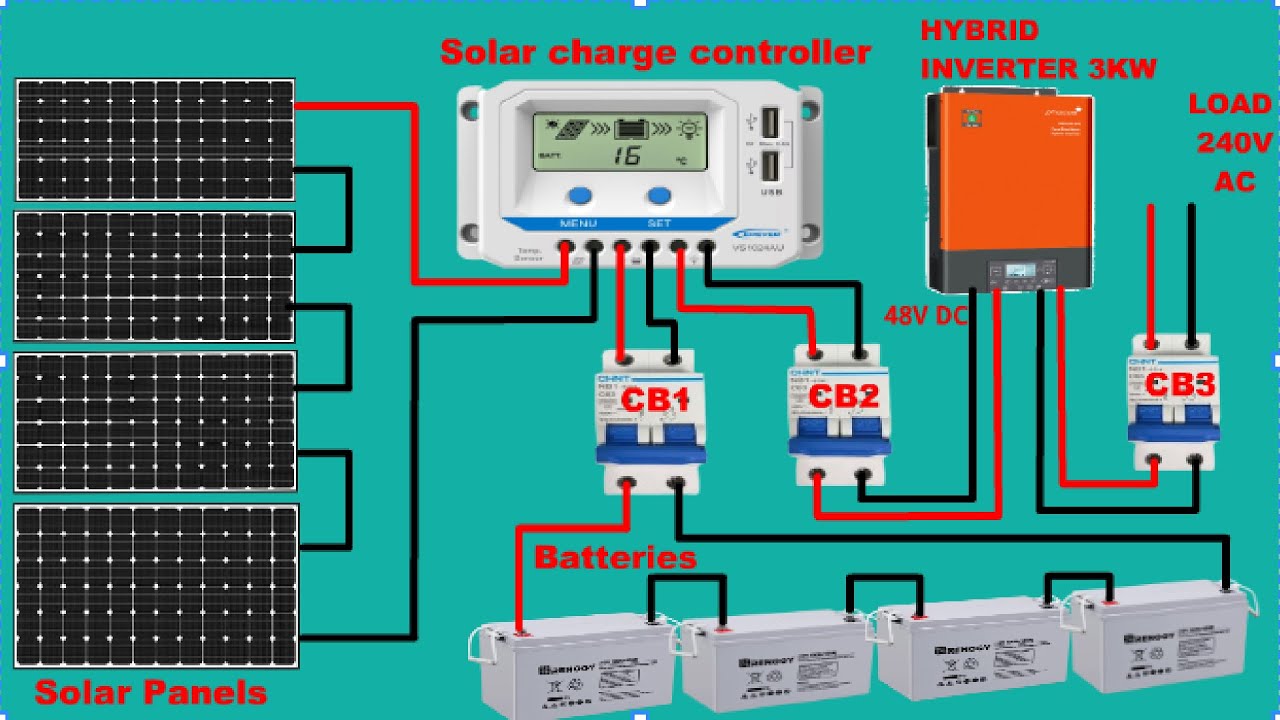
Before we dive into the installation and wiring process, it's essential to understand the basics of off-grid solar power systems. An off-grid solar power system is a self-contained system that generates electricity from sunlight and stores it in a battery bank for later use. The system consists of several components, including:
- Solar Panels: These are the photovoltaic (PV) panels that convert sunlight into electrical energy.
- Charge Controller: This device regulates the flow of energy from the solar panels to the battery bank, preventing overcharging and damage to the batteries.
- Battery Bank: This is the storage system that holds the generated electricity for later use.
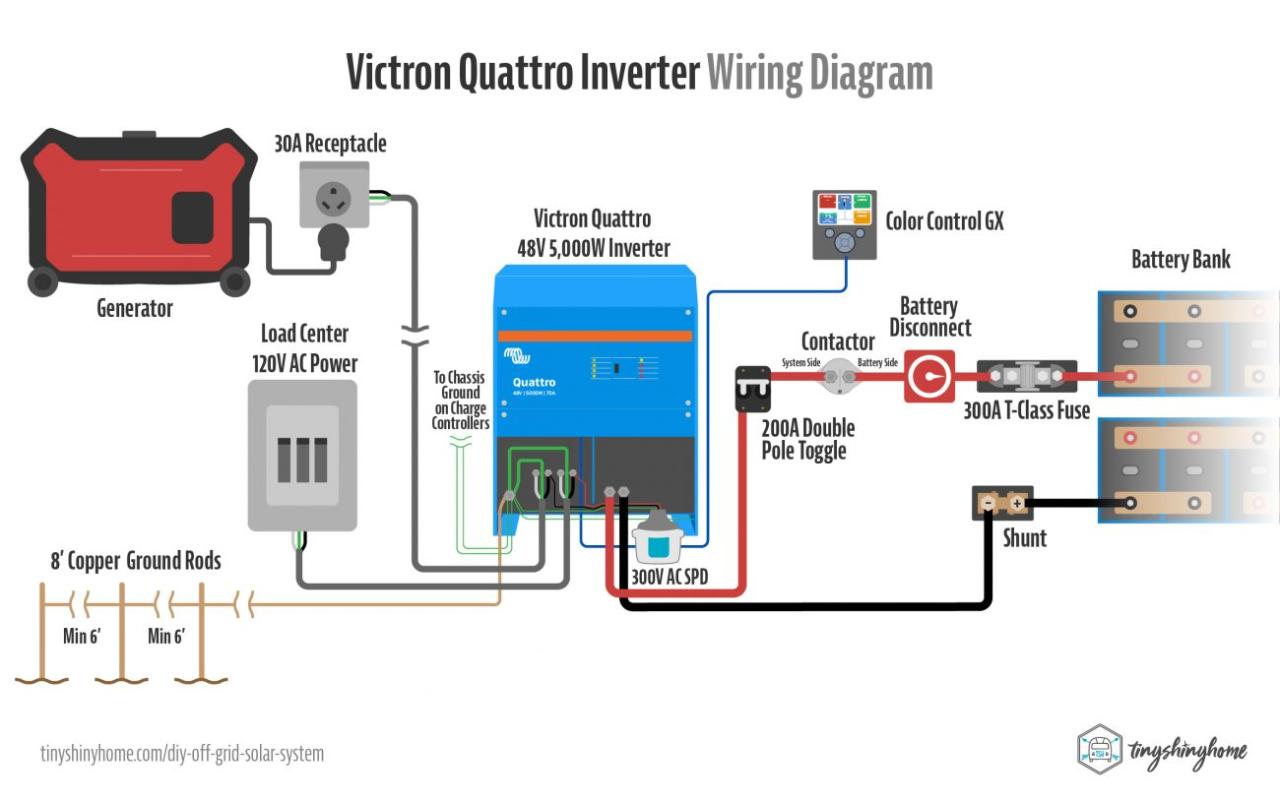
- Inverter/Charger: This device converts the DC power from the battery bank into AC power, which is usable by household appliances.
- Mounting System: This includes the racks and brackets that secure the solar panels in place.
Pre-Installation Checks
Before starting the installation process, it's essential to perform a series of pre-installation checks to ensure that your system is properly sized and configured for your specific needs. These checks include:
- Energy Requirements: Calculate your daily energy requirements to determine the size of the solar panel array and battery bank needed.
- Site Assessment: Assess the site where the solar panels will be installed, taking into account factors such as sunlight hours, shading, and wind loads.
- Electrical Panel Upgrade: Check if your electrical panel needs to be upgraded to accommodate the off-grid solar power system.
- Battery Bank Sizing: Calculate the size of the battery bank based on your energy requirements and the depth of discharge (DOD) of the batteries.
Installation and Wiring Process
With the pre-installation checks complete, it's time to start the installation and wiring process. Here's a step-by-step guide:
Step 1: Mounting the Solar Panels
- Choose a suitable location: Select a location that receives direct sunlight for most of the day, with minimal shading.
- Install the mounting system: Install the mounting system, ensuring that it is level and securely fastened to the roof or ground.
- Install the solar panels: Mount the solar panels to the mounting system, ensuring that they are securely fastened and connected to each other in a series-parallel configuration.
Step 2: Installing the Charge Controller
- Choose a suitable location: Install the charge controller in a dry, well-ventilated area, close to the battery bank.
- Connect the solar panels to the charge controller: Connect the solar panels to the charge controller, ensuring that the positive and negative terminals are correctly matched.
- Configure the charge controller: Configure the charge controller according to the manufacturer's instructions, setting the charging parameters and monitoring the system's performance.
Step 3: Installing the Battery Bank
- Choose a suitable location: Install the battery bank in a dry, well-ventilated area, close to the charge controller.
- Connect the batteries: Connect the batteries in a series-parallel configuration, ensuring that the positive and negative terminals are correctly matched.
- Configure the battery monitor: Configure the battery monitor according to the manufacturer's instructions, setting the monitoring parameters and alerts.
Step 4: Installing the Inverter/Charger
- Choose a suitable location: Install the inverter/charger in a dry, well-ventilated area, close to the battery bank.
- Connect the battery bank to the inverter/charger: Connect the battery bank to the inverter/charger, ensuring that the positive and negative terminals are correctly matched.
- Configure the inverter/charger: Configure the inverter/charger according to the manufacturer's instructions, setting the charging parameters and monitoring the system's performance.
Step 5: Connecting the Load
- Connect the inverter/charger to the electrical panel: Connect the inverter/charger to the electrical panel, ensuring that the wiring is correctly sized and matched.
- Connect the loads: Connect the loads to the electrical panel, ensuring that they are compatible with the off-grid solar power system.
Safety Considerations
When installing and wiring an off-grid solar power system, it's essential to take safety considerations into account. These include:
- Electrical shock: Ensure that all electrical connections are secure and insulated to prevent electrical shock.
- Fire hazards: Ensure that all components are installed and wired correctly to prevent fire hazards.
- Personal protective equipment: Wear personal protective equipment, such as gloves and safety glasses, when working with electrical systems.
Maintenance and Troubleshooting
Regular maintenance and troubleshooting are essential to ensure that your off-grid solar power system operates efficiently and safely. These include:
- Monitor the system's performance: Monitor the system's performance regularly, checking for any errors or issues.
- Clean the solar panels: Clean the solar panels regularly to ensure maximum energy production.
- Check the battery bank: Check the battery bank regularly, ensuring that the batteries are properly charged and maintained.
Conclusion
Installing and wiring an off-grid solar power system can be a complex and daunting task, but with the right guidance and precautions, it can be a rewarding and sustainable way to generate electricity. By following the steps outlined in this article, you can ensure that your system is properly sized, configured, and installed, providing you with a reliable and efficient source of renewable energy. Remember to always take safety considerations into account and perform regular maintenance and troubleshooting to ensure that your system operates efficiently and safely.