Maximum Power Point Tracking (MPPT) controllers play a crucial role in optimizing the performance of solar panels, ensuring that the system operates at maximum efficiency. In this article, we will delve into the world of MPPT controller wiring for 12V systems, covering the basics, components, and best practices for a reliable and efficient solar panel installation.

Introduction to MPPT Controllers
MPPT controllers are designed to maximize the energy output of solar panels by tracking the maximum power point (MPP) of the array. This is achieved by adjusting the voltage and current output of the panels to match the optimal operating point, resulting in increased energy production and reduced energy losses. MPPT controllers are particularly useful in systems with variable weather conditions, as they can adapt to changing solar irradiance and temperature levels.
Components of an MPPT Controller Wiring System
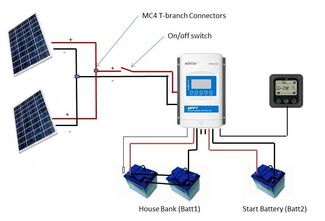
A typical MPPT controller wiring system for a 12V system consists of the following components:
- Solar Panels: The solar panels convert sunlight into electrical energy, which is then fed into the MPPT controller.
- MPPT Controller: The MPPT controller tracks the maximum power point of the solar array and adjusts the output to match the optimal operating point.
- Battery Bank: The battery bank stores excess energy generated by the solar panels for later use.
- Load: The load refers to the devices that consume energy from the system, such as lights, appliances, and electronics.
- Wiring and Connectors: The wiring and connectors used to connect the components of the system must be sized and rated for the maximum current and voltage of the system.

Wiring Considerations for MPPT Controllers
When wiring an MPPT controller for a 12V system, several factors must be considered to ensure a safe and efficient installation:
- Voltage and Current Ratings: The MPPT controller and wiring must be rated for the maximum voltage and current of the system. For a 12V system, the MPPT controller should be rated for at least 12V and the maximum current output of the solar panels.

- Wire Sizing: The wire sizing must be sufficient to handle the maximum current of the system. A general rule of thumb is to use wire that is at least 2 AWG (American Wire Gauge) smaller than the maximum current rating of the system.
- Insulation and Protection: The wiring must be insulated and protected from the elements to prevent damage and ensure safe operation.
- Grounding and Bonding: The system must be properly grounded and bonded to prevent electrical shock and ensure safe operation.
Best Practices for MPPT Controller Wiring
To ensure a reliable and efficient MPPT controller wiring system, follow these best practices:
- Keep Wiring Runs Short: Minimize the length of wiring runs to reduce voltage drop and energy losses.
- Use Proper Connectors: Use connectors that are rated for the maximum current and voltage of the system, and ensure they are properly secured to prevent loose connections.
- Label and Document: Label and document the wiring and components of the system to ensure easy identification and troubleshooting.
- Test and Verify: Test and verify the system to ensure it is operating correctly and safely.
Step-by-Step Wiring Instructions
To wire an MPPT controller for a 12V system, follow these step-by-step instructions:
- Connect the Solar Panels: Connect the solar panels to the MPPT controller, ensuring the positive and negative terminals are matched.
- Connect the Battery Bank: Connect the battery bank to the MPPT controller, ensuring the positive and negative terminals are matched.
- Connect the Load: Connect the load to the MPPT controller, ensuring the positive and negative terminals are matched.
- Connect the Grounding and Bonding: Connect the grounding and bonding wires to the system, ensuring they are properly secured and connected.
- Test and Verify: Test and verify the system to ensure it is operating correctly and safely.
Troubleshooting Common Issues
Common issues with MPPT controller wiring systems include:
- Low Voltage Output: Check the wiring and connections for loose or damaged connections, and ensure the MPPT controller is properly configured.
- High Voltage Output: Check the wiring and connections for short circuits or incorrect wiring, and ensure the MPPT controller is properly configured.
- Overheating: Check the wiring and connections for excessive heat buildup, and ensure the system is properly ventilated.
- Error Codes: Check the MPPT controller manual for error code explanations and troubleshooting procedures.
Conclusion
In conclusion, MPPT controller wiring for 12V systems requires careful consideration of the components, wiring, and best practices to ensure a safe and efficient installation. By following the guidelines and instructions outlined in this article, you can create a reliable and efficient solar panel system that maximizes energy production and minimizes energy losses. Remember to always follow proper safety protocols and consult the manufacturer's instructions for specific wiring and configuration requirements. With the right knowledge and skills, you can harness the power of the sun and enjoy a sustainable and renewable energy source.
Additional Tips and Recommendations
- Always consult the manufacturer's instructions for specific wiring and configuration requirements.
- Use high-quality wiring and connectors to ensure reliable and efficient operation.
- Consider using a wiring diagram or schematic to help plan and visualize the system.
- Regularly inspect and maintain the system to ensure safe and efficient operation.
- Consider upgrading to a more advanced MPPT controller or system monitoring software to optimize energy production and reduce energy losses.
By following these tips and recommendations, you can create a reliable and efficient solar panel system that provides years of trouble-free operation and maximizes energy production. Happy building!


