Get Ready for a Successful Installation
Are you ready to install the Rain Bird ESP 6 wiring diagram? Look no further! In this comprehensive guide, we will walk you through the step-by-step process of installing the Rain Bird ESP 6 wiring diagram, ensuring that you have all the information you need to complete the installation successfully. Whether you're a seasoned DIY enthusiast or a beginner looking to take on a new project, this guide will provide you with the knowledge and confidence to get the job done right. So, let's dive in and learn how to install the Rain Bird ESP 6 wiring diagram!
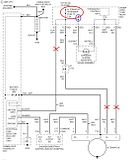
How to Install Rain Bird ESP 6 Wiring Diagram: Step-by-Step Instructions
To ensure a smooth installation process, follow these step-by-step instructions for installing the Rain Bird ESP 6 wiring diagram:
Step 1: Gather the Required Tools and Materials
Before you start the installation, it's essential to gather all the necessary tools and materials. Here's a list of what you'll need:
- Rain Bird ESP 6 wiring diagram
- Screwdriver
- Wire strippers
- Electrical tape
- Wire connectors
- Drill
- Screws
- Electrical conduit (if required)
- Wire nuts
Step 2: Turn off the Power
Safety first! Before you begin working on the wiring, make sure to turn off the power to the area where you'll be installing the Rain Bird ESP 6. This step is crucial to avoid any electrical accidents or damage.
Step 3: Mount the Rain Bird ESP 6 Controller
Start by mounting the Rain Bird ESP 6 controller on the desired location. Ensure that it is securely attached to the wall or any other surface, and make sure it is easily accessible for future maintenance.
Step 4: Connect the Wires
Now it's time to connect the wires. Follow the Rain Bird ESP 6 wiring diagram carefully to make the correct connections. Use wire strippers to remove the insulation from the ends of the wires and connect them to the corresponding terminals on the controller using wire connectors. Make sure the connections are tight and secure.
Step 5: Test the Connections
Before you finalize the installation, it's crucial to test the connections. Turn the power back on and check if the Rain Bird ESP 6 controller is working correctly. Activate each zone and ensure that the corresponding sprinklers or irrigation system components are functioning as expected.
Step 6: Secure and Organize the Wires
Once you've verified that all the connections are working correctly, secure and organize the wires. Use electrical tape or wire nuts to protect and secure the exposed ends of the wires. If necessary, use electrical conduit to protect the wires from damage and ensure a clean installation.
FAQs about Installing Rain Bird ESP 6 Wiring Diagram
Here are some frequently asked questions about installing the Rain Bird ESP 6 wiring diagram:
Q: Can I install the Rain Bird ESP 6 wiring diagram myself, or do I need professional help?
A: The installation process is designed to be DIY-friendly, but if you're not comfortable working with electrical wiring, it's always recommended to seek professional assistance to ensure a safe and accurate installation.
Q: Is it necessary to turn off the power before installing the Rain Bird ESP 6?
A: Yes, turning off the power is crucial to avoid electrical accidents or damage during the installation process.
Q: Can I mount the Rain Bird ESP 6 controller outdoors?
A: The Rain Bird ESP 6 controller is designed for indoor use. If you need to install it outdoors, make sure to use a weatherproof enclosure to protect it from the elements.
Q: Can I extend the wiring length for the Rain Bird ESP 6 controller?
A: It's generally not recommended to extend the wiring length beyond what is specified in the Rain Bird ESP 6 wiring diagram. Doing so may lead to voltage drop and performance issues.
Q: How can I troubleshoot if the Rain Bird ESP 6 controller is not working correctly after installation?
A: If you're experiencing issues with the Rain Bird ESP 6 controller, refer to the troubleshooting section in the user manual or consult Rain Bird's customer support for assistance.
Q: Can I use the Rain Bird ESP 6 wiring diagram for other Rain Bird controllers?
A: The wiring diagrams may vary depending on the model and series of Rain Bird controllers. Always refer to the specific wiring diagram provided for the controller you're installing.
Conclusion: Your Path to a Successful Installation
Congratulations! You have reached the end of our comprehensive guide on how to install the Rain Bird ESP 6 wiring diagram. By following the step-by-step instructions and referring to the wiring diagram, you now have the knowledge and confidence to complete the installation successfully. Remember to prioritize safety by turning off the power before working on the wiring and seeking professional help if needed. Now go ahead and enjoy the benefits of a well-installed Rain Bird ESP 6 controller, ensuring efficient irrigation and a beautiful landscape.