“House solar power wiring diagram”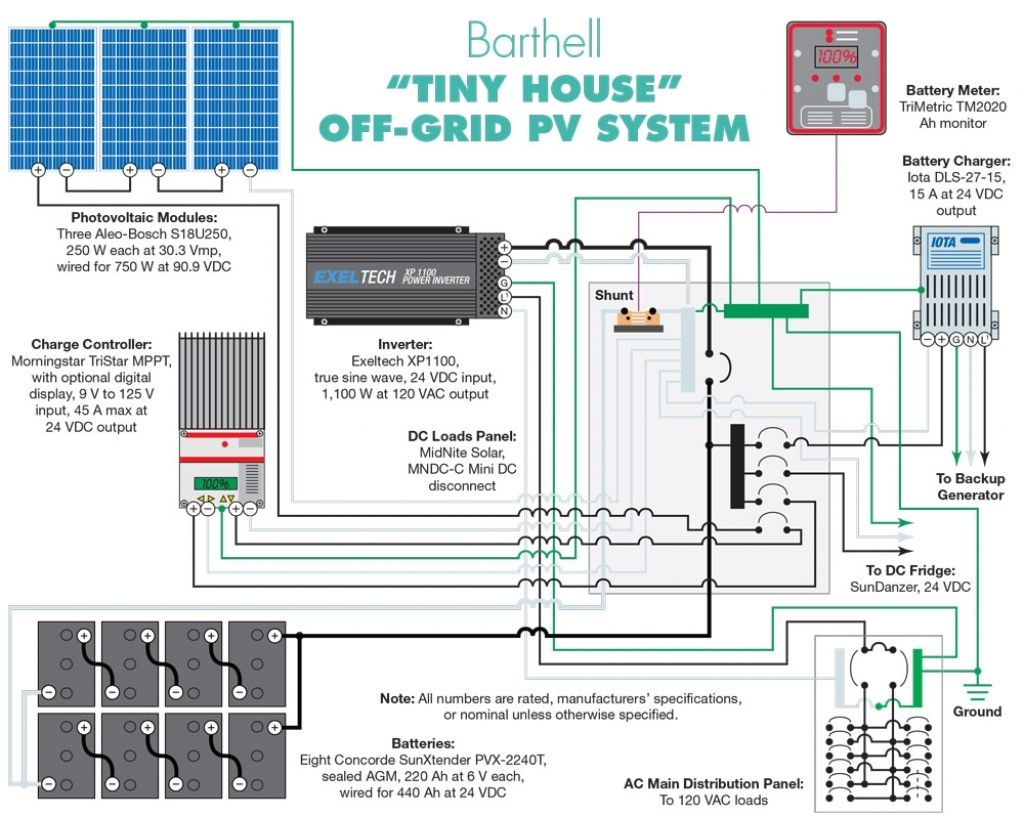
Introduction to Solar Power Systems
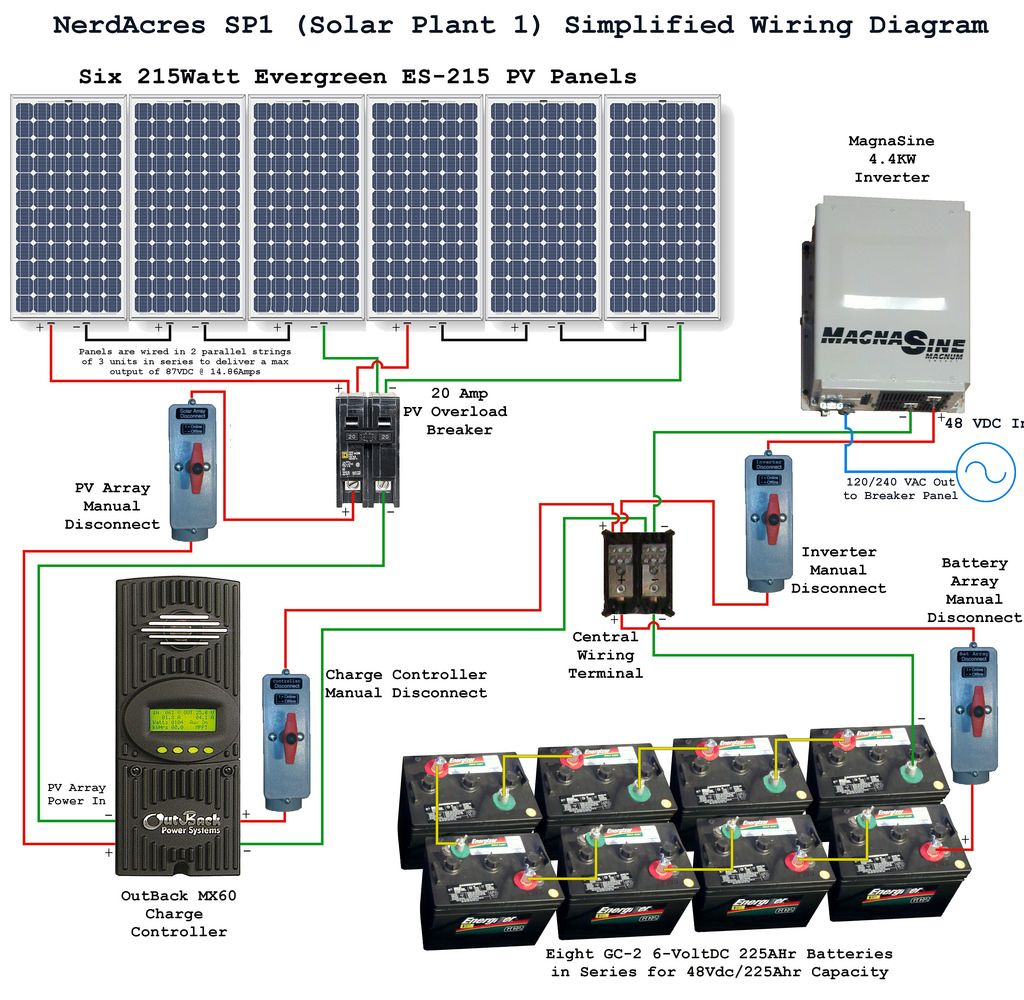
A solar power system, also known as a photovoltaic (PV) system, converts sunlight into electrical energy. The system consists of multiple components, including solar panels, an inverter, a mounting system, and a wiring diagram. The solar panels, typically installed on the roof or in a sunny area, generate DC (direct current) electricity. The inverter converts this DC power into AC (alternating current) electricity, which is then fed into the electrical panel and distributed throughout the house.
Why is a Wiring Diagram Important?
A wiring diagram, also known as a circuit diagram, is a visual representation of the electrical connections between the various components of a solar power system. It serves as a blueprint for the installation, ensuring that the system is wired correctly and safely. A well-designed wiring diagram is crucial for several reasons:
- Safety: A wiring diagram helps to identify potential electrical hazards, such as short circuits, overloads, and ground faults, which can cause fires, electrical shocks, or equipment damage.
- Efficiency: A properly designed wiring diagram optimizes the system’s performance, minimizing energy losses and ensuring that the maximum amount of energy is generated and utilized.
- Code Compliance: A wiring diagram helps to ensure that the solar power system meets local electrical codes and regulations, which vary by jurisdiction.
- Troubleshooting: A wiring diagram provides a clear understanding of the system’s layout, making it easier to identify and troubleshoot issues that may arise during operation.
Components of a Solar Power Wiring Diagram
A house solar power wiring diagram typically includes the following components:
- Solar Panels: Represented by a symbol, solar panels are the heart of the system, generating DC electricity.
- Inverter: The inverter converts DC power into AC electricity, which is then fed into the electrical panel.
- Mounting System: The mounting system, including racks, clamps, and trackers, secures the solar panels in place and ensures their optimal orientation.
- Electrical Panel: The electrical panel, also known as the main service panel, distributes the AC electricity generated by the solar power system throughout the house.
- Wiring: The wiring connects the various components, including the solar panels, inverter, and electrical panel.
- Grounding System: The grounding system, including grounding rods and wires, protects the system from electrical surges and lightning strikes.
- Fuses and Circuit Breakers: Fuses and circuit breakers provide overcurrent protection, preventing damage to the system and ensuring safe operation.
- Monitoring System: A monitoring system, including sensors and display devices, tracks the system’s performance, energy production, and other vital metrics.

Best Practices for Creating a Wiring Diagram
To create a wiring diagram for a house solar power system, follow these best practices:
- Use Standard Symbols: Use industry-standard symbols and notation to ensure clarity and readability.
- Label Components: Label each component clearly, including the solar panels, inverter, electrical panel, and wiring.
- Show Connections: Show all connections between components, including wiring, grounding, and fuses.
- Indicate Polarity: Indicate the polarity of DC and AC connections to prevent incorrect wiring.
- Include Safety Features: Include safety features, such as fuses, circuit breakers, and grounding systems, to ensure safe operation.
- Consider Local Codes: Consider local electrical codes and regulations when designing the wiring diagram.
- Use Electrical Diagram Software: Use specialized electrical diagram software, such as AutoCAD or SketchUp, to create a professional-looking wiring diagram.
Installation Considerations
When installing a house solar power system, consider the following factors to ensure a safe and efficient installation:
- Wiring Size and Type: Use the correct wire size and type to minimize energy losses and ensure safe operation.
- Grounding and Bonding: Ensure proper grounding and bonding of the system to prevent electrical shocks and equipment damage.
- Electrical Panel Upgrade: Upgrade the electrical panel if necessary to accommodate the solar power system.
- Inverter Installation: Install the inverter in a well-ventilated area, away from direct sunlight and moisture.
- Solar Panel Installation: Install solar panels at the correct angle and orientation to optimize energy production.
Troubleshooting a Solar Power System
If issues arise with a solar power system, refer to the wiring diagram to identify the problem. Common issues include:
- Low Energy Production: Check for shading, soiling, or panel damage.
- Inverter Faults: Check for error codes, overheating, or faulty connections.
- Wiring Issues: Check for damaged or incorrect wiring, including loose connections or incorrect polarity.
- Grounding Issues: Check for proper grounding and bonding of the system.
Conclusion
A house solar power wiring diagram is a critical component of a solar power system, ensuring safe and efficient operation. By following best practices for creating a wiring diagram and considering installation factors, homeowners can enjoy the benefits of renewable energy while minimizing the risks associated with electrical systems. Whether you’re a seasoned electrician or a DIY enthusiast, understanding the components and principles of a solar power wiring diagram is essential for a successful installation. As the world continues to transition towards renewable energy sources, the importance of a well-designed wiring diagram will only continue to grow.


