“Camper solar panel wiring layout”
Understanding the Basics
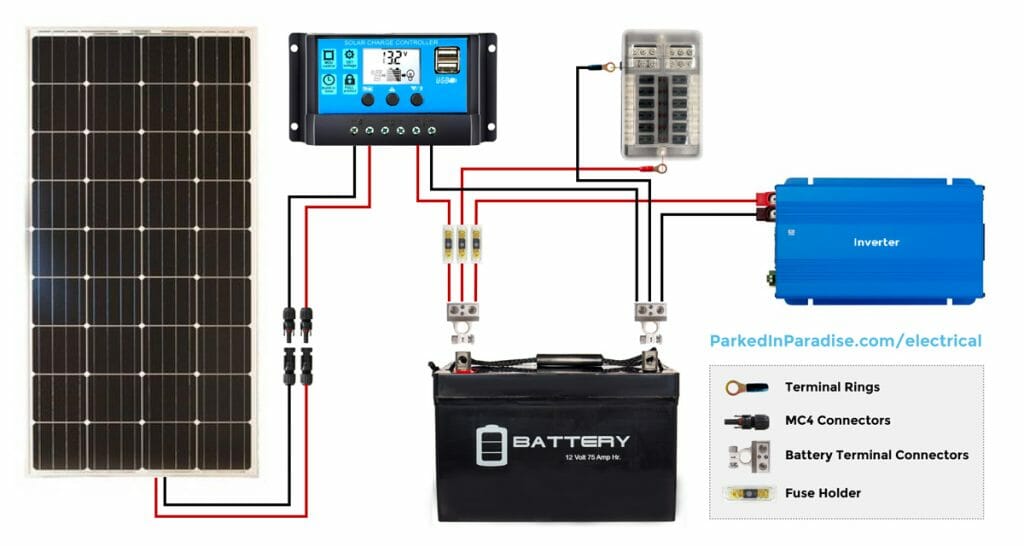
Before we dive into the wiring layout, it’s essential to understand the fundamental components of a camper solar panel system. The primary components include:
- Solar Panels: These are the photovoltaic (PV) panels that convert sunlight into electrical energy.
- Charge Controller: This device regulates the flow of energy from the solar panels to the battery, preventing overcharging and ensuring safe operation.
- Battery: The battery stores excess energy generated by the solar panels for later use.
- Inverter/Charger: This device converts DC power from the battery to AC power for use in the camper, and also charges the battery from an external power source (such as a generator or shore power).
- Wiring and Connectors: The wiring and connectors used to connect the various components of the solar panel system.
Wiring Configurations
There are several wiring configurations to consider when designing a camper solar panel system. The most common configurations include:
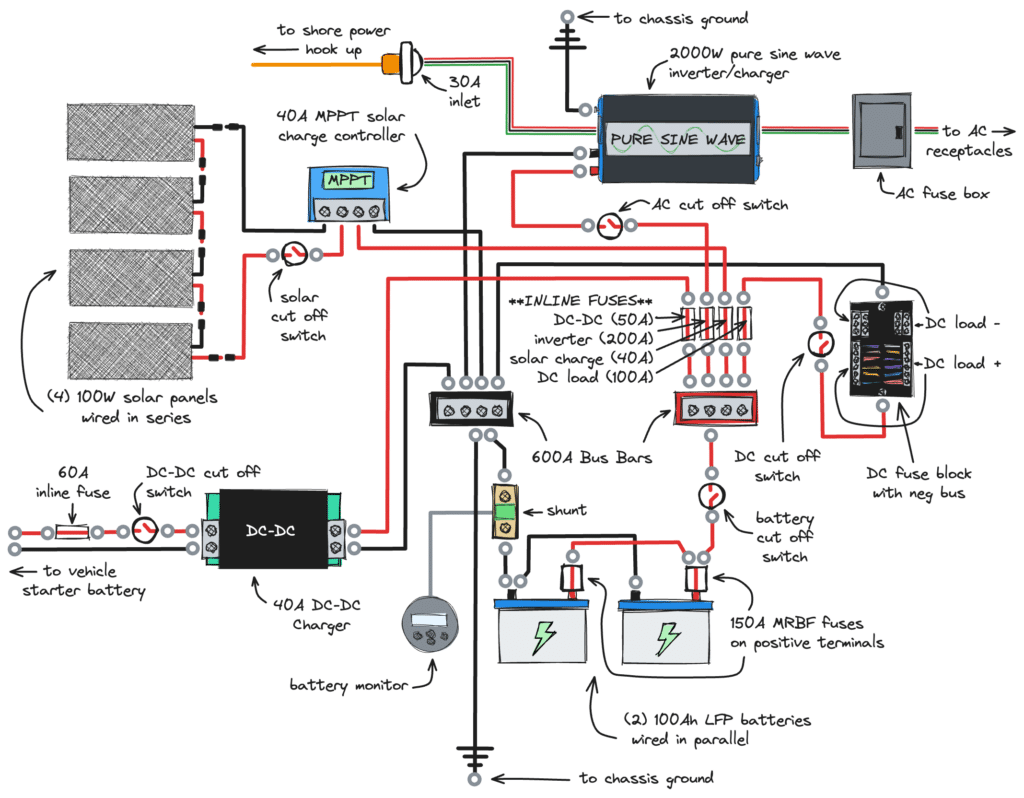
- Series Wiring: In a series configuration, the solar panels are connected one after the other, with the positive terminal of one panel connected to the negative terminal of the next panel. This configuration is suitable for smaller systems, as it allows for easy expansion and minimizes voltage drop.
- Parallel Wiring: In a parallel configuration, the solar panels are connected in parallel, with all the positive terminals connected together and all the negative terminals connected together. This configuration is ideal for larger systems, as it allows for higher current output and reduced voltage drop.
- Series-Parallel Wiring: This configuration combines the benefits of series and parallel wiring, with multiple panels connected in series, and then multiple strings connected in parallel.
Designing a Camper Solar Panel Wiring Layout
When designing a camper solar panel wiring layout, there are several factors to consider, including:
- System Size: Determine the total wattage required to power your camper, taking into account the number of appliances and devices you plan to use.
- Panel Size and Configuration: Choose the appropriate solar panel size and configuration to meet your system size requirements.
- Charge Controller Selection: Select a charge controller that is compatible with your solar panel configuration and system size.
- Battery Selection: Choose a battery that is suitable for your system size and intended use.
- Inverter/Charger Selection: Select an inverter/charger that is compatible with your battery and system size.
- Wiring and Connector Selection: Choose the appropriate wiring and connectors to connect the various components of your solar panel system.
Best Practices for Camper Solar Panel Wiring
To ensure a safe and efficient solar panel system, follow these best practices:
- Use the Correct Wire Size: Use wire that is rated for the maximum current output of your solar panel system to minimize voltage drop and prevent overheating.
- Keep Wiring Runs Short: Minimize the length of wiring runs to reduce voltage drop and prevent energy loss.
- Use Protective Devices: Install fuses, circuit breakers, or surge protectors to protect your system from overloads, short circuits, and power surges.
- Label and Document Your System: Label and document your wiring layout, including component specifications and wiring connections, to facilitate maintenance and troubleshooting.
- Regularly Inspect and Maintain Your System: Regularly inspect your system for signs of wear, damage, or malfunction, and perform routine maintenance tasks, such as cleaning the solar panels and checking battery water levels.
Common Mistakes to Avoid
When designing a camper solar panel wiring layout, there are several common mistakes to avoid, including:
- Incorrect Wire Size: Using wire that is too small can lead to voltage drop, overheating, and system malfunction.
- Inadequate Protection: Failing to install protective devices, such as fuses or circuit breakers, can leave your system vulnerable to overloads and short circuits.
- Poor Wiring Practices: Using poor wiring practices, such as twisted or damaged wires, can lead to energy loss, overheating, and system malfunction.
- Incompatible Components: Using incompatible components, such as a charge controller that is not compatible with your solar panel configuration, can lead to system malfunction or damage.
Conclusion
Designing a camper solar panel wiring layout requires careful consideration of several factors, including system size, panel configuration, charge controller selection, battery selection, inverter/charger selection, and wiring and connector selection. By following best practices, such as using the correct wire size, keeping wiring runs short, and using protective devices, you can create a safe and efficient solar panel system that meets your energy needs. Remember to avoid common mistakes, such as incorrect wire size, inadequate protection, and poor wiring practices, to ensure a reliable and long-lasting system. With a well-designed solar panel system, you can enjoy the freedom and convenience of off-grid camping, while minimizing your environmental impact and reducing your dependence on traditional fuel sources.
Additional Resources
For those looking to learn more about camper solar panel wiring, there are several additional resources available, including:
- Online Forums and Communities: Join online forums and communities, such as Reddit’s r/solarpanels, to connect with other solar panel enthusiasts and learn from their experiences.
- Manufacturer Websites: Visit the websites of solar panel manufacturers, such as Renogy or Goal Zero, to learn more about their products and technologies.
- Solar Panel Installation Guides: Consult solar panel installation guides, such as the one provided by the National Renewable Energy Laboratory, to learn more about the installation process and best practices.
- YouTube Tutorials: Watch YouTube tutorials, such as those provided by solar panel installers or DIY experts, to learn more about the installation process and gain hands-on experience.
By following the guidelines and best practices outlined in this article, you can create a well-designed and functional camper solar panel wiring layout that meets your energy needs and provides a reliable source of power for your off-grid adventures. Happy camping!


