“Off-grid home solar panel wiring”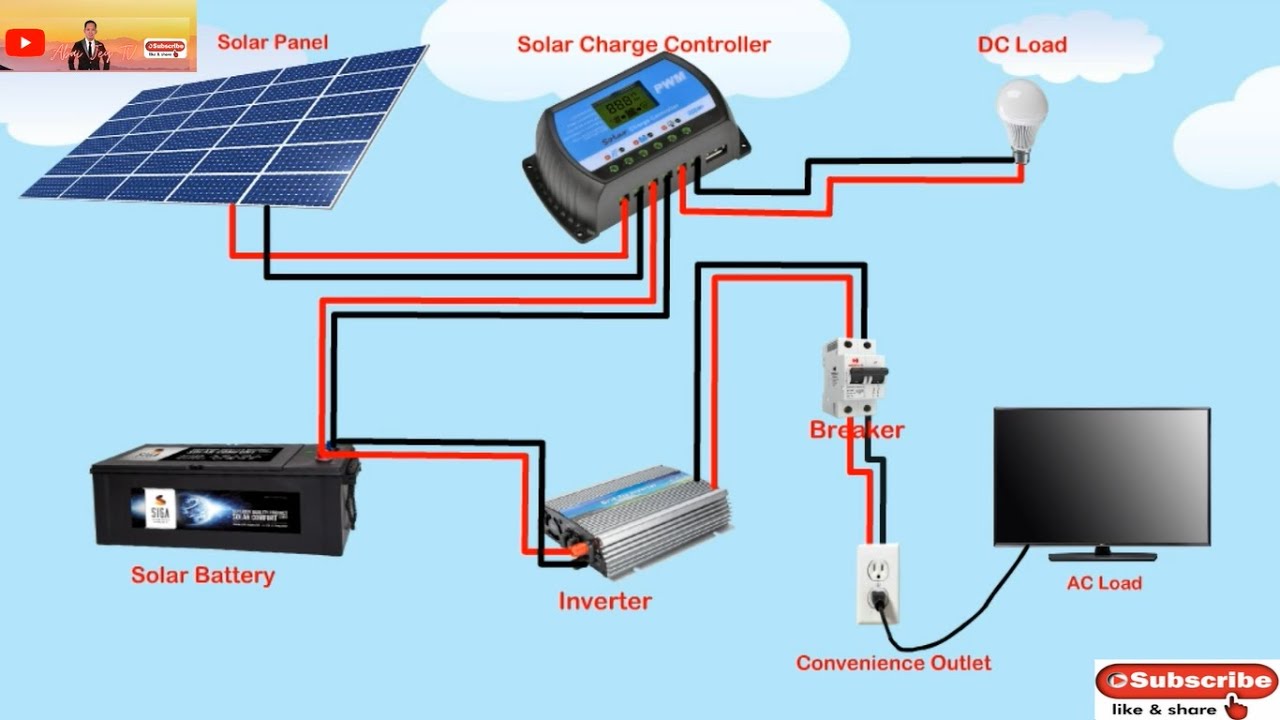
Introduction to Off-Grid Solar Panel Systems
An off-grid solar panel system is designed to generate electricity independently of the grid, using the sun’s energy to power your home. These systems typically consist of solar panels, a charge controller, a battery bank, and an inverter. The solar panels convert sunlight into direct current (DC) electricity, which is then stored in the battery bank for later use. The inverter converts the DC power into alternating current (AC) electricity, making it usable in your home.
Components of an Off-Grid Solar Panel System
Before we dive into the wiring aspect, let’s take a closer look at the components that make up an off-grid solar panel system:
- Solar Panels: These are the photovoltaic (PV) panels that convert sunlight into DC electricity. Solar panels come in various sizes and wattages, and their selection depends on your energy needs and available space.
- Charge Controller: This device regulates the flow of energy from the solar panels to the battery bank, preventing overcharging and ensuring the batteries are charged efficiently.
- Battery Bank: A collection of deep cycle batteries that store excess energy generated by the solar panels for later use. The battery bank is the heart of an off-grid system, providing power when the sun is not shining.
- Inverter: This device converts the DC power from the battery bank into AC power, making it usable in your home.
- Mounting Hardware: This includes the racking system, clamps, and connectors that secure the solar panels to your roof or a ground-mounted array.
Off-Grid Solar Panel Wiring Basics
When it comes to wiring an off-grid solar panel system, safety is paramount. It’s essential to follow proper wiring practices to avoid electrical shock, fires, and equipment damage. Here are some basic principles to keep in mind:
- Use the Correct Wire Size: Choose wire sizes that can handle the maximum current and voltage of your system. Use a wire size calculator to determine the correct gauge for your application.
- Color Code Your Wires: Use standard color coding to identify positive, negative, and ground wires. This will help you avoid confusion and ensure a safe installation.
- Keep Wires Organized: Use cable ties, clips, or conduit to keep wires tidy and protected from damage.
- Ground Your System: Proper grounding is essential for safety and performance. Ensure your system is grounded to a suitable earthing point, such as a grounding rod or plate.

Wiring the Solar Panel Array
When wiring the solar panel array, follow these steps:
- Connect Solar Panels in Series: Connect solar panels in series to increase the voltage of your system. Use a series connector or a combiner box to connect the panels.
- Connect Solar Panels in Parallel: Connect solar panels in parallel to increase the current of your system. Use a parallel connector or a combiner box to connect the panels.
- Use a Combiner Box: A comber box is a convenient way to connect multiple solar panels to a single output. It also provides a safe and protected connection point.
- Connect to the Charge Controller: Connect the solar panel array to the charge controller, following the manufacturer’s instructions.
Wiring the Charge Controller and Battery Bank
When wiring the charge controller and battery bank, follow these steps:
- Connect the Charge Controller to the Battery Bank: Connect the charge controller to the battery bank, following the manufacturer’s instructions.
- Connect the Battery Bank to the Inverter: Connect the battery bank to the inverter, following the manufacturer’s instructions.
- Use a Battery Monitor: A battery monitor helps you keep track of your battery bank’s state of charge, voltage, and temperature.
- Ground the Battery Bank: Ensure the battery bank is properly grounded to prevent electrical shock and equipment damage.
Wiring the Inverter and Load Center
When wiring the inverter and load center, follow these steps:
- Connect the Inverter to the Load Center: Connect the inverter to the load center, following the manufacturer’s instructions.
- Connect the Load Center to the Home’s Electrical Panel: Connect the load center to the home’s electrical panel, following the manufacturer’s instructions.
- Use a Transfer Switch: A transfer switch allows you to switch between the off-grid system and the grid, if connected.
- Ground the Inverter and Load Center: Ensure the inverter and load center are properly grounded to prevent electrical shock and equipment damage.
Safety Considerations and Best Practices
When working with electrical systems, safety is paramount. Here are some safety considerations and best practices to keep in mind:
- Hire a Licensed Electrician: If you’re not experienced in electrical work, consider hiring a licensed electrician to perform the installation.
- Follow Manufacturer’s Instructions: Follow the manufacturer’s instructions for each component, including the solar panels, charge controller, battery bank, and inverter.
- Use Protective Gear: Wear protective gear, such as gloves, safety glasses, and a hard hat, when working with electrical systems.
- Test Your System: Test your system regularly to ensure it’s operating safely and efficiently.
- Maintain Your System: Regularly inspect and maintain your system to prevent damage and ensure optimal performance.
Conclusion
Off-grid home solar panel wiring requires careful planning, attention to detail, and a commitment to safety. By following the principles outlined in this article, you can create a safe and efficient off-grid solar panel system that meets your energy needs. Remember to always follow manufacturer’s instructions, use proper wiring practices, and consider hiring a licensed electrician if you’re not experienced in electrical work. With the right knowledge and precautions, you can enjoy the benefits of renewable energy and reduce your reliance on the grid.


