“RV solar panel to charge controller wiring”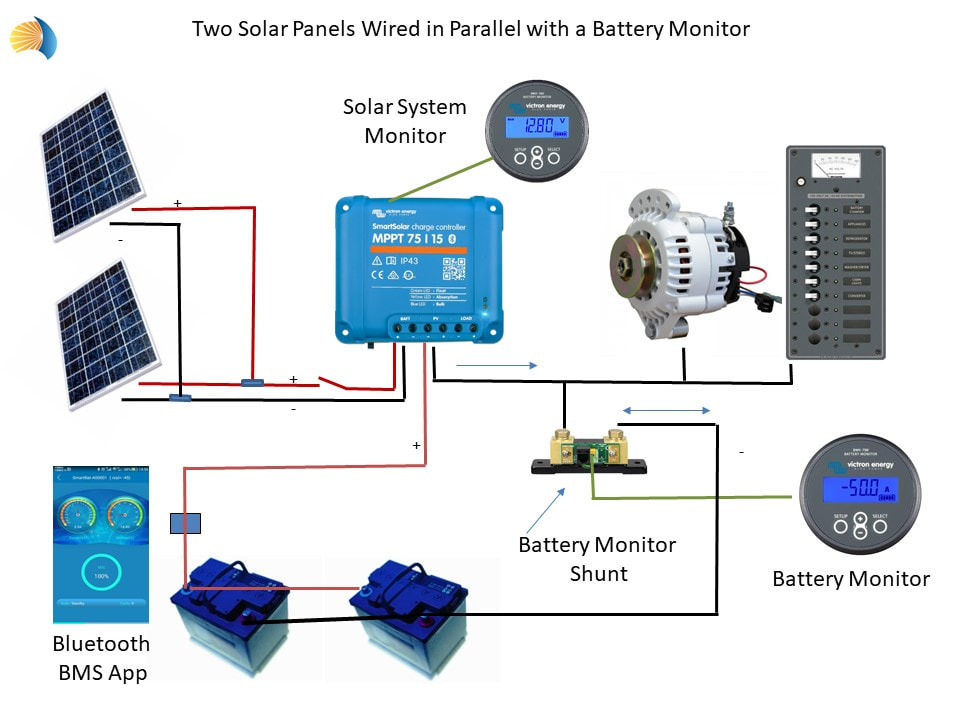
Understanding the Role of the Charge Controller
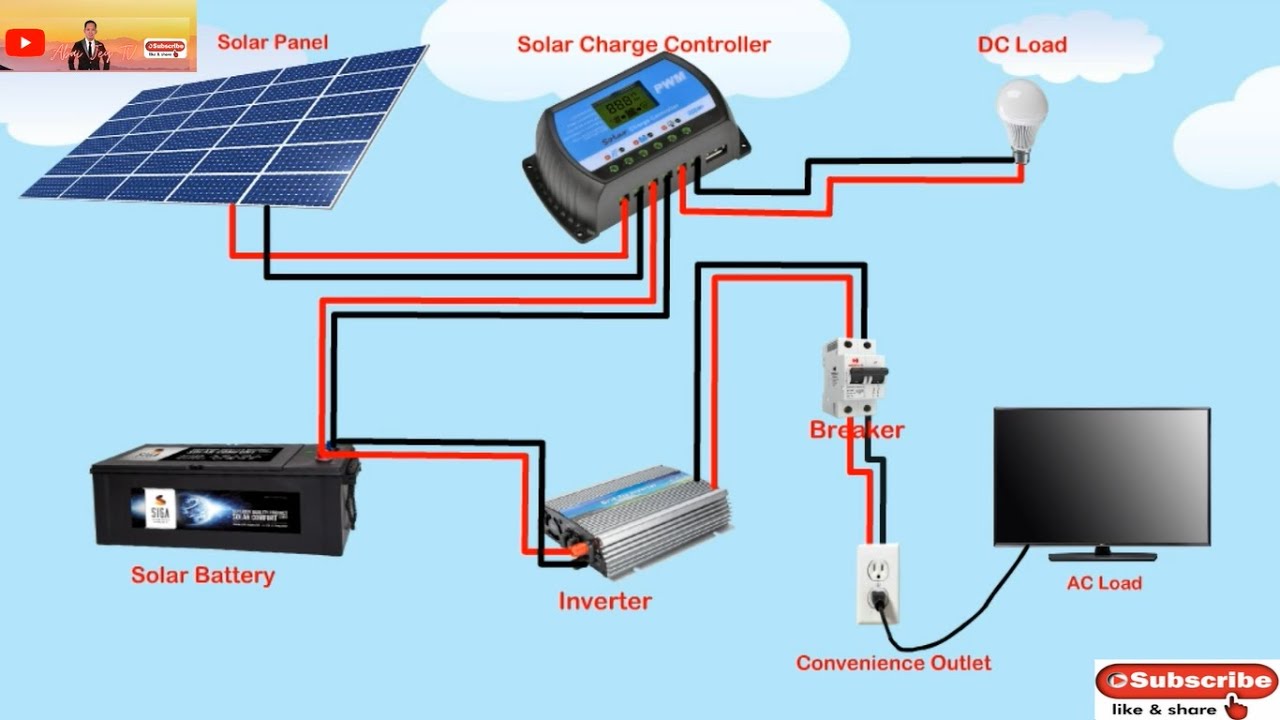
Before we dive into the wiring aspect, it’s crucial to understand the role of the charge controller in your RV’s solar panel system. The charge controller is a critical component that regulates the flow of energy from the solar panels to the battery bank. Its primary function is to prevent overcharging, which can damage the batteries and reduce their lifespan. The charge controller also helps to maintain a stable voltage, ensuring that the batteries are charged efficiently and safely.
Types of Charge Controllers
There are two primary types of charge controllers: PWM (Pulse Width Modulation) and MPPT (Maximum Power Point Tracking). PWM charge controllers are simpler and less expensive, but they can be less efficient, especially in partial shading conditions. MPPT charge controllers, on the other hand, are more advanced and can extract up to 30% more energy from the solar panels, making them a better choice for larger systems.
Wiring Requirements
When it comes to wiring your RV’s solar panels to the charge controller, there are several factors to consider. The wiring requirements will depend on the size of your solar panel system, the type of charge controller you’re using, and the voltage of your battery bank. Here are some general guidelines to keep in mind:
- Voltage: The voltage of your solar panel system should match the voltage of your battery bank. Most RVs use 12V or 24V battery banks, so you’ll want to ensure that your solar panels and charge controller are compatible.
- Current: The current rating of your wiring should be sufficient to handle the maximum current output of your solar panels. A good rule of thumb is to oversize your wiring by 20-30% to account for any potential losses.
- Gauge: The gauge of your wiring will depend on the length of the run and the current rating. A smaller gauge wire (e.g., 10 AWG) is suitable for shorter runs, while a larger gauge wire (e.g., 4 AWG) is required for longer runs.
Wiring Best Practices
To ensure safe and efficient operation of your RV’s solar panel system, follow these wiring best practices:
- Use UV-resistant wiring: RVs are often exposed to harsh outdoor conditions, including direct sunlight. Using UV-resistant wiring will help protect your wiring from degradation and ensure a longer lifespan.
- Keep wiring runs short: Minimizing the length of your wiring runs will reduce voltage drop and energy loss.
- Avoid wiring in high-temperature areas: Wiring should be kept away from high-temperature areas, such as near engines or generators, to prevent overheating and damage.
- Use proper connectors and terminals: Use high-quality connectors and terminals to ensure secure connections and prevent corrosion.
Common Wiring Configurations

There are several common wiring configurations used in RV solar panel systems:
- Series wiring: This configuration involves connecting multiple solar panels in series to increase the voltage. Series wiring is suitable for smaller systems and can be more efficient, but it can also be more prone to shading issues.
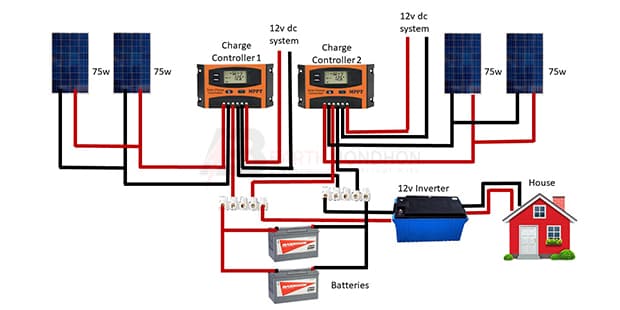
- Parallel wiring: This configuration involves connecting multiple solar panels in parallel to increase the current. Parallel wiring is more suitable for larger systems and can provide better performance in partial shading conditions.
- Combination wiring: This configuration involves combining series and parallel wiring to create a hybrid system. Combination wiring offers a good balance between voltage and current, making it a popular choice for many RV owners.
Charge Controller to Battery Wiring
Once you’ve connected your solar panels to the charge controller, you’ll need to connect the charge controller to the battery bank. Here are some tips to keep in mind:
- Use a fuse or circuit breaker: Install a fuse or circuit breaker between the charge controller and the battery bank to protect against overcurrent conditions.
- Size the wiring correctly: Ensure that the wiring between the charge controller and the battery bank is sized correctly to handle the maximum current output of the charge controller.
- Use a battery monitor: Consider installing a battery monitor to keep track of your battery state of charge, voltage, and temperature.
Troubleshooting Common Issues
Despite proper wiring and installation, issues can still arise. Here are some common problems to watch out for:
- Overcharging: If your batteries are overcharging, check the charge controller settings and ensure that the voltage and current limits are set correctly.
- Undercharging: If your batteries are undercharging, check the solar panel output and ensure that the wiring is not damaged or corroded.
- Voltage drop: If you’re experiencing voltage drop, check the wiring gauge and length to ensure that it’s sufficient for the system.
Conclusion
Wiring your RV’s solar panels to the charge controller is a critical step in harnessing the full potential of your solar panel system. By understanding the basics, following best practices, and avoiding common pitfalls, you can create a safe and efficient system that provides reliable power for your RV adventures. Remember to always follow the manufacturer’s instructions and consult with a professional if you’re unsure about any aspect of the installation. With proper wiring and maintenance, your RV’s solar panel system will provide years of trouble-free operation, allowing you to enjoy the freedom and flexibility of boondocking with confidence.
Additional Resources
For further information on RV solar panel systems and wiring, consider the following resources:
- National Electric Code (NEC): The NEC provides guidelines for electrical wiring and safety.
- RVIA (Recreational Vehicle Industry Association): The RVIA offers resources and guidelines for RV owners, including information on solar panel systems and electrical wiring.
- Online forums and communities: Join online forums and communities, such as RV enthusiast groups, to connect with other RV owners and learn from their experiences.
By following the guidelines and best practices outlined in this article, you’ll be well on your way to creating a reliable and efficient RV solar panel system that meets your energy needs and enhances your overall RV experience. Happy camping!