One of the key components of a solar power system is the battery bank, which stores excess energy generated by the solar panels during the day for use at night or during periods of low sunlight. In this article, we will provide a step-by-step guide on how to wire a solar battery bank, helping you to create a safe and efficient solar power system.

Understanding the Basics
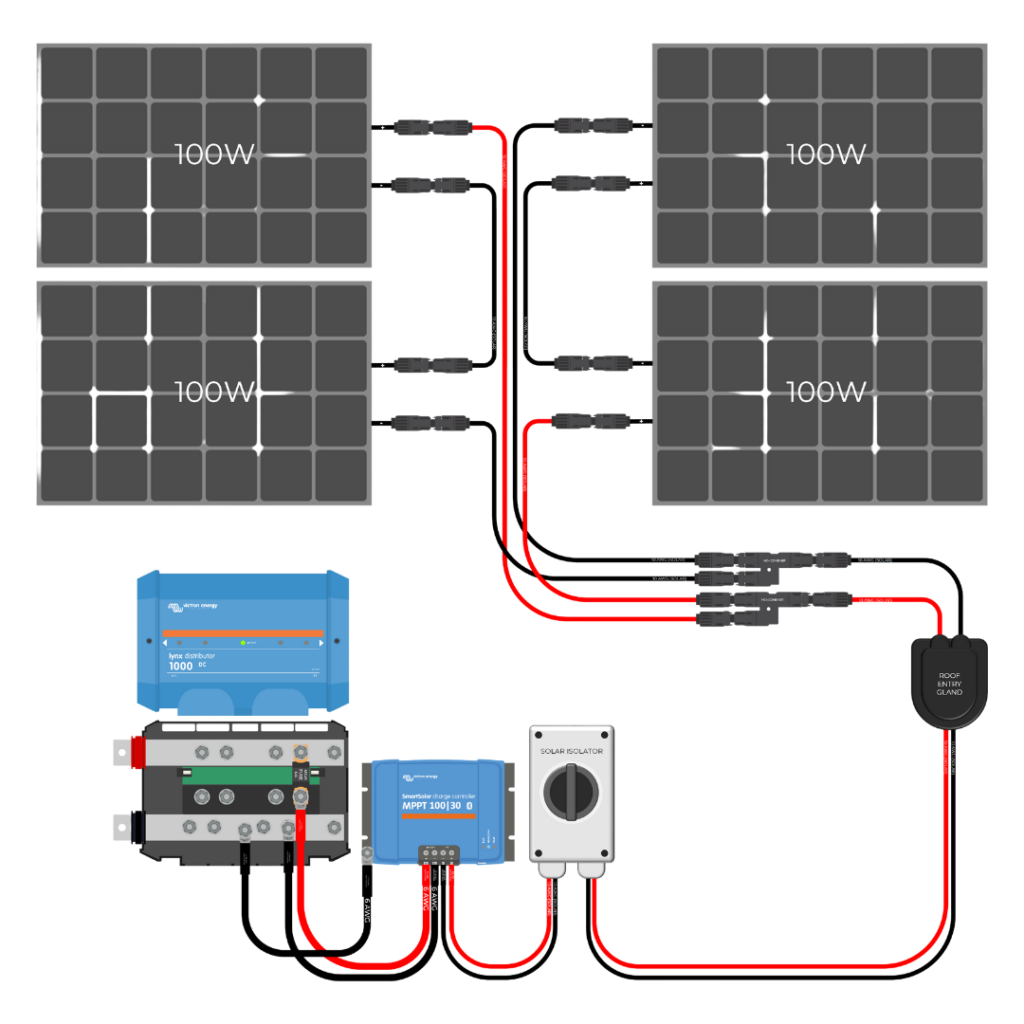
Before we dive into the wiring process, it's essential to understand the basics of a solar battery bank. A solar battery bank consists of multiple batteries connected together to store energy generated by the solar panels. The batteries are typically deep cycle batteries, designed to withstand the repeated charge and discharge cycles that occur in a solar power system.
The primary components of a solar battery bank include:
- Batteries: Deep cycle batteries, such as lead-acid or lithium-ion batteries, designed for use in solar power systems.
- Battery Management System (BMS): A system that monitors and controls the charging and discharging of the batteries, ensuring they operate within safe limits.
- Charge Controller: A device that regulates the flow of energy from the solar panels to the battery bank, preventing overcharging.
- Inverter/Charger: A device that converts DC power from the battery bank to AC power for use in the home or business.
Wiring a Solar Battery Bank

Wiring a solar battery bank requires careful planning and attention to detail to ensure a safe and efficient system. Here's a step-by-step guide to help you get started:
Step 1: Plan Your Battery Bank Configuration
Before starting the wiring process, determine the configuration of your battery bank. The most common configurations are:
- Series Configuration: Batteries connected in series, with the positive terminal of one battery connected to the negative terminal of the next battery.

- Parallel Configuration: Batteries connected in parallel, with all positive terminals connected together and all negative terminals connected together.
- Series-Parallel Configuration: A combination of series and parallel configurations, offering a higher voltage and capacity.
Step 2: Choose the Correct Wire Size
Choose the correct wire size for your battery bank, taking into account the voltage and current requirements of your system. A general rule of thumb is to use a wire size that can handle at least 1.5 times the maximum expected current.
Step 3: Connect the Batteries
Connect the batteries in the desired configuration, using the correct wire size and type (e.g., copper or aluminum). Ensure all connections are secure and tightened properly.
Step 4: Install the Battery Management System (BMS)
Install the BMS, following the manufacturer's instructions. The BMS should be connected to each battery, monitoring voltage, temperature, and state of charge.
Step 5: Connect the Charge Controller
Connect the charge controller to the battery bank, following the manufacturer's instructions. The charge controller should be connected to the positive terminal of the first battery in the series or parallel configuration.
Step 6: Connect the Inverter/Charger
Connect the inverter/charger to the battery bank, following the manufacturer's instructions. The inverter/charger should be connected to the positive terminal of the last battery in the series or parallel configuration.
Step 7: Test the System
Test the system to ensure it's functioning correctly, checking for:
- Voltage: Verify the voltage of the battery bank matches the expected voltage.
- Current: Verify the current drawn from the battery bank matches the expected current.
- State of Charge: Verify the state of charge of the batteries matches the expected state of charge.
Safety Precautions
When wiring a solar battery bank, it's essential to follow safety precautions to avoid injury or damage to the system:
- Wear protective gear: Wear protective gear, such as gloves and safety glasses, when handling batteries and electrical components.
- Ensure proper ventilation: Ensure proper ventilation when working with batteries, as they can emit hydrogen gas.
- Avoid short circuits: Avoid short circuits by ensuring all connections are secure and tightened properly.
- Follow manufacturer instructions: Follow the manufacturer's instructions for each component, including the BMS, charge controller, and inverter/charger.
Common Mistakes to Avoid
When wiring a solar battery bank, there are several common mistakes to avoid:
- Incorrect wire size: Using a wire size that's too small can lead to overheating and reduce system efficiency.
- Insufficient ventilation: Insufficient ventilation can lead to the accumulation of hydrogen gas, increasing the risk of explosion.
- Incorrect battery configuration: Incorrect battery configuration can lead to reduced system efficiency and lifespan.
- Inadequate testing: Inadequate testing can lead to system failures and reduced lifespan.
Conclusion
Wiring a solar battery bank requires careful planning and attention to detail to ensure a safe and efficient system. By following the steps outlined in this guide, you can create a reliable and efficient solar power system that meets your energy needs. Remember to always follow safety precautions and manufacturer instructions to avoid injury or damage to the system. With the right knowledge and skills, you can harness the power of solar energy and reduce your reliance on fossil fuels.
Additional Resources
For more information on wiring a solar battery bank, we recommend consulting the following resources:
- National Electric Code (NEC): A comprehensive guide to electrical wiring and safety standards.
- Manufacturer instructions: Consult the manufacturer's instructions for each component, including the BMS, charge controller, and inverter/charger.
- Online forums and communities: Join online forums and communities to connect with experienced solar professionals and enthusiasts.
By following the guidelines and best practices outlined in this article, you can create a safe and efficient solar battery bank that meets your energy needs and contributes to a sustainable future.


