Determine the size of your solar panel array and the capacity of your battery bank. This will help you choose the right MPPT charge controller and ensure that your system is properly sized.

Consider the following factors when planning your system:
- The wattage of your solar panel array
- The voltage and current output of your solar panel array
- The capacity of your battery bank (in amp-hours)
- The charging voltage and current requirements of your battery bank
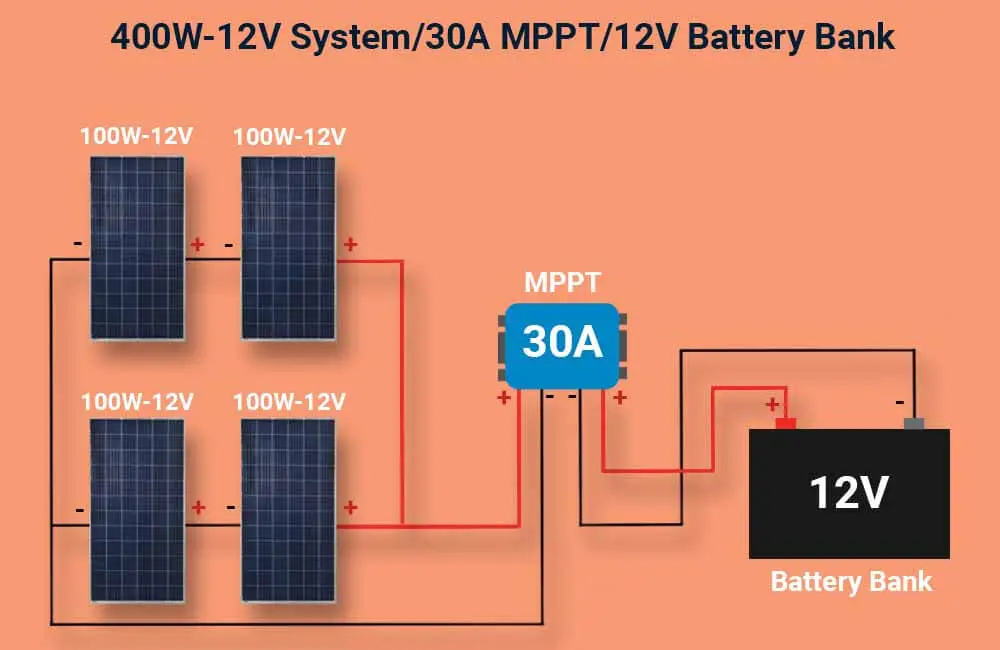
Step 2: Connect the Solar Panel to the MPPT Charge Controller
To connect the solar panel to the MPPT charge controller, follow these steps:
- Locate the positive and negative ports on the solar panel. These are usually marked with a "+" and "-" sign.
- Locate the input ports on the MPPT charge controller. These are usually marked with a "+" and "-" sign.
- Connect the positive wire from the solar panel to the positive input port on the MPPT charge controller.
- Connect the negative wire from the solar panel to the negative input port on the MPPT charge controller.
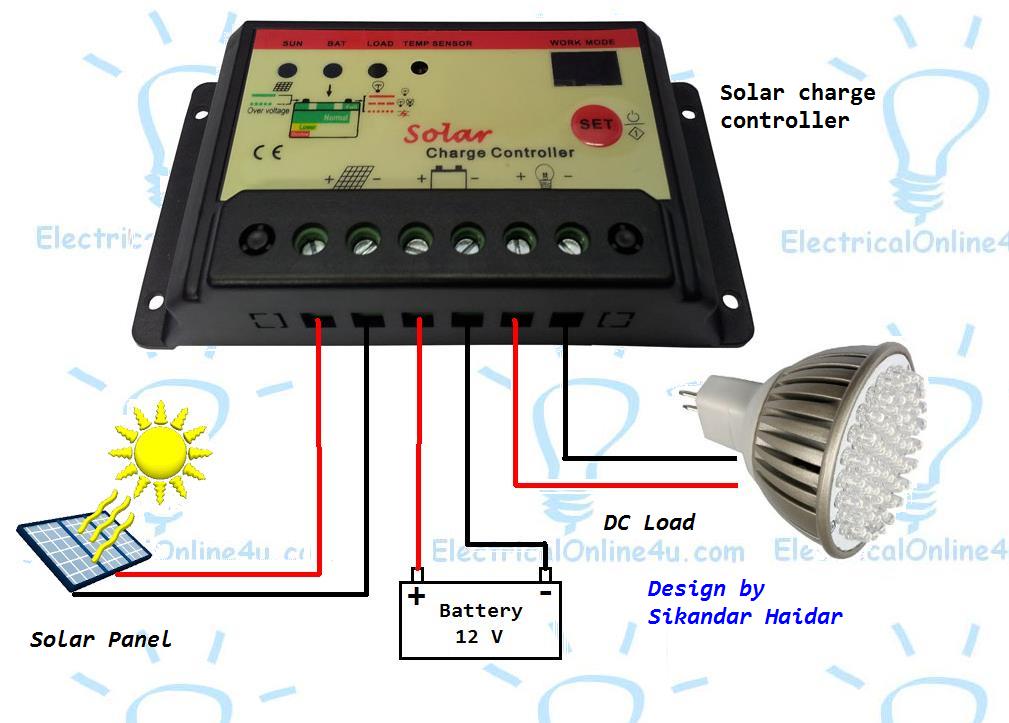
Step 3: Connect the Battery to the MPPT Charge Controller
To connect the battery to the MPPT charge controller, follow these steps:
- Locate the positive and negative ports on the battery. These are usually marked with a "+" and "-" sign.
- Locate the output ports on the MPPT charge controller. These are usually marked with a "+" and "-" sign.

- Connect the positive wire from the battery to the positive output port on the MPPT charge controller.
- Connect the negative wire from the battery to the negative output port on the MPPT charge controller.
Step 4: Set Up the MPPT Charge Controller
To set up the MPPT charge controller, follow these steps:
- Read the user manual that comes with the MPPT charge controller to understand its features and settings.
- Set the charging voltage and current limits according to the specifications of your battery bank.
- Set the maximum power point tracking (MPPT) mode to "on" to enable the charge controller to track the maximum power point of the solar panel.
- Set the charging algorithm to the recommended setting for your battery type (e.g., Flooded, AGM, or Lithium).
Step 5: Add Fuses and Connectors (Optional)
If you want to add an extra layer of protection to your system, you can install fuses between the solar panel and the MPPT charge controller, and between the MPPT charge controller and the battery.
- Install a fuse holder and fuse on the positive wire between the solar panel and the MPPT charge controller.
- Install a fuse holder and fuse on the positive wire between the MPPT charge controller and the battery.
- Use MC4 or similar connectors to connect the wires to the solar panel, MPPT charge controller, and battery.
Step 6: Insulate and Protect the Wires
To insulate and protect the wires, follow these steps:
- Use insulation tape or heat shrink tubing to cover any exposed wires or connections.
- Mount the MPPT charge controller and other components in a safe and dry location, away from direct sunlight and moisture.
Step 7: Test the System
To test the system, follow these steps:
- Connect a multimeter to the positive and negative wires of the solar panel to measure the voltage and current output.
- Connect a multimeter to the positive and negative wires of the battery to measure the voltage and current output.
- Turn on the MPPT charge controller and verify that it is charging the battery correctly.
- Monitor the system performance over time to ensure that it is operating efficiently and safely.
Conclusion
Wiring a solar panel to an MPPT charge controller is a relatively straightforward process, but it requires careful planning and attention to detail. By following the steps outlined in this article, you can create a safe and efficient solar charging system that will provide you with a reliable source of renewable energy.
Remember to always follow the manufacturer's instructions and guidelines for the specific components used in your system, and to take necessary safety precautions when working with electrical systems.
Additional Tips and Considerations
- Always use the correct wire size and type for your system to minimize energy losses and ensure safe operation.
- Consider using a battery monitor or remote display to track your system's performance and receive alerts if any issues arise.
- Regularly inspect and maintain your system to ensure that it is operating efficiently and safely.
- Consider upgrading to a more efficient MPPT charge controller or adding additional features, such as a remote monitoring system or a backup power source.
By following these tips and considering the specific needs and requirements of your system, you can create a reliable and efficient solar charging system that will provide you with a sustainable source of energy for years to come.