A well-designed solar power system can provide a reliable and sustainable source of energy for your RV, allowing you to enjoy the freedom of the open road while minimizing your environmental footprint. In this article, we will discuss the importance of a solar power battery bank wiring diagram for RV and provide a comprehensive guide on how to design and install a safe and efficient system.
Why Solar Power for RV?
Solar power is an attractive option for RV owners due to its numerous benefits. Some of the advantages of solar power for RV include:
- Renewable Energy Source: Solar power is a renewable energy source that reduces your reliance on fossil fuels and minimize your carbon footprint.
- Cost-Effective: Solar power can save you money on energy costs in the long run, especially if you spend extended periods boondocking or dry camping.
- Increased Freedom: With a solar power system, you can camp in remote areas without worrying about finding a power source.
- Low Maintenance: Solar panels require minimal maintenance and can last for up to 25 years or more.
Components of a Solar Power System
A solar power system for RV consists of several key components, including:
- Solar Panels: These are the components that convert sunlight into electrical energy.
- Charge Controller: This device regulates the flow of energy from the solar panels to the battery bank.
- Battery Bank: This is the storage system that holds the energy generated by the solar panels.
- Inverter/Charger: This device converts the DC power from the battery bank to AC power for use in the RV.
- Wiring and Connectors: These are the components that connect the various parts of the system together.
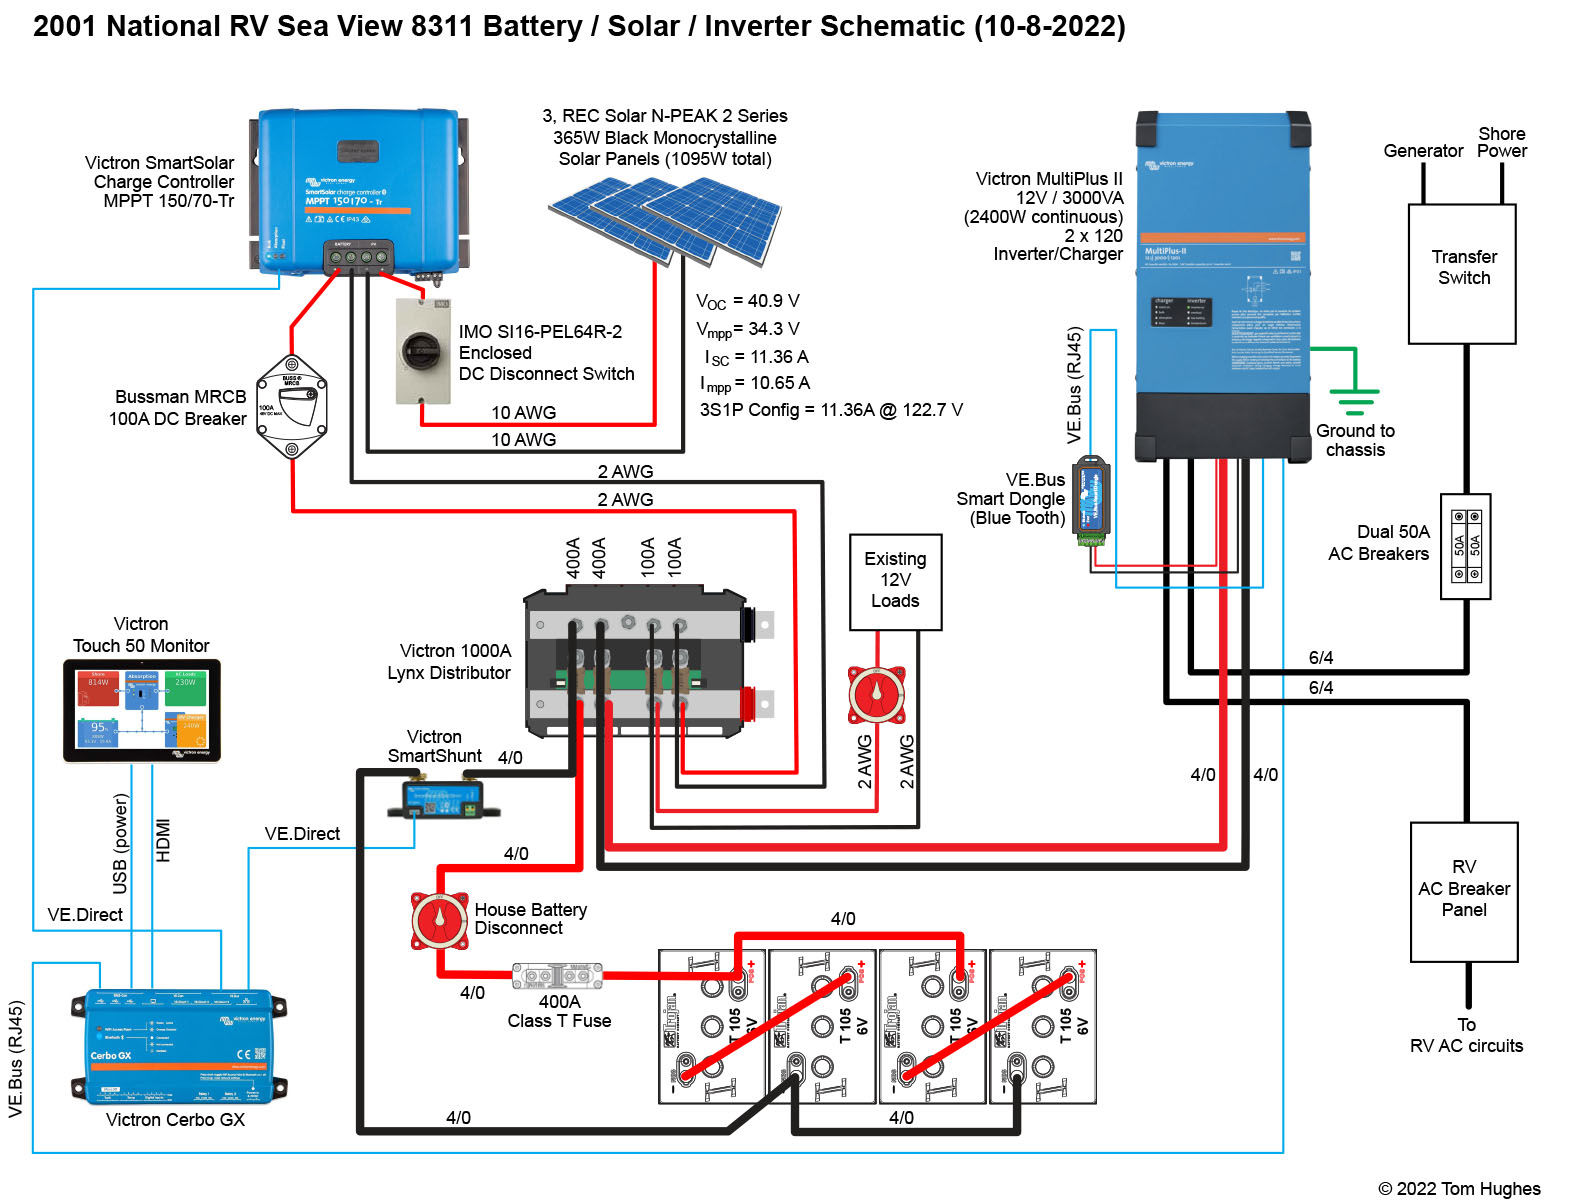
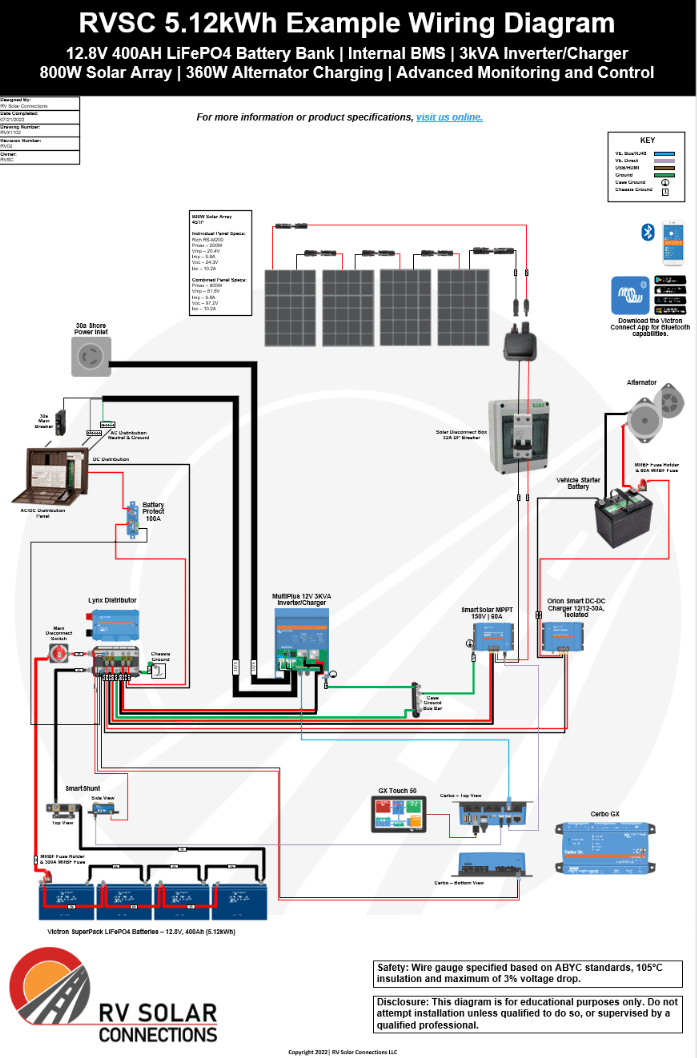
Solar Power Battery Bank Wiring Diagram
A solar power battery bank wiring diagram is a critical component of a safe and efficient solar power system. The diagram provides a visual representation of the system's wiring and connections, making it easier to install, troubleshoot, and maintain the system.
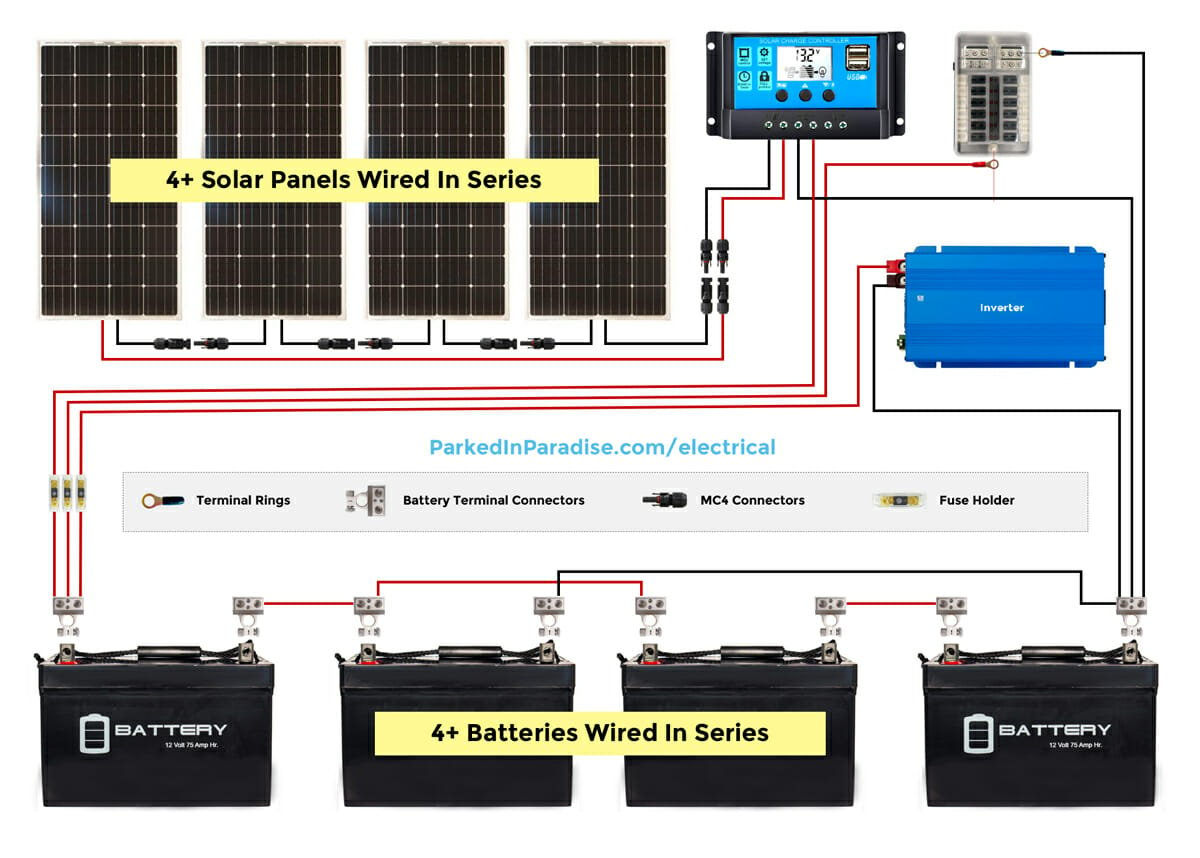
A typical solar power battery bank wiring diagram for RV includes the following components:
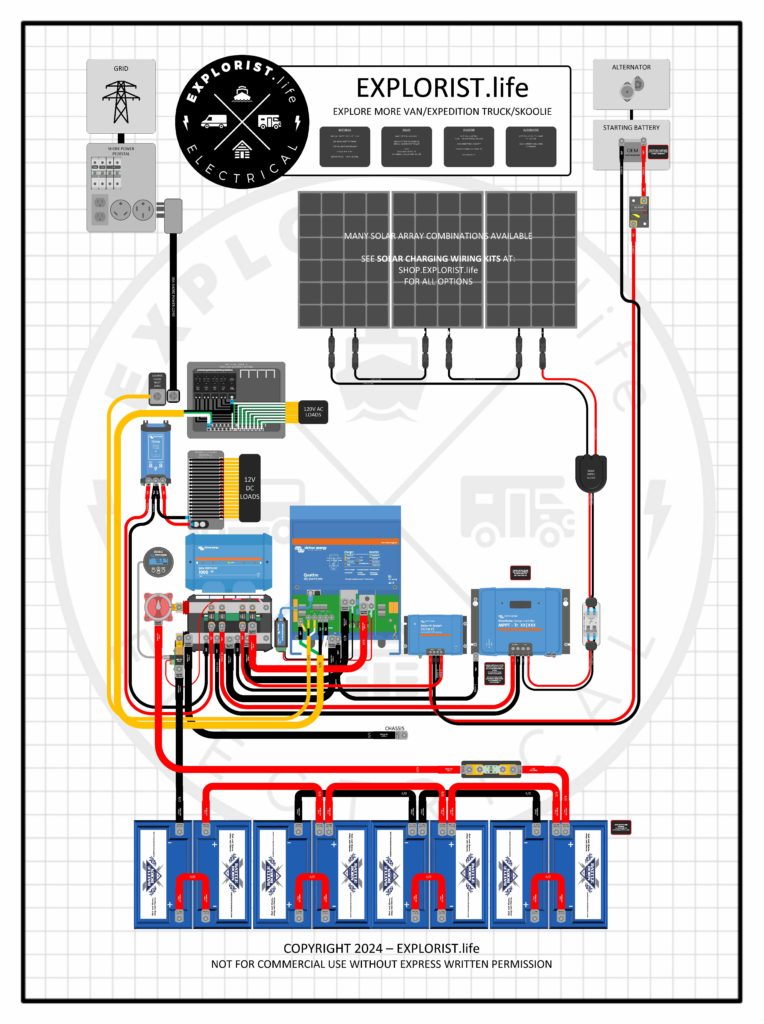
- Solar Panel Array: This is the collection of solar panels that generate energy for the system.
- Charge Controller: This device is connected to the solar panel array and regulates the flow of energy to the battery bank.
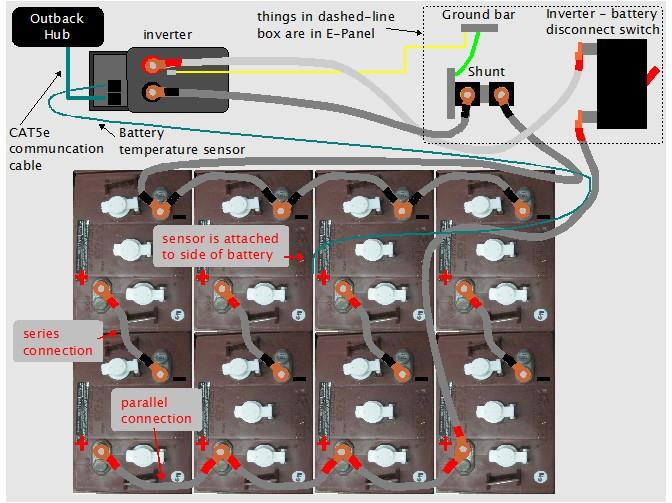
- Battery Bank: This is the storage system that holds the energy generated by the solar panels.
- Inverter/Charger: This device is connected to the battery bank and converts the DC power to AC power for use in the RV.
- Grounding System: This is a critical component that provides a safe path to ground for the system.
Designing a Solar Power Battery Bank Wiring Diagram
Designing a solar power battery bank wiring diagram requires careful consideration of several factors, including:
- System Size: The size of the system will depend on your energy needs and the size of your RV.
- Panel Configuration: The configuration of the solar panels will depend on the available space on your RV and the amount of energy you need to generate.
- Battery Bank Size: The size of the battery bank will depend on your energy storage needs and the depth of discharge you require.
- Inverter/Charger Size: The size of the inverter/charger will depend on your power requirements and the size of your battery bank.
- Wiring and Connectors: The wiring and connectors used in the system must be sized and rated for the maximum amount of energy the system will generate.
Installing a Solar Power Battery Bank Wiring Diagram
Installing a solar power battery bank wiring diagram requires careful attention to detail and a thorough understanding of electrical systems. Here are some general steps to follow:
- Plan the System: Plan the system carefully, taking into account your energy needs and the size of your RV.
- Install the Solar Panels: Install the solar panels on the RV, ensuring they are securely fastened and angled for maximum energy generation.
- Install the Charge Controller: Install the charge controller, connecting it to the solar panel array and the battery bank.
- Install the Battery Bank: Install the battery bank, connecting it to the charge controller and the inverter/charger.
- Install the Inverter/Charger: Install the inverter/charger, connecting it to the battery bank and the RV's electrical system.
- Connect the Wiring: Connect the wiring and connectors, ensuring they are sized and rated for the maximum amount of energy the system will generate.
- Test the System: Test the system to ensure it is working safely and efficiently.
Safety Considerations
Solar power systems can be safe and efficient, but they also pose some safety risks if not installed and maintained properly. Here are some safety considerations to keep in mind:
- Electrical Shock: Electrical shock is a serious risk when working with electrical systems. Ensure you take proper precautions, such as wearing protective gear and following safe wiring practices.
- Fire Risk: Solar power systems can pose a fire risk if not installed and maintained properly. Ensure you follow proper installation and maintenance procedures to minimize this risk.
- Overcharging: Overcharging can damage the battery bank and reduce its lifespan. Ensure you use a charge controller to regulate the flow of energy to the battery bank.
Conclusion
A solar power battery bank wiring diagram is a critical component of a safe and efficient solar power system for RV. By understanding the components of a solar power system and designing a wiring diagram that meets your energy needs, you can enjoy the benefits of solar power while minimizing your environmental footprint. Remember to follow proper installation and maintenance procedures to ensure the system is safe and efficient, and always take safety considerations into account when working with electrical systems.
Additional Tips and Recommendations
- Consult a Professional: If you are not experienced with electrical systems, consider consulting a professional to design and install your solar power system.
- Use High-Quality Components: Use high-quality components, such as solar panels, charge controllers, and inverters, to ensure the system is safe and efficient.
- Monitor the System: Monitor the system regularly to ensure it is working safely and efficiently, and make adjustments as needed.
- Follow Manufacturer Instructions: Follow the manufacturer's instructions for the components and the system as a whole to ensure proper installation and maintenance.
- Consider a Backup System: Consider installing a backup system, such as a generator or a second battery bank, to provide power during periods of low sunlight or high energy demand.
By following these tips and recommendations, you can enjoy the benefits of solar power while minimizing your environmental footprint and ensuring a safe and efficient system. Happy camping!