However, setting up an off-grid solar panel system can be a daunting task, especially when it comes to wiring the system. In this article, we will provide a step-by-step guide on how to wire an off-grid solar panel system to an inverter, ensuring a safe and efficient connection.

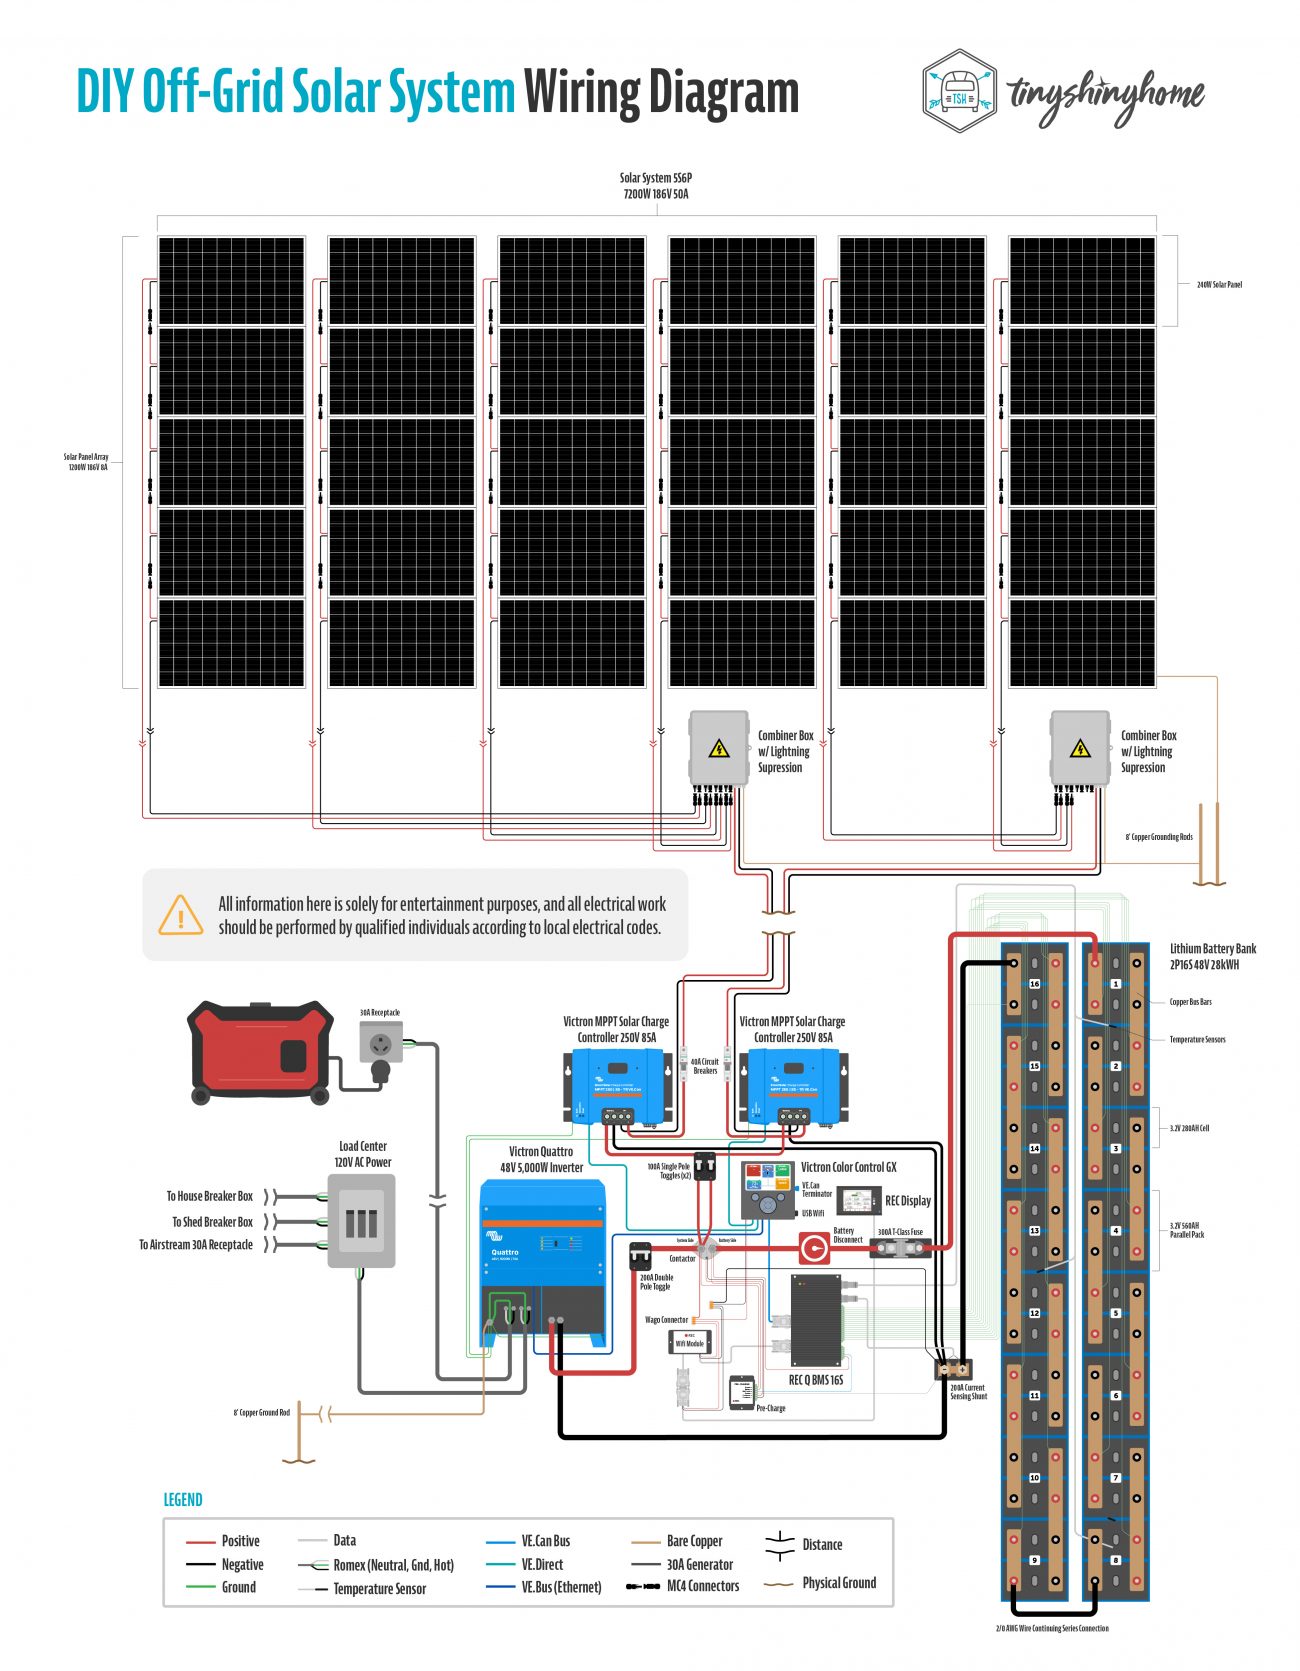
Introduction to Off-Grid Solar Panel Systems
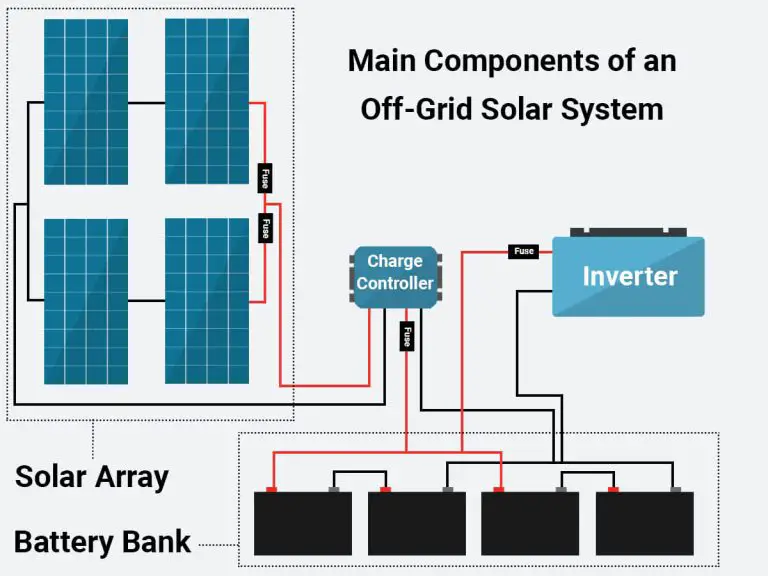
Before we dive into the wiring process, it's essential to understand the basic components of an off-grid solar panel system. The primary components include:
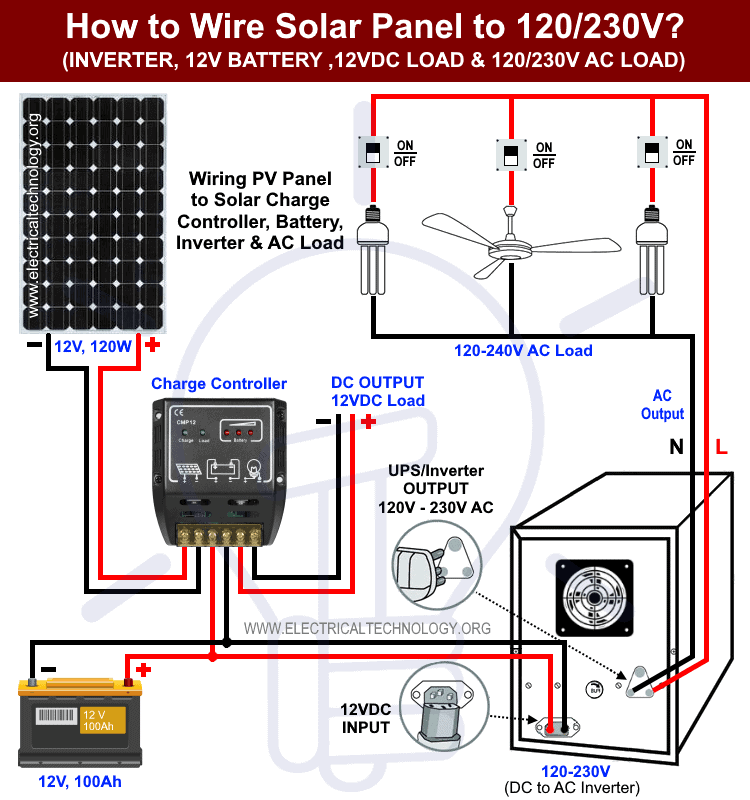
- Solar Panels: These convert sunlight into DC (direct current) electricity.
- Charge Controller: Regulates the flow of energy from the solar panels to the battery bank.
- Battery Bank: Stores excess energy generated by the solar panels for later use.
- Inverter: Converts DC power from the battery bank to AC (alternating current) power for household use.
- Mounting Hardware: Secures the solar panels to the roof or a grounding system.
Step 1: Plan Your System
Before starting the wiring process, it's crucial to plan your system carefully. Consider the following factors:
- Determine Your Energy Needs: Calculate your daily energy requirements to determine the size of your solar panel system.
- Choose the Right Components: Select solar panels, a charge controller, battery bank, and inverter that match your energy needs.
- Ensure Compatibility: Verify that all components are compatible with each other.
- Create a Wiring Diagram: Draw a detailed wiring diagram to help you visualize the connections and ensure a safe and efficient setup.
Step 2: Prepare the Solar Panel Array
- Mount the Solar Panels: Install the solar panels on the roof or a grounding system, ensuring they are securely fastened and angled for optimal energy generation.
- Connect the Solar Panels in Series and/or Parallel: Connect the solar panels in series and/or parallel to achieve the desired voltage and current output.
- Use MC4 Connectors: Use MC4 connectors to connect the solar panels, as they are designed for outdoor use and can withstand the elements.
Step 3: Connect the Solar Panel Array to the Charge Controller
- Use the Correct Cable Size: Use a cable size that is suitable for the voltage and current output of the solar panel array.
- Connect the Positive and Negative Terminals: Connect the positive terminal of the solar panel array to the positive terminal of the charge controller, and the negative terminal of the solar panel array to the negative terminal of the charge controller.
- Secure the Connections: Use cable ties or electrical tape to secure the connections and prevent damage from the elements.
Step 4: Connect the Charge Controller to the Battery Bank
- Use the Correct Cable Size: Use a cable size that is suitable for the voltage and current output of the charge controller.
- Connect the Positive and Negative Terminals: Connect the positive terminal of the charge controller to the positive terminal of the battery bank, and the negative terminal of the charge controller to the negative terminal of the battery bank.
- Set the Charge Controller Parameters: Set the charge controller parameters to match the battery bank's requirements, such as voltage, current, and charging mode.
Step 5: Connect the Battery Bank to the Inverter
- Use the Correct Cable Size: Use a cable size that is suitable for the voltage and current output of the battery bank.
- Connect the Positive and Negative Terminals: Connect the positive terminal of the battery bank to the positive terminal of the inverter, and the negative terminal of the battery bank to the negative terminal of the inverter.
- Set the Inverter Parameters: Set the inverter parameters to match the battery bank's requirements, such as voltage, current, and output frequency.
Step 6: Connect the Inverter to the Load Center
- Use the Correct Cable Size: Use a cable size that is suitable for the voltage and current output of the inverter.
- Connect the Output Terminals: Connect the output terminals of the inverter to the load center, which distributes the AC power to the household.
- Ensure Proper Grounding: Ensure that the inverter and load center are properly grounded to prevent electrical shock and ensure safe operation.
Step 7: Test the System
- Verify the Connections: Verify that all connections are secure and not loose.
- Check the Voltage and Current: Check the voltage and current output of the solar panel array, charge controller, and inverter to ensure they are within the specified ranges.
- Test the Inverter: Test the inverter to ensure it is functioning correctly and producing the desired output.
Step 8: Monitor and Maintain the System
- Monitor the System Performance: Monitor the system performance regularly to ensure it is operating efficiently and effectively.
- Perform Regular Maintenance: Perform regular maintenance tasks, such as cleaning the solar panels, checking the battery bank water levels, and verifying the connections, to ensure the system continues to operate safely and efficiently.
Conclusion
Wiring an off-grid solar panel system to an inverter requires careful planning, attention to detail, and a thorough understanding of the components and their connections. By following the step-by-step guide outlined in this article, you can ensure a safe and efficient connection, and enjoy the benefits of renewable energy. Remember to always follow proper safety protocols and consult the manufacturer's instructions for specific components to ensure a successful and trouble-free installation. With proper installation and maintenance, your off-grid solar panel system will provide you with reliable and clean energy for years to come.


