However, setting up an off-grid solar power system can be a daunting task, especially when it comes to wiring. In this article, we will provide a step-by-step guide on how to wire a DIY off-grid solar power system, ensuring a safe and efficient installation.
Introduction to Off-Grid Solar Power Systems
An off-grid solar power system is a self-sufficient energy system that generates electricity from solar panels and stores it in batteries for later use. The system consists of several components, including solar panels, a charge controller, a battery bank, an inverter, and a load center. The wiring of these components is critical to ensure the system operates safely and efficiently.
Components of an Off-Grid Solar Power System
Before we dive into the wiring process, let's take a look at the components involved in an off-grid solar power system:
- Solar Panels: These are the primary energy generators of the system, converting sunlight into direct current (DC) electricity.
- Charge Controller: This device regulates the flow of energy from the solar panels to the battery bank, preventing overcharging and ensuring the batteries are charged efficiently.
- Battery Bank: A group of deep cycle batteries that store excess energy generated by the solar panels for later use.
- Inverter: This device converts the DC electricity stored in the batteries into alternating current (AC) electricity, which is usable by household appliances.
- Load Center: The main electrical panel that distributes power to various loads, such as lights, refrigerators, and computers.
Wiring Considerations
Before starting the wiring process, it's essential to consider the following factors:
- System Voltage: The voltage of the system, which is typically 12V, 24V, or 48V.

- System Current: The maximum current that will flow through the system, which depends on the size of the solar array and the load.
- Wire Size: The correct wire size to use, which depends on the system current and voltage.
- Grounding: A safe and reliable grounding system is essential to prevent electrical shock and ensure the system operates efficiently.
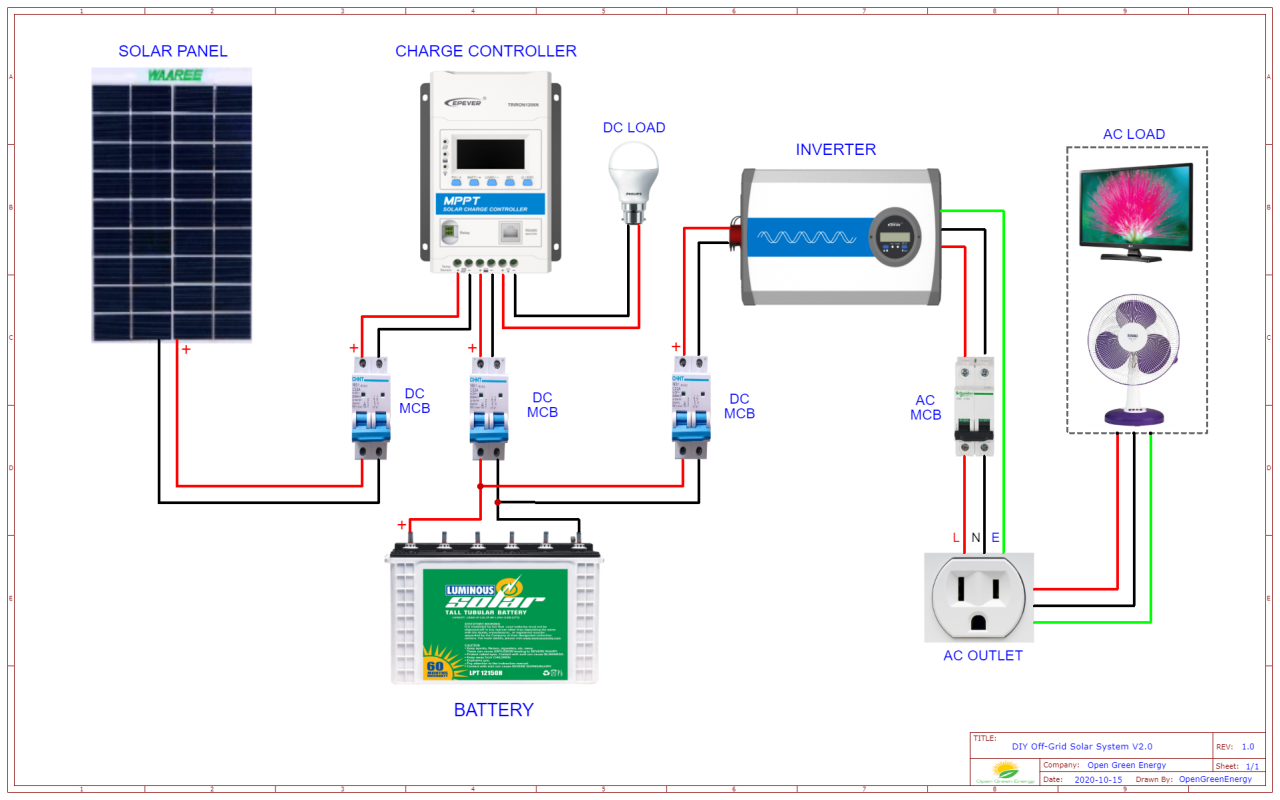
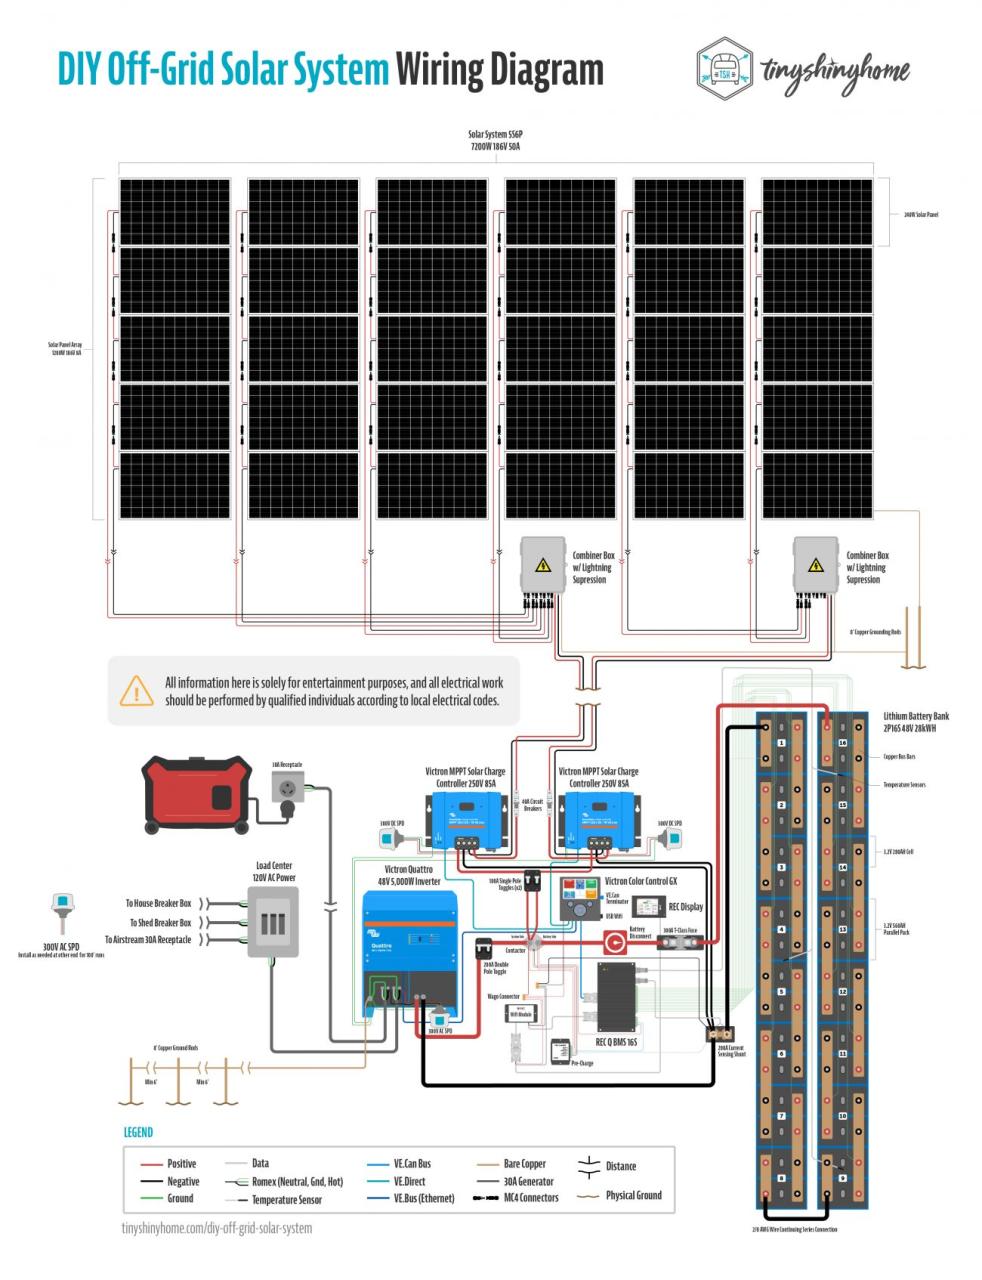
Wiring the Solar Array
The solar array is the first component to be wired in the off-grid solar power system. The following steps will guide you through the process:
- Connect the Solar Panels: Connect the positive and negative terminals of each solar panel to the corresponding terminals of the next panel, creating a series connection.
- Add a Combiner Box: Connect the series-connected solar panels to a combiner box, which combines the output of multiple strings of solar panels.
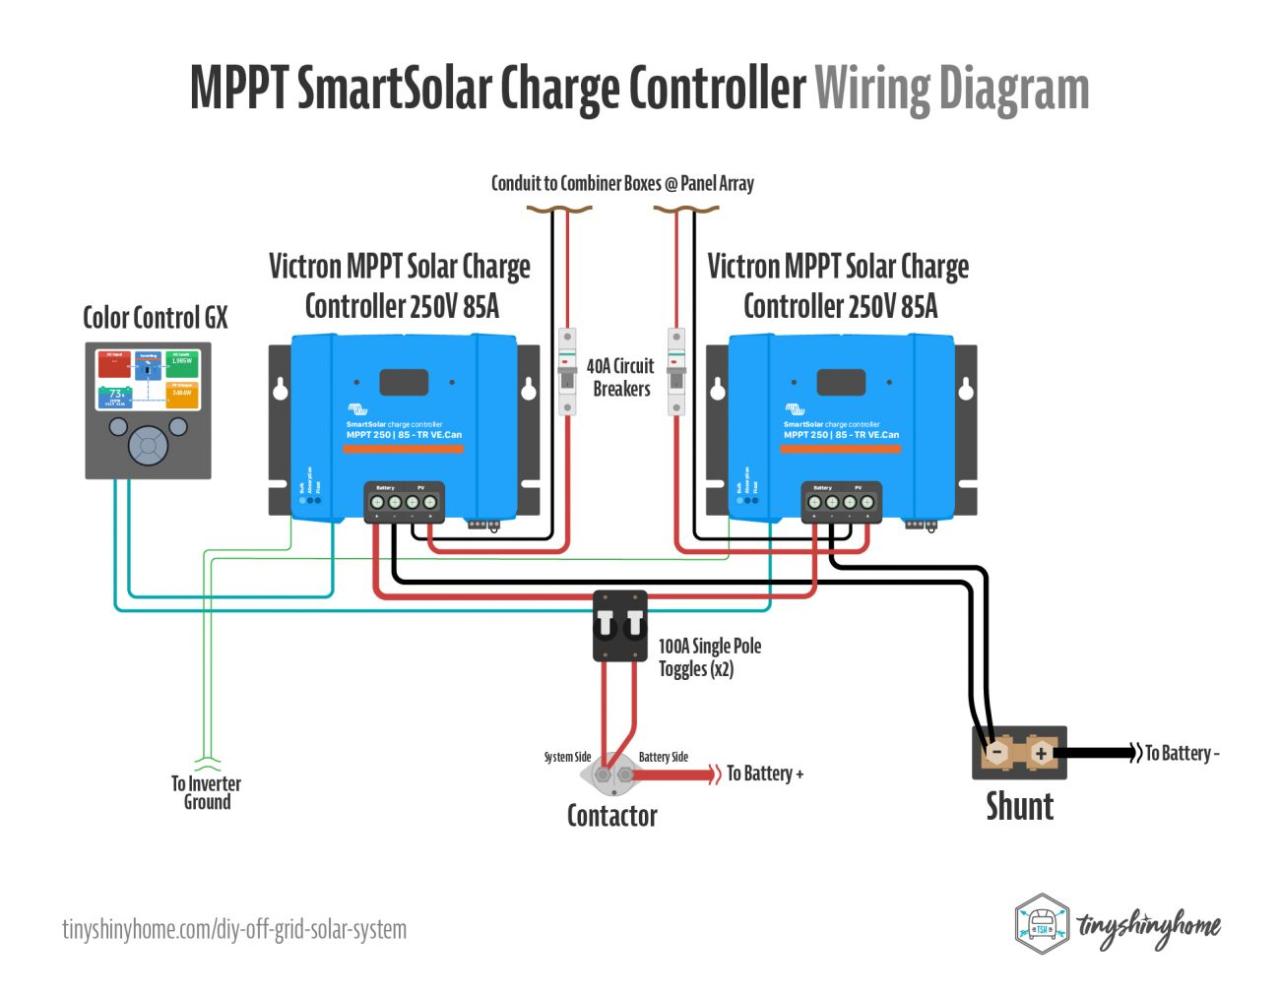
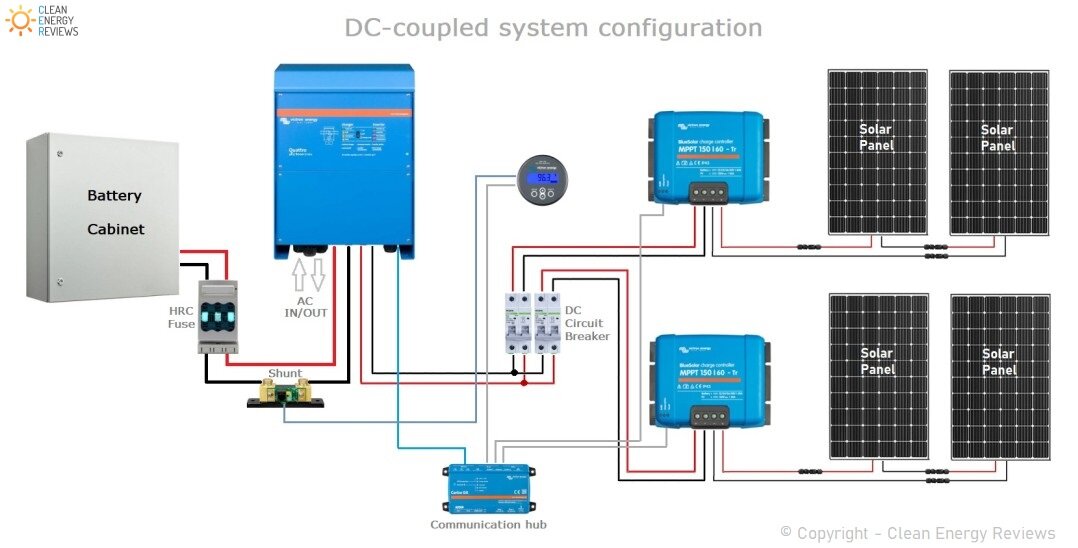
- Connect to the Charge Controller: Connect the combiner box to the charge controller, ensuring the correct polarity and voltage.
Wiring the Charge Controller
The charge controller is the next component to be wired. The following steps will guide you through the process:
- Connect the Charge Controller to the Battery Bank: Connect the output of the charge controller to the battery bank, ensuring the correct polarity and voltage.
- Connect the Charge Controller to the Solar Array: Connect the input of the charge controller to the solar array, ensuring the correct polarity and voltage.
- Configure the Charge Controller: Configure the charge controller to regulate the flow of energy from the solar array to the battery bank.
Wiring the Battery Bank
The battery bank is a critical component of the off-grid solar power system. The following steps will guide you through the wiring process:
- Connect the Batteries in Series: Connect the positive and negative terminals of each battery to the corresponding terminals of the next battery, creating a series connection.
- Connect the Battery Bank to the Inverter: Connect the output of the battery bank to the inverter, ensuring the correct polarity and voltage.
- Add a Battery Monitor: Install a battery monitor to track the state of charge and voltage of the battery bank.
Wiring the Inverter
The inverter is the final component to be wired. The following steps will guide you through the process:
- Connect the Inverter to the Battery Bank: Connect the input of the inverter to the battery bank, ensuring the correct polarity and voltage.
- Connect the Inverter to the Load Center: Connect the output of the inverter to the load center, ensuring the correct polarity and voltage.
- Configure the Inverter: Configure the inverter to convert the DC electricity from the battery bank to AC electricity for household use.
Grounding and Bonding
Grounding and bonding are critical components of an off-grid solar power system. The following steps will guide you through the process:
- Install a Grounding Rod: Install a grounding rod near the solar array and connect it to the system grounding point.
- Bond the System Components: Bond all system components, including the solar array, charge controller, battery bank, and inverter, to the system grounding point.
- Verify the Grounding System: Verify that the grounding system is safe and reliable, ensuring the system operates efficiently and preventing electrical shock.
Final Inspection and Testing
Before energizing the system, perform a final inspection and testing to ensure that:
- All connections are secure and correct: Verify that all connections are secure and correct, including polarity and voltage.
- The system is properly grounded: Verify that the grounding system is safe and reliable.
- The system operates efficiently: Verify that the system operates efficiently, generating and storing energy as expected.
Conclusion
Wiring a DIY off-grid solar power system requires careful planning and attention to detail. By following the steps outlined in this article, you can ensure a safe and efficient installation. Remember to always follow local electrical codes and regulations, and consider consulting a professional if you're unsure about any aspect of the process. With the right knowledge and equipment, you can enjoy the benefits of renewable energy and reduce your reliance on traditional grid electricity.