While installing an off-grid solar power system can seem daunting, the wiring process is a crucial step that requires careful attention to detail. In this article, we will provide a comprehensive, step-by-step guide to off-grid solar power wiring, helping you to navigate the process with confidence.
Introduction to Off-Grid Solar Power Systems
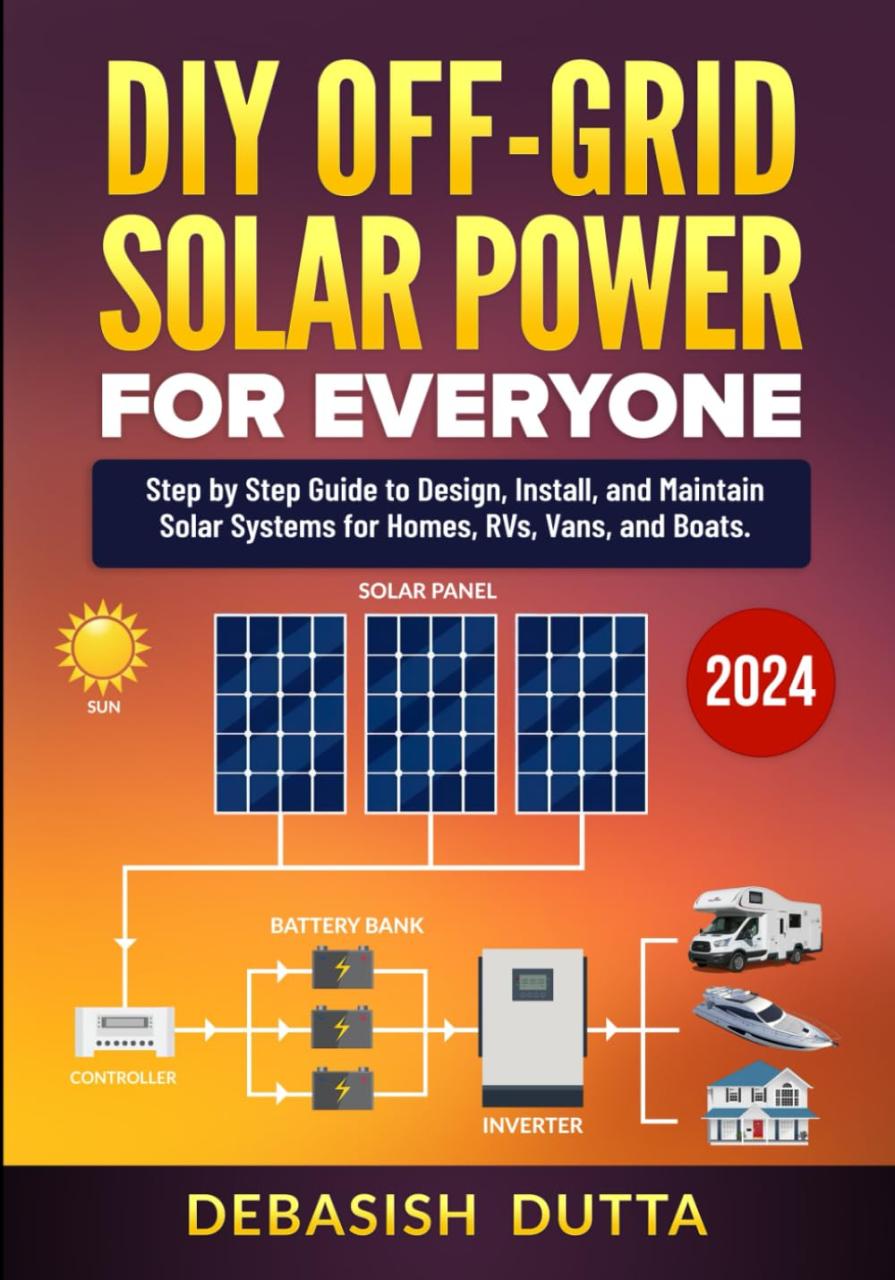
Before we dive into the wiring instructions, it's essential to understand the basic components of an off-grid solar power system. A typical system consists of:
- Solar Panels: These convert sunlight into direct current (DC) electricity.
- Charge Controller: This device regulates the flow of energy from the solar panels to the battery bank, preventing overcharging and damage.
- Battery Bank: A collection of deep cycle batteries that store excess energy generated by the solar panels for later use.
- Inverter/Charger: This device converts the DC energy stored in the battery bank into alternating current (AC) electricity, which is usable by household appliances.
- Load Center: A central hub that distributes AC power to various circuits and devices throughout the system.
Pre-Wiring Considerations

Before beginning the wiring process, it's essential to consider the following factors:
- System Size: Determine the size of your off-grid solar power system based on your energy needs and available space.
- Component Selection: Choose components that are compatible with each other and suitable for your system size.
- Wiring Size and Type: Select wiring that meets the American Wire Gauge (AWG) standards and is suitable for the voltage and current requirements of your system.

- Grounding and Bonding: Ensure that your system is properly grounded and bonded to prevent electrical shock and equipment damage.
Step 1: Prepare the Solar Panel Array
- Mount the Solar Panels: Install the solar panels on a suitable mounting structure, ensuring they are securely fastened and angled for optimal energy production.

- Connect the Solar Panels: Connect the solar panels in series and/or parallel to achieve the desired voltage and current output.
- Use MC4 Connectors: Use MC4 connectors to connect the solar panels to the charge controller, ensuring a secure and waterproof connection.
Step 2: Install the Charge Controller
- Mount the Charge Controller: Install the charge controller in a secure, dry location, such as a electrical panel or enclosure.
- Connect the Solar Panel Array: Connect the solar panel array to the charge controller, using MC4 connectors.
- Configure the Charge Controller: Configure the charge controller according to the manufacturer's instructions, setting parameters such as voltage, current, and charging modes.
Step 3: Install the Battery Bank
- Select a Suitable Location: Choose a well-ventilated, dry location for the battery bank, away from living areas and ignition sources.
- Connect the Batteries: Connect the batteries in series and/or parallel to achieve the desired voltage and capacity.
- Use Battery Interconnects: Use battery interconnects to connect the batteries, ensuring a secure and low-resistance connection.
Step 4: Install the Inverter/Charger
- Mount the Inverter/Charger: Install the inverter/charger in a secure, dry location, such as an electrical panel or enclosure.
- Connect the Battery Bank: Connect the battery bank to the inverter/charger, using battery interconnects.
- Configure the Inverter/Charger: Configure the inverter/charger according to the manufacturer's instructions, setting parameters such as voltage, frequency, and charging modes.
Step 5: Install the Load Center
- Mount the Load Center: Install the load center in a secure, dry location, such as an electrical panel or enclosure.
- Connect the Inverter/Charger: Connect the inverter/charger to the load center, using suitable wiring and connectors.
- Install Circuit Breakers: Install circuit breakers or fuses to protect the system from overloads and short circuits.
Step 6: Connect the Loads
- Determine the Load Requirements: Determine the load requirements of your system, including the type and number of appliances.
- Install Wiring and Connectors: Install wiring and connectors suitable for the load requirements, following the National Electric Code (NEC) guidelines.
- Connect the Loads: Connect the loads to the load center, using suitable wiring and connectors.
Step 7: Test and Commission the System
- Perform Safety Checks: Perform safety checks to ensure the system is properly grounded and bonded.
- Test the System: Test the system to ensure it is functioning correctly, checking for voltage, current, and power output.
- Monitor the System: Monitor the system performance, using tools such as a multi-meter and a monitoring system.
Conclusion
Off-grid solar power wiring requires careful attention to detail and a thorough understanding of the system components and wiring requirements. By following these step-by-step instructions, you can ensure a safe and efficient installation, providing you with a reliable source of renewable energy. Remember to always follow local electrical codes and regulations, and consult a professional if you are unsure about any aspect of the installation process.
Additional Tips and Considerations
- Always use suitable wiring and connectors, following the NEC guidelines and manufacturer's instructions.
- Ensure proper grounding and bonding to prevent electrical shock and equipment damage.
- Monitor the system performance regularly, using tools such as a multi-meter and a monitoring system.
- Keep the system well-maintained, performing regular inspections and repairs as needed.
- Consider installing a backup generator or other energy storage systems to ensure a reliable energy supply during periods of low solar radiation.
By following these guidelines and considering the unique requirements of your off-grid solar power system, you can create a reliable and efficient energy source that meets your needs and reduces your reliance on traditional energy sources.