Honda Civic 1998 Radio Wiring Harness Diagram: A Complete Guide for Installation
When it comes to upgrading or replacing the radio in your 1998 Honda Civic, having a clear understanding of the radio wiring harness diagram is essential. The wiring harness diagram provides crucial information about the electrical connections between the vehicle’s power, speakers, and the radio. If you’re planning to install a new aftermarket radio, knowing how to properly connect each wire is key to ensuring everything works as expected and preventing any damage to your car's electrical system.
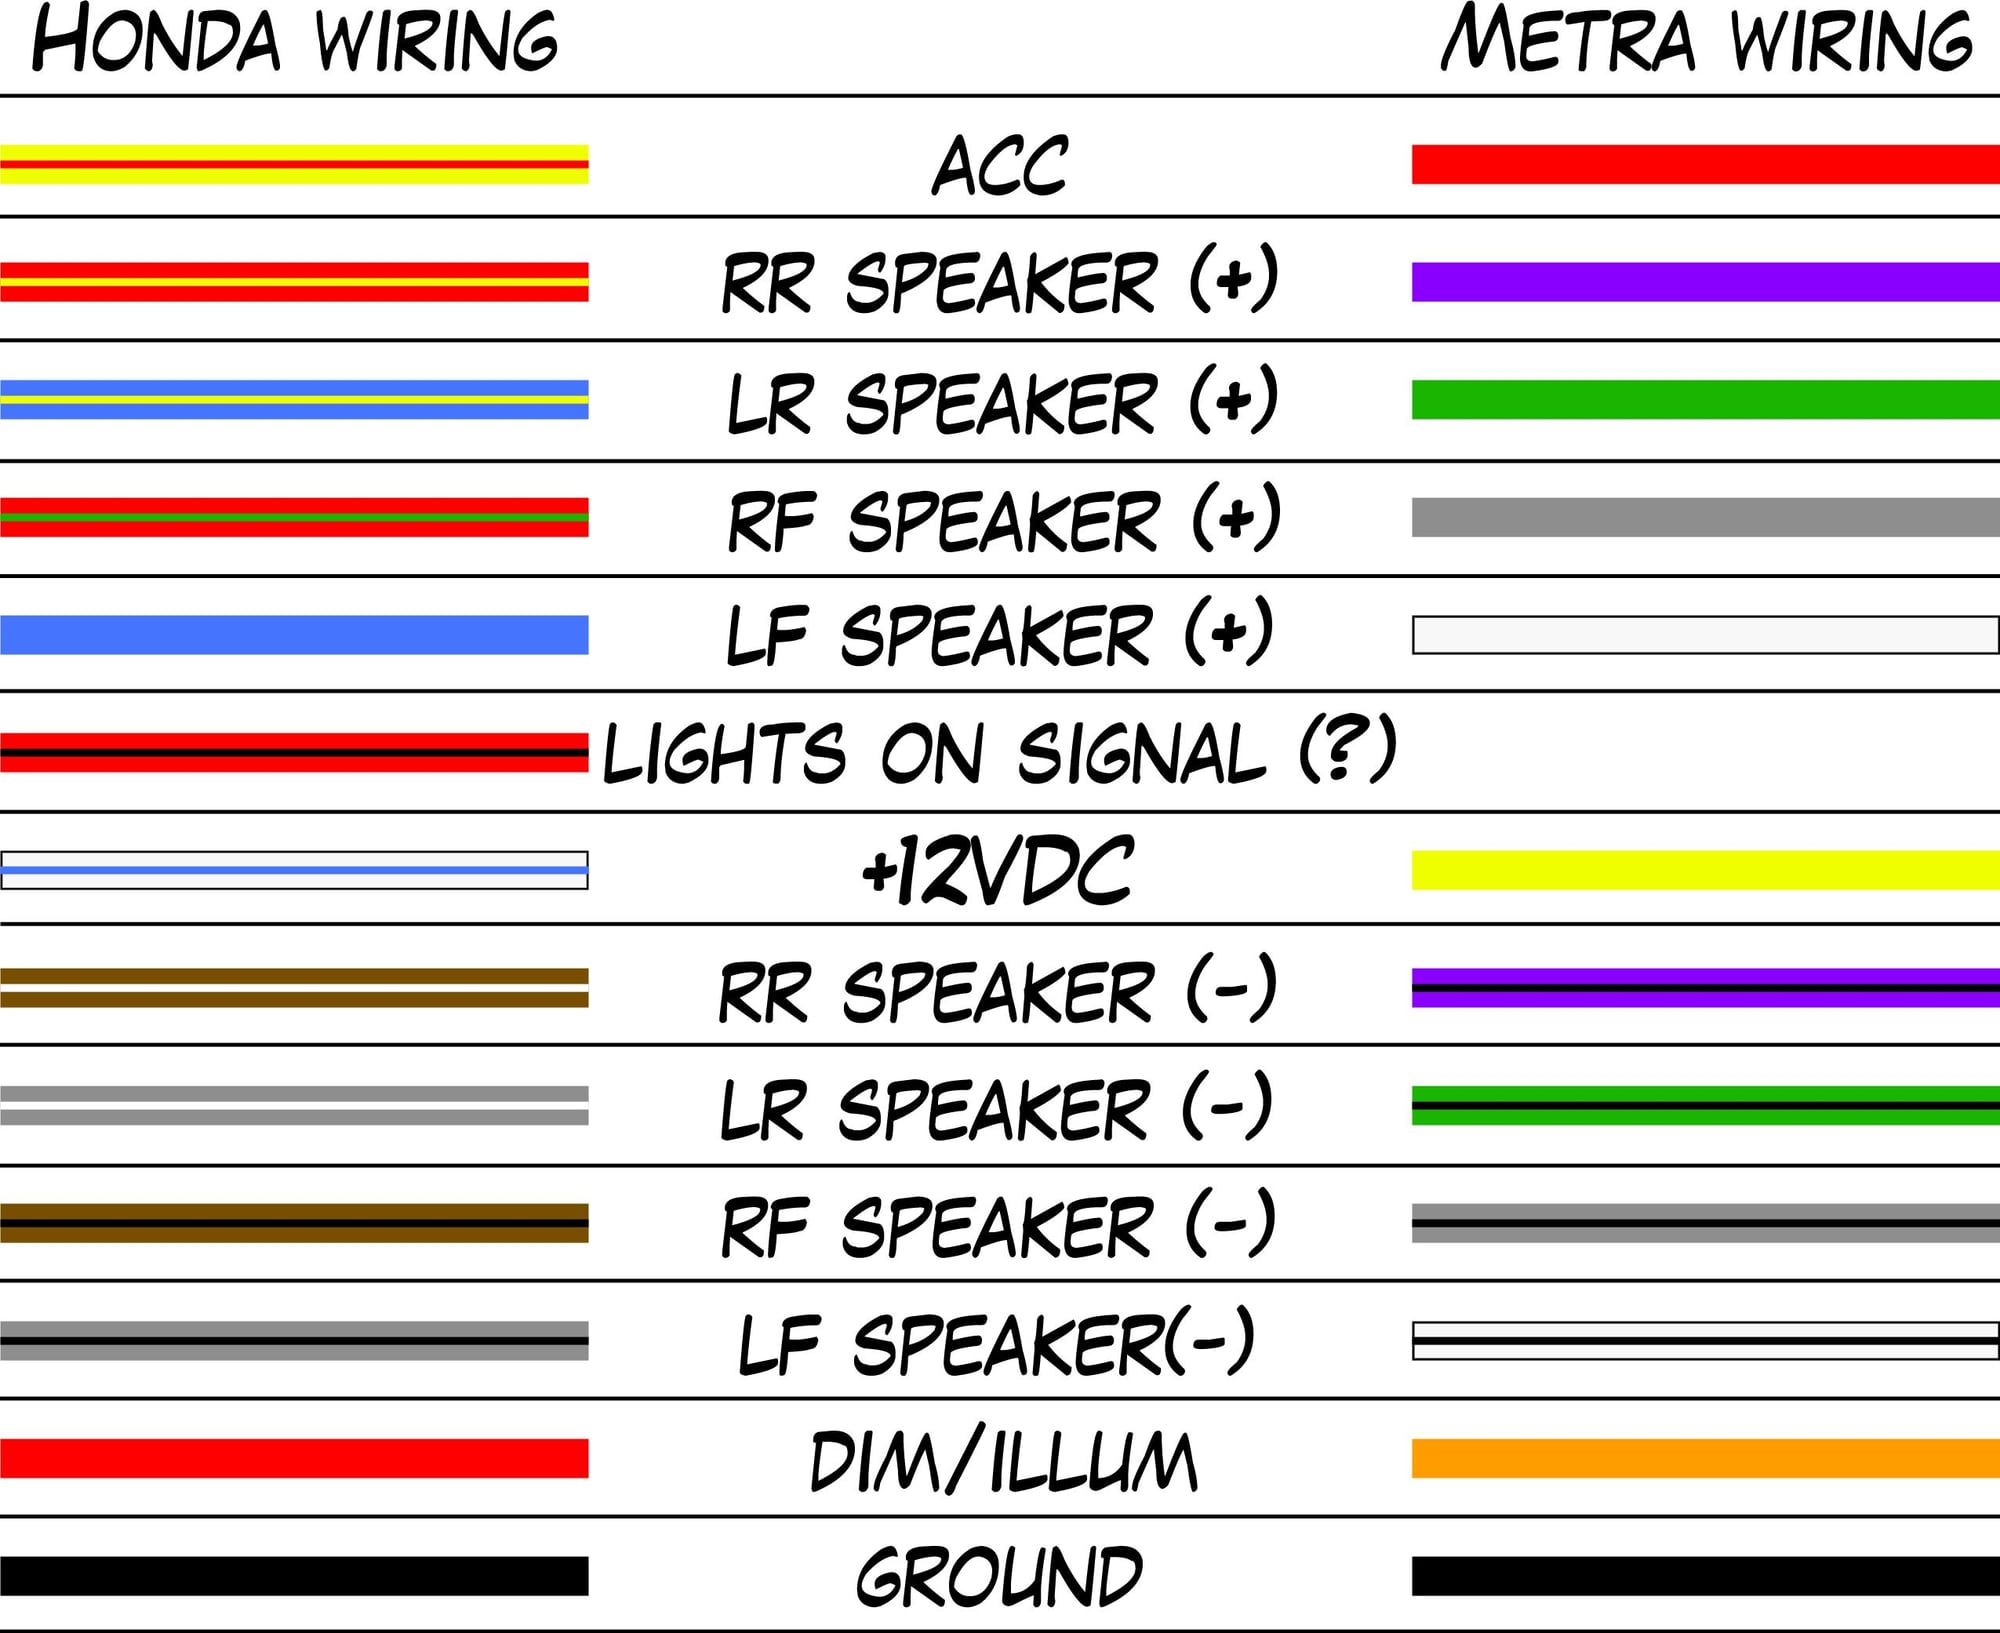
This article will guide you through the wiring diagram for the 1998 Honda Civic’s radio, including details on wire colors, connections, and installation tips for a successful upgrade.
Why Is the Radio Wiring Harness Important?
The radio wiring harness serves as a bridge between your vehicle’s electrical system and your aftermarket radio. It simplifies the process by providing a set of color-coded wires that correspond to specific functions. The importance of having the correct wiring diagram is clear: if wires are connected incorrectly, it can cause electrical issues or even damage the radio or vehicle’s electrical system.
In the case of the 1998 Honda Civic, the wiring harness includes essential connections such as power supply, ground, speaker wires, and illumination. Knowing which wire corresponds to which function will ensure that the installation process is smooth and that your radio works properly.
Understanding the Wiring Diagram for the 1998 Honda Civic
For a clearer understanding, let’s break down the key wire connections in the 1998 Honda Civic radio wiring diagram.
1. Power Supply and Ground Wires
- Blue/White Wire – Constant Power (12V+): This wire provides continuous power to your radio, even when the vehicle is turned off. This allows your radio to store settings and presets.
- Yellow/Red Wire – Switched Power (12V+): The switched power wire powers the radio when the ignition is on. This wire ensures that your radio only works when the vehicle is running.
- Black Wire – Ground: The ground wire is critical for completing the electrical circuit. It prevents electrical surges and ensures that the radio works properly. A proper ground connection is vital for preventing buzzing or interference in the audio.
- Red/Black Wire – Illumination: This wire controls the lighting of the radio face. When the headlights are turned on, this wire illuminates the radio’s display, allowing you to see it at night.
2. Speaker Wires
The speaker wires in the 1998 Honda Civic radio harness are color-coded to make it easy to identify the correct connection. Each speaker in your car will be connected to specific wires based on its location.
- Blue/Green Wire – Front Left Speaker: This wire connects to the front left speaker. It’s essential to ensure that you connect it to the correct speaker for proper sound.
- Gray/Black Wire – Front Left Speaker (Negative): This wire is the negative terminal for the front left speaker.
- Red/Green Wire – Front Right Speaker: This wire connects to the front right speaker.
- Brown/Black Wire – Front Right Speaker (Negative): This wire is the negative terminal for the front right speaker.
- Blue/Yellow Wire – Rear Left Speaker: This wire connects to the rear left speaker.
- Gray/White Wire – Rear Left Speaker (Negative): This wire is the negative terminal for the rear left speaker.
- Red/Yellow Wire – Rear Right Speaker: This wire connects to the rear right speaker.
- Brown/White Wire – Rear Right Speaker (Negative): This wire is the negative terminal for the rear right speaker.
Understanding which wire corresponds to each speaker is important for ensuring proper sound quality and stereo output. Misconnections can result in poor audio quality or no sound at all from certain speakers.
3. Antenna Wire
- Antenna Wire: This wire is responsible for receiving the signal from your car’s antenna to ensure that you can listen to radio stations clearly. Depending on your aftermarket radio model, you may need an adapter to connect the antenna wire to the new radio.
Installation Process
Now that you understand the wiring diagram, let’s move on to the steps for installing your new radio using the harness.
Step 1: Gather the Necessary Tools
Before you start, make sure you have all the necessary tools for the installation:
- Screwdrivers (Phillips and flathead)
- Wire stripper and crimping tool
- Electrical tape or heat shrink tubing
- Wiring harness adapter (optional but recommended)
- Multimeter (for testing connections)
Step 2: Remove the Old Radio
If you are replacing an existing radio, you will first need to remove the old unit. Follow these steps:
- Disconnect the Car Battery: To avoid any electrical shorts or shocks, disconnect the vehicle’s battery by removing the negative terminal.
- Remove the Dashboard Panel: Use a flathead screwdriver to gently pry off the trim panel surrounding the radio.
- Unbolt the Radio: Use the appropriate tools to unbolt the radio from its mount.
- Disconnect the Wiring: Carefully unplug the old radio from the wiring harness. Take note of the wire connections for reference.
Step 3: Connect the New Radio
Once you’ve removed the old radio, it’s time to connect the new unit.
- Attach the Wiring Harness Adapter: If you’re using an aftermarket radio, it’s highly recommended to use a wiring harness adapter. This will allow you to connect the factory wires to your new radio without cutting or splicing the vehicle’s original wiring.
- Match the Wires: Using the wiring diagram, match the wires from the adapter to the wires of the new radio. Each wire should correspond to its function—constant power, switched power, ground, illumination, and speakers.
- Secure the Connections: Use wire strippers to remove a small portion of the insulation from each wire, and then connect the wires using crimp connectors or solder. Insulate the connections with electrical tape or heat shrink tubing to prevent shorts.
Step 4: Test the New Radio
Before securing the new radio into place, it’s a good idea to test the connections:
- Reconnect the Car Battery: Reconnect the vehicle’s battery, ensuring the negative terminal is securely connected.
- Power On the Radio: Turn on the vehicle and check that the radio powers on and displays properly.
- Test the Speakers: Ensure that all speakers are producing sound and that the audio levels are balanced.
- Check the Illumination: Test the radio’s illumination to ensure that the lighting turns on when the headlights are activated.
Step 5: Secure the Radio and Finalize Installation
Once you’ve confirmed that the radio works as expected, you can finish the installation:
- Mount the Radio: Slide the radio into the dashboard mount and secure it with screws.
- Reattach the Trim Panel: Once the radio is securely in place, reattach the trim panel around the radio.
Troubleshooting Tips
If your radio isn’t working correctly after installation, try the following:
- Double-check the wiring: Make sure that all connections are secure and correctly matched according to the wiring diagram.
- Check for blown fuses: If the radio isn’t turning on, a blown fuse may be the culprit.
- Test the ground wire: A poor ground connection can cause interference or prevent the radio from working properly.
Conclusion
Upgrading or replacing the radio in your 1998 Honda Civic is a rewarding project that can improve the functionality and enjoyment of your vehicle. By understanding the wiring harness diagram and following the installation steps carefully, you can ensure that your new radio is installed correctly and works seamlessly with your car’s electrical system.
Always remember to double-check all connections, use proper safety precautions, and consult the manufacturer’s instructions for your new radio. With the right tools, knowledge, and a bit of patience, you’ll have a fully functional, high-quality radio setup in your 1998 Honda Civic in no time!
1998 honda civic radio wiring harness diagram pics wiring.
find china manufacturers of radio wiring harness order now.


1998 arkansas football,1998 acura integra,1998 academy awards,1998 arkansas football roster,1998 age,1998 all star game,1998 audi a4,1998 acura tl,1998 arkansas football schedule,1998 acura nsx,honda accord,honda accord sport,honda accord 2021,honda atv,honda accord for sale,honda accord hybrid,honda accord 2018,honda accord 2020,honda africa twin,honda accord coupe,civic auditorium,civic arena,civic action,civic activities,civic alliance,civic awd,civic association,civic affairs,civic at frisco square,civic action project,radio app,radio antenna,radioactive,radio ambulante,radio alphabet,radio active song,radio app for iphone,radio alarm clock,radio aleluya,radio advertising,wiring a light switch,wiring a 3 way switch,wiring an outlet,wiring a gfci outlet,wiring a ceiling fan,wiring a switch,wiring a plug,wiring a doorbell,wiring a receptacle,wiring a light fixture,harness and leash set,harness and lanyard,harness amazon,harness app,harness and leash,harness and leash for cats,harness adapter,harness assembly,harness accessories,harness and collar set,diagram a sentence,diagram a sentence for me,diagram app,diagram a sentence online,diagram as code,diagram and label a section of dna,diagram architecture,diagram art,diagram and explain the endosymbiotic theory,diagram anatomy


