“Solar power wiring for DIY projects”
Understanding Solar Power Systems
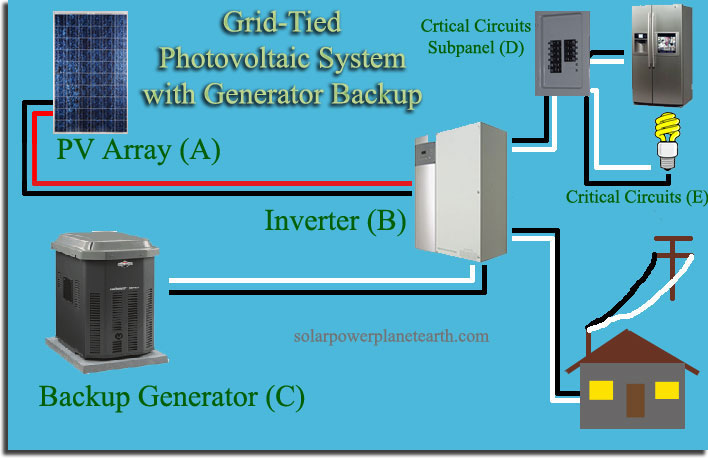
Before diving into the world of solar power wiring, it’s essential to understand the basics of solar power systems. A typical solar power system consists of:
- Solar Panels: These are the photovoltaic (PV) panels that convert sunlight into direct current (DC) electricity.
- Charge Controller: This component regulates the flow of energy from the solar panels to the battery bank, preventing overcharging and ensuring the batteries are charged efficiently.
- Battery Bank: This is the storage system for the energy generated by the solar panels. Deep cycle batteries are commonly used in solar power systems.
- Inverter: This component converts the DC electricity from the battery bank into alternating current (AC) electricity, which is usable in homes and businesses.
- Load Center: This is the main electrical panel that distributes the AC electricity to the various circuits in the building.
Safety Considerations
Solar power wiring can be hazardous if not done correctly. It’s crucial to follow safety guidelines to avoid electrical shock, fires, and other accidents. Here are some safety considerations to keep in mind:
- Use proper personal protective equipment (PPE): Wear insulated gloves, safety glasses, and a hard hat when working with electrical systems.
- Ensure proper grounding: Grounding is essential to prevent electrical shock. Use a grounding rod and ensure all components are properly grounded.
- Use UL-rated components: Only use components that are UL (Underwriters Laboratories) rated for solar power systems.
- Follow local electrical codes: Familiarize yourself with local electrical codes and regulations, and ensure your installation meets these standards.
- Hire a professional if unsure: If you’re unsure about any aspect of the installation, consider hiring a licensed electrician or solar installer.
Solar Power Wiring Basics
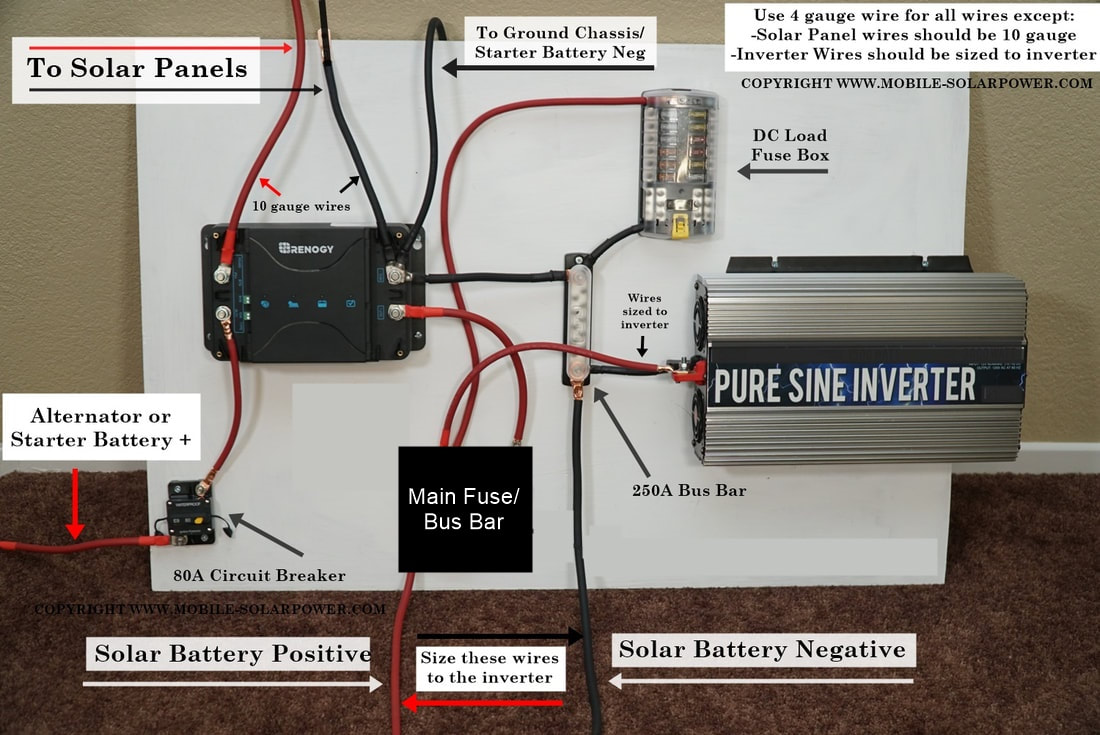
Solar power wiring involves connecting the various components of the solar power system together. Here are the basic steps:
- Connect the solar panels: Connect the solar panels in series or parallel to achieve the desired voltage and current.
- Connect the charge controller: Connect the charge controller to the solar panels and the battery bank.
- Connect the battery bank: Connect the battery bank to the charge controller and the inverter.
- Connect the inverter: Connect the inverter to the battery bank and the load center.
- Connect the load center: Connect the load center to the inverter and the various circuits in the building.
Wiring Diagrams and Schematics
Wiring diagrams and schematics are essential tools for planning and installing a solar power system. Here are some tips for creating and using wiring diagrams and schematics:
- Use a wiring diagram software: Utilize software such as AutoCAD or SketchUp to create detailed wiring diagrams and schematics.
- Include all components: Ensure all components, including solar panels, charge controllers, battery banks, inverters, and load centers, are included in the wiring diagram.
- Label all wires: Label all wires with their corresponding voltage, current, and function.
- Use color-coding: Use color-coding to differentiate between different types of wires, such as positive, negative, and ground wires.
Best Practices for Solar Power Wiring
Here are some best practices to keep in mind when installing a solar power system:
- Use proper wire sizing: Use wire sizing charts to ensure the correct gauge wire is used for each component.
- Use proper connectors: Use connectors that are rated for the specific application, such as MC4 connectors for solar panels.
- Keep wiring organized: Keep wiring organized and tidy to prevent damage and ensure easy maintenance.
- Test the system: Test the system thoroughly before connecting it to the grid or using it to power loads.
- Monitor the system: Monitor the system regularly to ensure it’s functioning correctly and efficiently.
Common Mistakes to Avoid
Here are some common mistakes to avoid when installing a solar power system:
- Incorrect wire sizing: Using wire that’s too small can cause overheating and fires.
- Insufficient grounding: Poor grounding can lead to electrical shock and equipment damage.
- Incorrect component selection: Using components that are not rated for the specific application can lead to system failure and damage.
- Poor wiring connections: Poor wiring connections can cause electrical shock, fires, and system failure.
- Lack of maintenance: Failing to regularly inspect and maintain the system can lead to system failure and reduced efficiency.
Conclusion
Solar power wiring for DIY projects can be a complex and challenging task, but with the right knowledge and skills, it can be a rewarding and cost-effective way to generate renewable energy. By following the safety considerations, basics, and best practices outlined in this article, you can ensure a successful and efficient solar power installation. Remember to always follow local electrical codes and regulations, and consider hiring a professional if you’re unsure about any aspect of the installation. With the right approach, you can harness the power of the sun to generate clean and sustainable energy for your home or business.
Recommended Tools and Materials
Here are some recommended tools and materials for solar power wiring:
- Wire strippers: For stripping insulation from wires.
- Wire cutters: For cutting wires to the correct length.
- Crimping tools: For crimping connectors onto wires.
- Multimeter: For measuring voltage, current, and resistance.
- MC4 connectors: For connecting solar panels to the charge controller.
- UL-rated wire: For connecting components together.
- Grounding rod: For ensuring proper grounding.
- Solar panel mounting hardware: For securing solar panels to the roof or ground.
Additional Resources
For more information on solar power wiring and DIY projects, check out the following resources:
- National Electric Code (NEC): The NEC provides guidelines for electrical wiring and installation.
- UL (Underwriters Laboratories): UL provides ratings and standards for electrical components and systems.
- Solar Energy Industries Association (SEIA): SEIA provides resources and guidelines for solar power installations.
- Online forums and communities: Join online forums and communities, such as Reddit’s r/solarpower, to connect with other DIYers and solar power enthusiasts.
- Local electrical codes and regulations: Familiarize yourself with local electrical codes and regulations to ensure compliance with your installation.
By following the guidelines and best practices outlined in this article, you can ensure a safe and successful solar power installation. Remember to always follow local electrical codes and regulations, and consider hiring a professional if you’re unsure about any aspect of the installation. Happy building!