“How to troubleshoot solar panel wiring for homes?”
Understanding Solar Panel Wiring
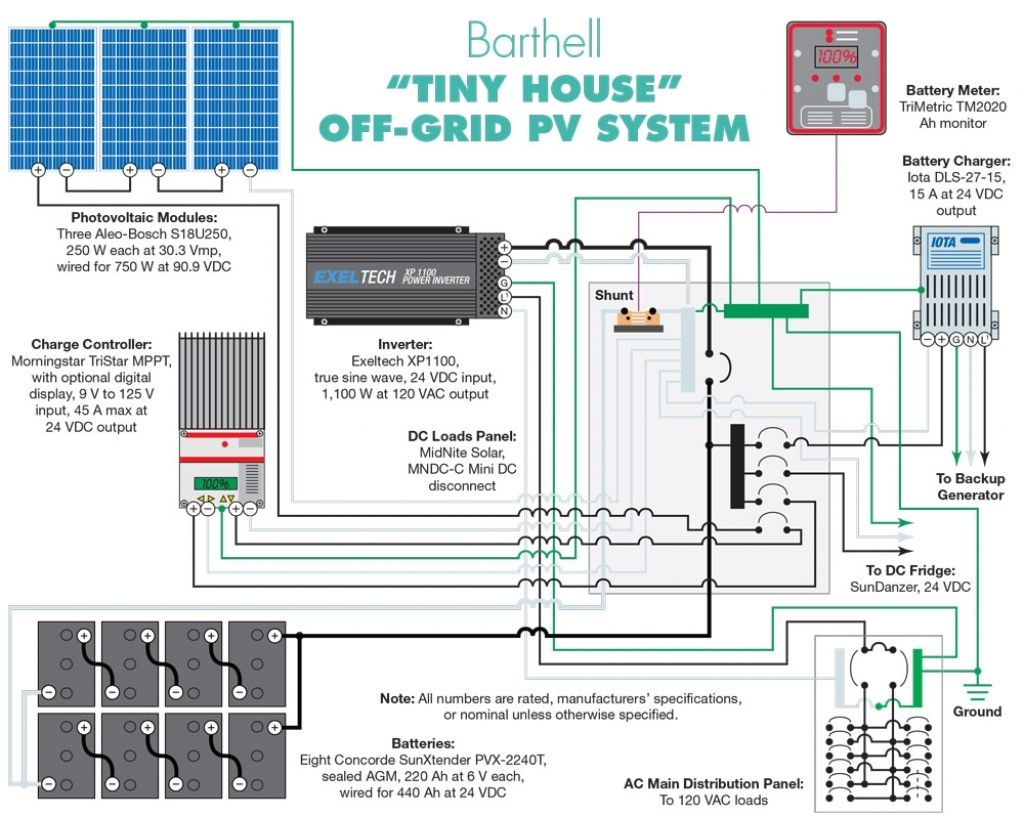
Before we dive into the troubleshooting process, it’s essential to understand the basics of solar panel wiring. A typical solar panel system consists of multiple panels connected in series and/or parallel, forming a string or an array. The DC (direct current) power generated by the panels is then sent to an inverter, which converts it into AC (alternating current) power, compatible with the electrical grid.
The wiring system of a solar panel installation typically includes:
- Panel connections: Each panel has a junction box with connectors (e.g., MC4) that link to the next panel in the string.
- String wiring: The panels are connected in series, forming a string, which is then connected to a combiner box.
- Combiner box: The combiner box gathers the output from multiple strings and routes it to the inverter.
- Inverter connections: The inverter is connected to the combiner box and the electrical grid.
Common Issues with Solar Panel Wiring

While solar panel systems are designed to be reliable, issues can still arise due to various factors, such as:
- Loose connections: Over time, connections can become loose, causing a decrease in system performance.
- Faulty connectors: Damaged or corroded connectors can lead to a loss of power and system downtime.
- Grounding issues: Improper grounding can cause electrical shock, fires, or system malfunctions.
- Voltage imbalances: Uneven voltage levels across the system can reduce efficiency and cause damage to components.
- Rodents or animal damage: Rodents and other animals can chew through wiring, causing damage and disruption.

Troubleshooting Steps
To identify and resolve issues with your solar panel wiring, follow these step-by-step troubleshooting steps:

Step 1: Visual Inspection
Begin by visually inspecting the solar panel system, looking for signs of damage, wear, or corrosion. Check for:
- Loose or damaged connectors
- Frayed or chewed wires
- Corrosion or water damage
- Signs of animal or rodent activity
Step 2: System Monitoring
Review the system’s monitoring data to identify any performance issues or anomalies. Check for:
- Low system production
- High system temperatures
- Error messages or warnings
Step 3: Voltage and Current Measurements
Use a multimeter to measure the voltage and current at various points in the system, including:
- Panel voltage and current
- String voltage and current
- Combiner box voltage and current
- Inverter input and output voltage and current
Compare the measured values to the expected values, as specified in the system documentation.
Step 4: Continuity Testing
Perform continuity testing to ensure that the wiring is intact and not damaged. Use a multimeter to check for continuity between:
- Panel connectors
- String connectors
- Combiner box connectors
- Inverter connectors
Step 5: Grounding and Bonding Check
Verify that the system is properly grounded and bonded. Check for:
- Secure connections to the grounding system
- Correct bonding between components
- No signs of corrosion or damage to grounding components
Step 6: Inverter and Combiner Box Check
Inspect the inverter and combiner box for any issues, such as:
- Error messages or warning lights
- Overheating or unusual noise
- Loose or damaged connections
Step 7: Panel Cleaning and Maintenance
Regularly clean the solar panels to ensure they are free from debris and dirt, which can reduce system performance.
Repair and Replacement Procedures
Once you’ve identified the issue, follow these repair and replacement procedures:
- Loose connections: Tighten connections securely, ensuring they are not over-torqued.
- Faulty connectors: Replace damaged or corroded connectors with new ones.
- Grounding issues: Repair or replace faulty grounding components, ensuring proper connections to the grounding system.
- Voltage imbalances: Adjust the system configuration to balance voltage levels across the system.
- Rodent or animal damage: Repair or replace damaged wiring, and consider using animal-deterrent measures, such as wire shielding or protective covers.
Safety Precautions
When troubleshooting and repairing your solar panel wiring, always follow these safety precautions:
- Turn off the system: Before starting any work, turn off the solar panel system at the inverter and disconnect it from the electrical grid.
- Use personal protective equipment: Wear protective gear, such as gloves, safety glasses, and a hard hat, when working with electrical systems.
- Avoid electrical shock: Be aware of potential electrical shock hazards, such as exposed wires or components.
- Follow local regulations: Comply with local electrical codes and regulations when repairing or replacing wiring.
Conclusion
Troubleshooting solar panel wiring requires a systematic approach, following a step-by-step process to identify and resolve issues. By understanding the basics of solar panel wiring, recognizing common problems, and following the troubleshooting steps outlined in this article, you can effectively diagnose and repair issues with your solar panel system. Remember to always prioritize safety when working with electrical systems, and consider seeking professional assistance if you’re unsure or uncomfortable with any aspect of the process. With proper maintenance and troubleshooting, your solar panel system can continue to operate efficiently, providing clean and renewable energy for your home.


