“Off-grid solar panel wiring diagram”
Introduction to Off-Grid Solar Panel Systems
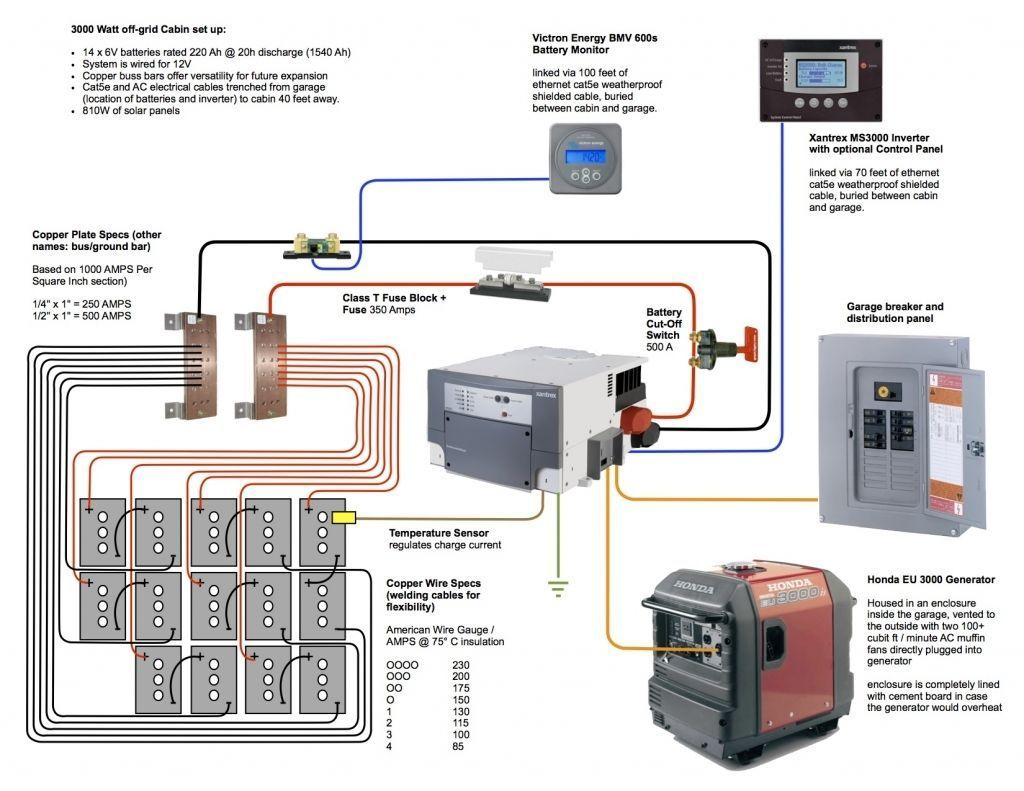
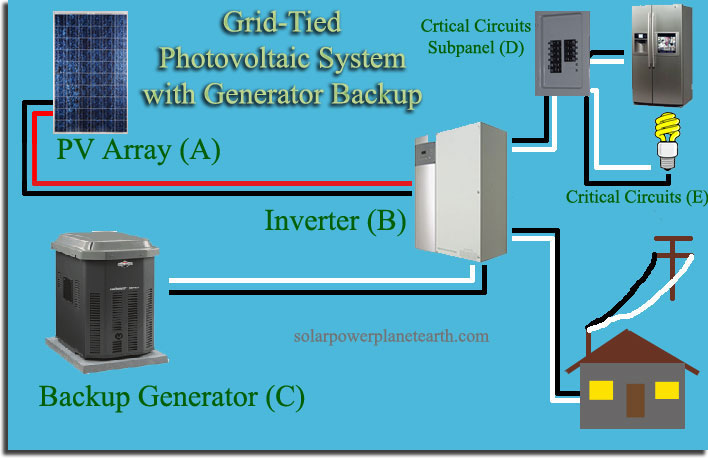
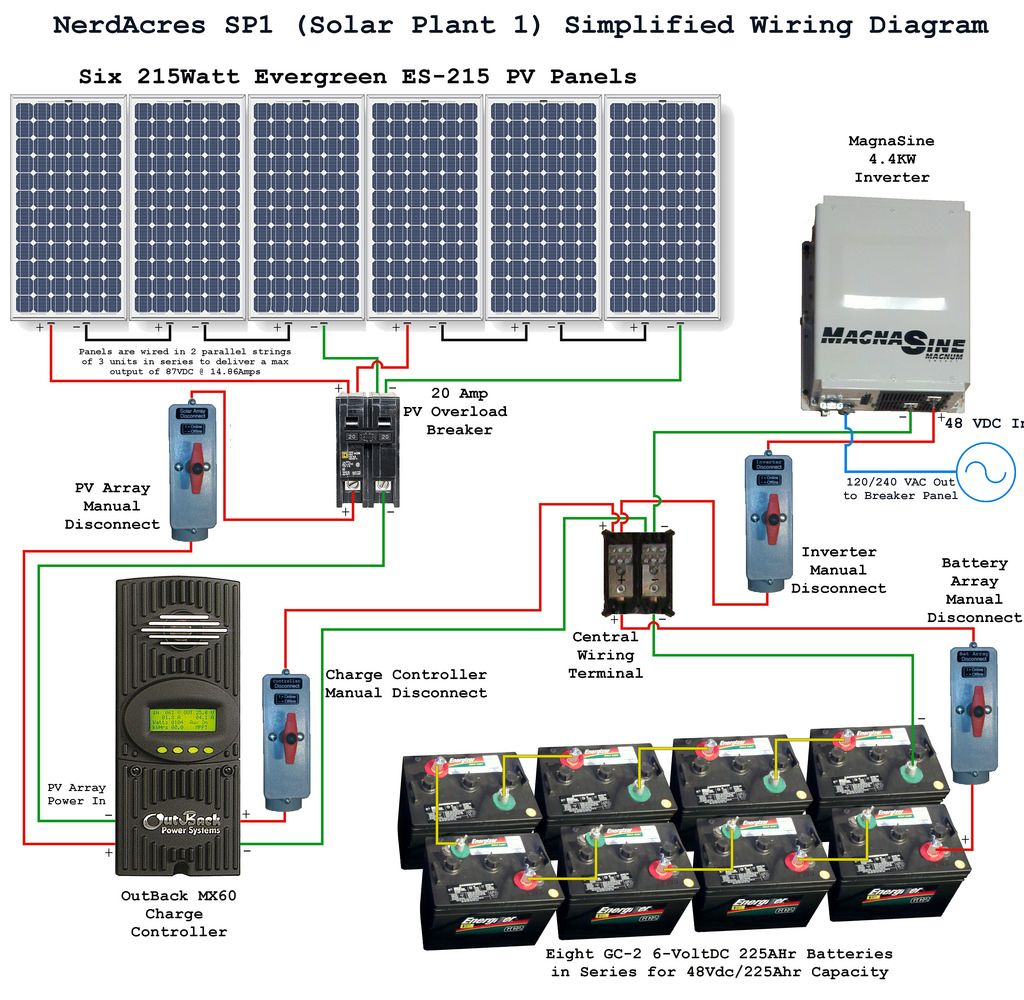
Off-grid solar panel systems are designed to operate independently of the grid, providing electricity to homes, cabins, or remote locations where grid access is limited or non-existent. These systems typically consist of solar panels, a charge controller, a battery bank, and an inverter/charger. The solar panels generate DC power, which is then stored in the battery bank via the charge controller. The inverter/charger converts the DC power to AC power, allowing you to run appliances and lighting.
Key Components of an Off-Grid Solar Panel System
Before we dive into the wiring diagram, it’s essential to understand the key components of an off-grid solar panel system:
- Solar Panels: These are the primary source of energy, converting sunlight into DC power.
- Charge Controller: Regulates the flow of energy from the solar panels to the battery bank, preventing overcharging and ensuring the batteries are properly charged.
- Battery Bank: Stores excess energy generated by the solar panels, providing a backup source of power during periods of low sunlight or at night.
- Inverter/Charger: Converts DC power from the battery bank to AC power, allowing you to run appliances and lighting.
- Mounting Hardware: Secures the solar panels to the roof or a ground-mounted rack, ensuring they are properly angled and aligned to maximize energy production.
- Wiring and Connectors: Transfers energy between components, requiring careful selection and installation to minimize energy loss and ensure safety.

Design Considerations for an Off-Grid Solar Panel Wiring Diagram
When designing an off-grid solar panel wiring diagram, several factors must be taken into account to ensure a safe, efficient, and reliable system:
- System Voltage: The voltage of the system, typically 12V, 24V, or 48V, will determine the type of components used and the wiring configuration.
- System Size: The number of solar panels, battery bank capacity, and inverter/charger rating will impact the wiring diagram, requiring careful calculation to ensure the system can meet the energy demands of the load.
- Energy Efficiency: Minimizing energy loss is crucial in an off-grid system, requiring careful selection of components and wiring to reduce voltage drop and energy wasting resistive losses.
- Safety: Ensuring the system is safe to operate, with proper grounding, bonding, and surge protection, is essential to prevent electrical shock, fire, or equipment damage.


Creating an Off-Grid Solar Panel Wiring Diagram
A well-designed wiring diagram is essential for a safe and efficient off-grid solar panel system. Here’s a step-by-step guide to creating a basic wiring diagram:
- Determine the System Configuration: Decide on the system voltage, size, and components, including the number of solar panels, battery bank capacity, and inverter/charger rating.
- Choose the Wiring Diagram Type: Select a wiring diagram type, such as a series, parallel, or combination of both, depending on the system configuration and component requirements.
- Draw the Wiring Diagram: Use a software tool or pencil and paper to draw the wiring diagram, including all components, wiring, and connectors.
- Label and Color-Code the Wiring: Clearly label and color-code the wiring to ensure easy identification and minimize errors.
- Verify the Wiring Diagram: Double-check the wiring diagram for accuracy, ensuring all components are properly connected and the system is safe to operate.
Example Off-Grid Solar Panel Wiring Diagram
Here’s an example wiring diagram for a basic off-grid solar panel system:
- Solar Panel Array: 4 x 300W solar panels, connected in series-parallel (2S2P) configuration, producing 24V DC power.
- Charge Controller: 40A MPPT charge controller, regulating the flow of energy from the solar panels to the battery bank.
- Battery Bank: 4 x 200Ah deep cycle batteries, connected in series-parallel (2S2P) configuration, storing 24V DC power.
- Inverter/Charger: 3000W pure sine wave inverter/charger, converting DC power to AC power and charging the battery bank.
- Wiring and Connectors: 10AWG wire, connectors, and lugs, minimizing energy loss and ensuring safe connections.
The wiring diagram would show the following connections:
- Solar panels to charge controller: series-parallel (2S2P) connection, using 10AWG wire and MC4 connectors.
- Charge controller to battery bank: 10AWG wire, using ring terminals and a fuse holder.
- Battery bank to inverter/charger: 10AWG wire, using ring terminals and a fuse holder.
- Inverter/charger to AC load center: 10AWG wire, using a 30A circuit breaker and a AC load center.
Best Practices for Off-Grid Solar Panel Wiring Diagrams
To ensure a safe, efficient, and reliable off-grid solar panel system, follow these best practices when creating a wiring diagram:
- Follow Industry Standards: Adhere to industry standards, such as the National Electric Code (NEC), to ensure compliance and safety.
- Use Proper Wiring and Connectors: Select wiring and connectors that meet the system’s voltage and current requirements, minimizing energy loss and ensuring safe connections.
- Label and Color-Code Wiring: Clearly label and color-code wiring to prevent errors and ensure easy identification.
- Test and Verify the System: Test and verify the system before putting it into operation, ensuring all components are functioning correctly and the system is safe to use.
- Maintain and Monitor the System: Regularly maintain and monitor the system, performing routine inspections and repairs to ensure optimal performance and extend the system’s lifespan.
Conclusion
Creating an off-grid solar panel wiring diagram requires careful consideration of the system’s components, configuration, and safety requirements. By following industry standards, using proper wiring and connectors, and testing and verifying the system, you can ensure a safe, efficient, and reliable off-grid solar panel system. Whether you’re a seasoned solar professional or a DIY enthusiast, a well-designed wiring diagram is essential for a successful off-grid solar panel installation. Remember to always follow best practices, and don’t hesitate to seek professional advice if you’re unsure about any aspect of the design or installation process.


