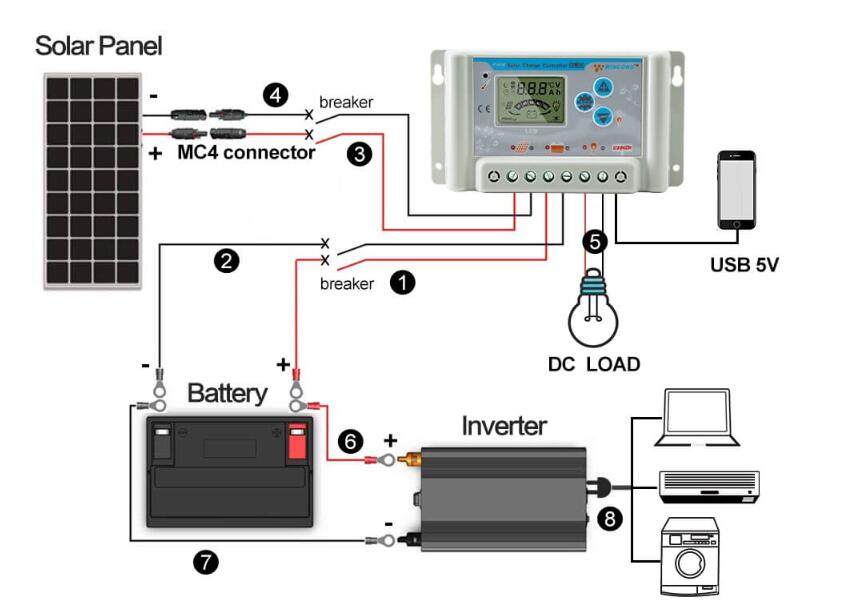
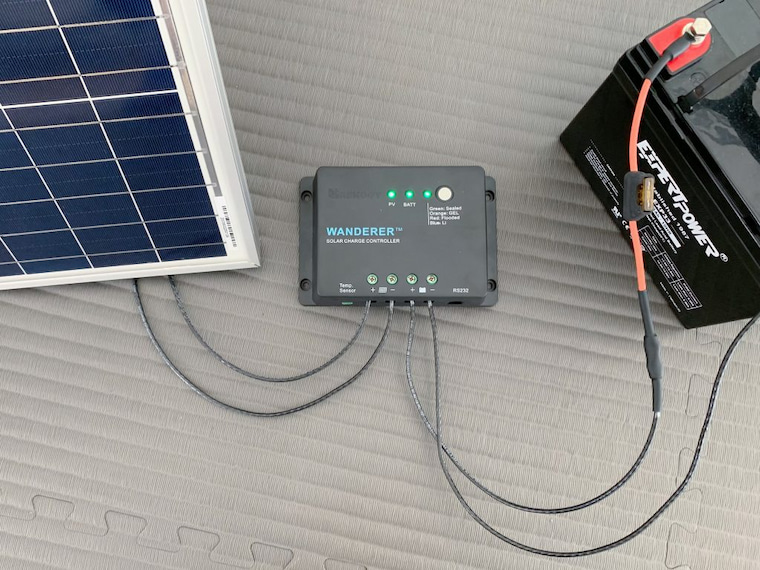
“How to wire solar panels to a charge controller”
Introduction to Charge Controllers
A charge controller is an essential component of a solar panel system, responsible for regulating the flow of energy from the solar panels to the battery bank. Its primary function is to prevent overcharging of the batteries, which can lead to reduced battery life and even cause damage to the system. Charge controllers can be categorized into two main types: Pulse Width Modulation (PWM) and Maximum Power Point Tracking (MPPT).
PWM Charge Controllers
PWM charge controllers are the most common type of charge controller. They work by regulating the voltage and current from the solar panels to the battery bank, ensuring that the batteries are charged safely and efficiently. PWM charge controllers are suitable for small to medium-sized solar panel systems and are often less expensive than MPPT charge controllers.
MPPT Charge Controllers
MPPT charge controllers, on the other hand, are more advanced and efficient than PWM charge controllers. They use advanced algorithms to track the maximum power point of the solar panels, ensuring that the maximum amount of energy is extracted from the solar panels and delivered to the battery bank. MPPT charge controllers are ideal for larger solar panel systems and can increase the overall efficiency of the system by up to 30%.
Wiring Solar Panels to a Charge Controller
Wiring solar panels to a charge controller requires careful planning and attention to detail. The following steps outline the process:
- Determine the System Voltage: Before connecting the solar panels to the charge controller, determine the system voltage. Most solar panel systems operate at 12, 24, or 48 volts. Ensure that the charge controller is compatible with the system voltage.
- Connect the Solar Panels in Series or Parallel: Solar panels can be connected in series or parallel to achieve the desired voltage and current. Series connection increases the voltage, while parallel connection increases the current.
- Use the Correct Wire Size: Use the correct wire size to connect the solar panels to the charge controller. The wire size will depend on the distance between the solar panels and the charge controller, as well as the current rating of the solar panels.
- Connect the Positive and Negative Terminals: Connect the positive terminal of the solar panel to the positive terminal of the charge controller, and the negative terminal of the solar panel to the negative terminal of the charge controller.
- Use a Fuse or Circuit Breaker: Install a fuse or circuit breaker between the solar panels and the charge controller to protect the system from overcurrent conditions.
- Ground the System: Ground the system by connecting the negative terminal of the charge controller to a grounding point, such as a grounding rod or a metal frame.
- Connect the Battery Bank: Connect the battery bank to the charge controller, ensuring that the positive terminal of the battery bank is connected to the positive terminal of the charge controller, and the negative terminal of the battery bank is connected to the negative terminal of the charge controller.
- Configure the Charge Controller: Configure the charge controller according to the manufacturer’s instructions, setting the system voltage, battery type, and charging parameters.


Safety Precautions
When wiring solar panels to a charge controller, it is essential to follow safety precautions to avoid electrical shock or damage to the system. The following safety precautions should be taken:

- Disconnect the Solar Panels: Disconnect the solar panels from the charge controller before making any connections.
- Use Insulated Wire: Use insulated wire to connect the solar panels to the charge controller, preventing electrical shock.
- Avoid Overcurrent Conditions: Avoid overcurrent conditions by using the correct wire size and installing a fuse or circuit breaker.
- Ground the System: Ground the system to prevent electrical shock and ensure safe operation.
- Follow Manufacturer’s Instructions: Follow the manufacturer’s instructions for the charge controller and solar panels, ensuring that the system is configured correctly and safely.
Troubleshooting Common Issues
Common issues that may arise when wiring solar panels to a charge controller include:
- Overcharging: Overcharging can occur if the charge controller is not configured correctly or if the solar panels are producing more energy than the battery bank can handle.
- Undercharging: Undercharging can occur if the solar panels are producing less energy than the battery bank requires.
- Faulty Connections: Faulty connections can occur if the wire size is incorrect or if the connections are loose.
- Charge Controller Malfunction: Charge controller malfunction can occur if the charge controller is faulty or if it is not configured correctly.
Conclusion
Wiring solar panels to a charge controller requires careful planning and attention to detail. By following the steps outlined in this article, individuals can ensure a safe and efficient connection, maximizing the energy output of their solar panel system. It is essential to follow safety precautions and troubleshoot common issues to ensure the system operates correctly and efficiently. With the increasing demand for renewable energy sources, solar panel systems have become an attractive option for individuals and businesses looking to reduce their reliance on traditional energy sources.
:max_bytes(150000):strip_icc()/GettyImages-1306175466-5fea06cef4d6421993ed4385257eba50.jpg)


