These systems allow homeowners and businesses to generate their own electricity, independent of the grid, and reduce their reliance on fossil fuels. However, setting up an off-grid solar system can be complex, and proper wiring is crucial to ensure safe and efficient operation. In this article, we will provide a comprehensive guide on how to set up a complete off-grid solar system wiring setup.

Introduction to Off-Grid Solar Systems
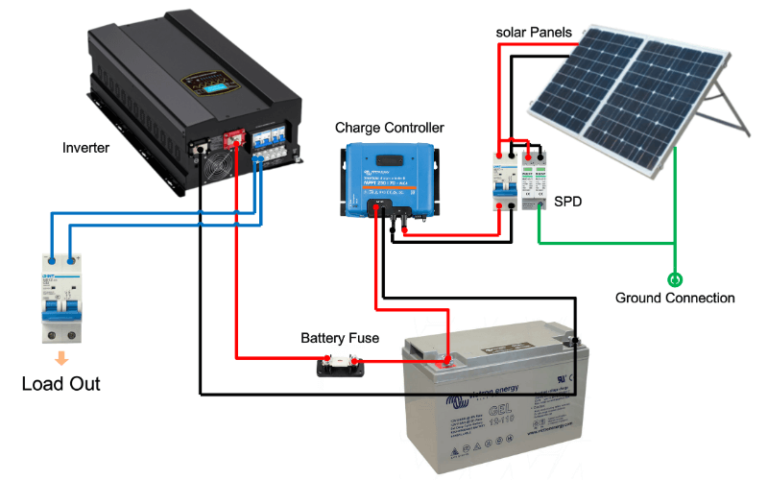
An off-grid solar system is a self-sufficient system that generates electricity from solar panels and stores it in batteries for later use. The system consists of several components, including:
- Solar Panels: Convert sunlight into DC electricity
- Charge Controller: Regulates the flow of energy from the solar panels to the battery bank
- Battery Bank: Stores excess energy generated by the solar panels for later use
- Inverter/Charger: Converts DC energy from the battery bank to AC energy for household use
- Load Center: Distributes AC energy to various appliances and devices
Wiring Setup Overview
The wiring setup for an off-grid solar system involves connecting the various components together in a safe and efficient manner. The setup typically consists of several circuits, including:
- Solar Panel Circuit: Connects the solar panels to the charge controller
- Charge Controller Circuit: Connects the charge controller to the battery bank
- Battery Bank Circuit: Connects the battery bank to the inverter/charger

- Inverter/Charger Circuit: Connects the inverter/charger to the load center
- Load Center Circuit: Connects the load center to various appliances and devices
Solar Panel Circuit
The solar panel circuit is responsible for connecting the solar panels to the charge controller. The following steps should be followed:

- Connect the solar panels in series: Connect the positive terminal of one solar panel to the negative terminal of the next solar panel, and so on.
- Use suitable wiring: Use wiring that is rated for outdoor use and can withstand the elements.
- Use a combiner box: Connect the solar panels to a combiner box, which combines the output of multiple solar panels into a single output.
- Connect the combiner box to the charge controller: Connect the output of the combiner box to the charge controller.
Charge Controller Circuit
The charge controller circuit is responsible for regulating the flow of energy from the solar panels to the battery bank. The following steps should be followed:
- Connect the charge controller to the solar panel circuit: Connect the output of the combiner box to the charge controller.
- Connect the charge controller to the battery bank: Connect the output of the charge controller to the battery bank.
- Set the charge controller parameters: Set the charge controller parameters, such as the maximum charging voltage and current, to match the specifications of the battery bank.
Battery Bank Circuit
The battery bank circuit is responsible for storing excess energy generated by the solar panels for later use. The following steps should be followed:
- Connect the batteries in series and parallel: Connect the batteries in series to increase the voltage, and in parallel to increase the capacity.
- Use suitable wiring: Use wiring that is rated for battery use and can withstand the corrosive environment of the battery bank.
- Connect the battery bank to the inverter/charger: Connect the output of the battery bank to the inverter/charger.
Inverter/Charger Circuit
The inverter/charger circuit is responsible for converting DC energy from the battery bank to AC energy for household use. The following steps should be followed:
- Connect the inverter/charger to the battery bank: Connect the input of the inverter/charger to the output of the battery bank.
- Connect the inverter/charger to the load center: Connect the output of the inverter/charger to the load center.
- Set the inverter/charger parameters: Set the inverter/charger parameters, such as the output voltage and frequency, to match the specifications of the load center.
Load Center Circuit
The load center circuit is responsible for distributing AC energy to various appliances and devices. The following steps should be followed:
- Connect the load center to the inverter/charger: Connect the input of the load center to the output of the inverter/charger.
- Connect the load center to various appliances and devices: Connect the output of the load center to various appliances and devices, such as lights, refrigerators, and computers.
- Use suitable wiring: Use wiring that is rated for indoor use and can withstand the loads of the appliances and devices.
Safety Considerations
When setting up an off-grid solar system wiring setup, safety should be the top priority. The following safety considerations should be taken into account:
- Use proper wiring and connections: Use wiring and connections that are rated for the application and can withstand the elements.
- Use protective devices: Use protective devices, such as fuses and circuit breakers, to protect the system from overloads and short circuits.
- Follow proper grounding procedures: Follow proper grounding procedures to ensure that the system is properly grounded and can withstand lightning strikes and other electrical surges.
- Hire a professional: If you are not experienced in setting up off-grid solar systems, hire a professional to ensure that the system is set up safely and efficiently.
Conclusion
Setting up a complete off-grid solar system wiring setup requires careful planning and attention to detail. By following the steps outlined in this article, you can ensure that your off-grid solar system is set up safely and efficiently. Remember to always follow safety considerations and hire a professional if you are not experienced in setting up off-grid solar systems. With a properly set up off-grid solar system, you can enjoy the benefits of renewable energy and reduce your reliance on fossil fuels.
Recommended Wiring and Connection Sizes
The following are recommended wiring and connection sizes for an off-grid solar system:
- Solar panel circuit: 10 AWG wire, 15 A fuse
- Charge controller circuit: 10 AWG wire, 15 A fuse
- Battery bank circuit: 2 AWG wire, 100 A fuse
- Inverter/charger circuit: 4 AWG wire, 50 A fuse
- Load center circuit: 12 AWG wire, 20 A fuse
Recommended System Components
The following are recommended system components for an off-grid solar system:
- Solar panels: 300 W, 24 V
- Charge controller: 40 A, 24 V
- Battery bank: 12 V, 200 Ah
- Inverter/charger: 2000 W, 24 V
- Load center: 20 A, 120/240 V
Note: The recommended system components and wiring sizes may vary depending on the specific application and requirements of the system. It is always best to consult with a professional to determine the best system components and wiring sizes for your specific application.