However, installing an off-grid solar system can seem daunting, especially when it comes to wiring. In this article, we will walk you through a step-by-step guide on how to wire an off-grid solar system, helping you to harness the power of the sun and reduce your reliance on the grid.

Introduction to Off-Grid Solar Systems
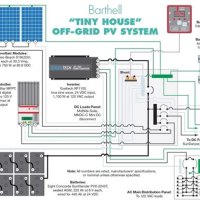
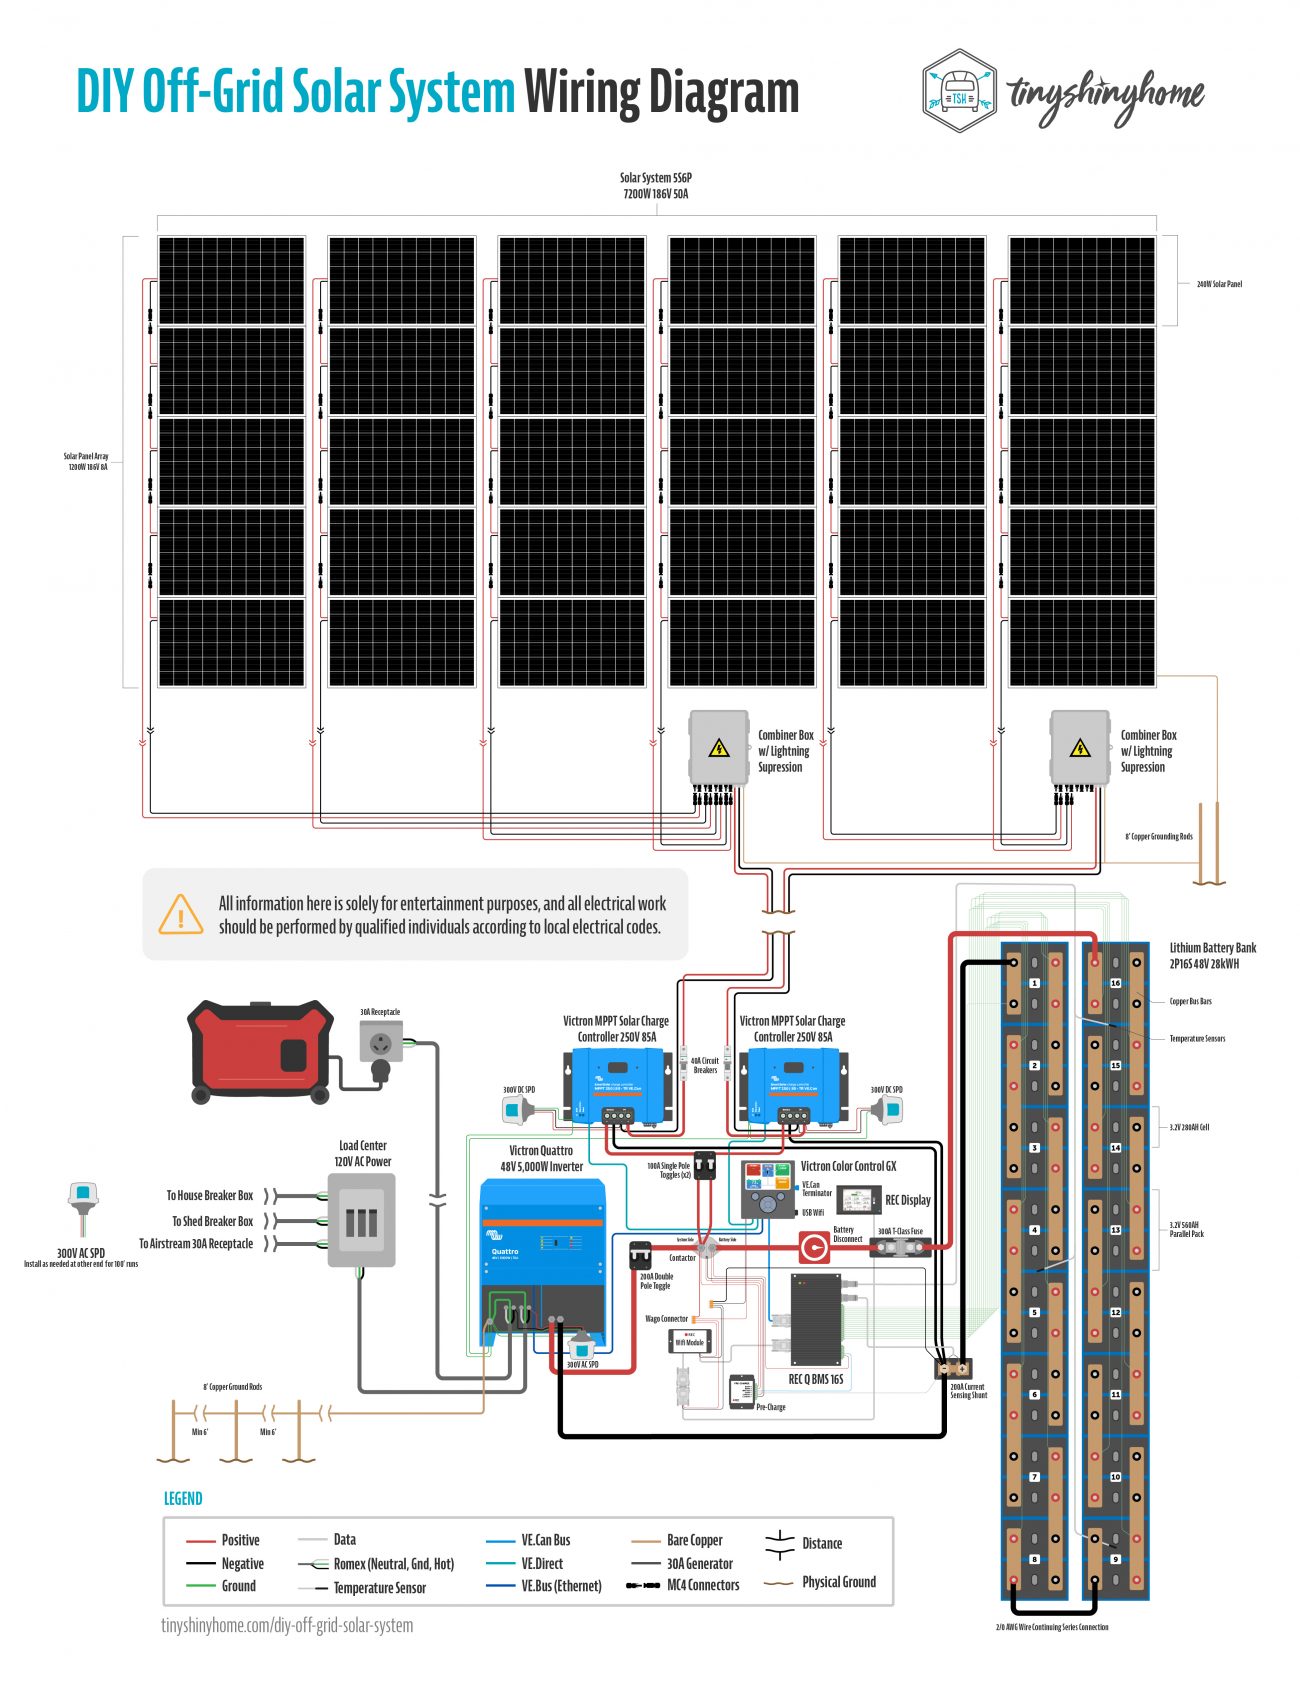
An off-grid solar system, also known as a standalone solar system, is a self-contained system that generates electricity from solar panels and stores it in batteries for later use. The system consists of several key components, including:
- Solar Panels: These convert sunlight into DC electricity.
- Charge Controller: Regulates the flow of energy from the solar panels to the batteries.
- Battery Bank: Stores excess energy generated by the solar panels for later use.
- Inverter: Converts DC electricity from the batteries to AC electricity, which is usable in homes and businesses.
- Mounting System: Secures the solar panels in place, either on a roof or on the ground.
Wiring an Off-Grid Solar System: A Step-by-Step Guide
Wiring an off-grid solar system requires careful planning and attention to detail. Here's a step-by-step guide to help you get started:
Step 1: Plan Your System
Before you begin wiring, it's essential to plan your system. Determine the size of your solar panel array, the number of batteries you'll need, and the type of inverter and charge controller you'll require. Consider the following factors:
- Energy Requirements: Calculate your daily energy needs based on your appliances and lighting.

- Solar Panel Array Size: Determine the number of solar panels you'll need to meet your energy requirements.
- Battery Bank Size: Calculate the number of batteries you'll need to store excess energy.
Step 2: Prepare Your Materials
Gather all the necessary materials, including:

- Solar Panels: Ensure they are compatible with your charge controller and inverter.
- Charge Controller: Choose a controller that matches your solar panel array size and battery bank size.
- Battery Bank: Select deep cycle batteries designed for off-grid solar systems.
- Inverter: Choose an inverter that matches your energy requirements and battery bank size.
- Wiring and Connectors: Use heavy-duty wiring and connectors rated for outdoor use.
- Grounding Equipment: Ensure you have a proper grounding system to protect against electrical shock.
Step 3: Install the Solar Panel Array
Install the solar panel array, following these steps:
- Mount the Solar Panels: Secure the solar panels to the mounting system, ensuring they are level and facing the correct direction.
- Connect the Solar Panels: Connect the solar panels in series and parallel, depending on your system design.
- Install the Solar Panel Combiner Box: Connect the solar panel array to the combiner box, which combines the output of multiple solar panels.
Step 4: Install the Charge Controller
Install the charge controller, following these steps:
- Mount the Charge Controller: Secure the charge controller to a wall or mounting plate.
- Connect the Solar Panel Array: Connect the solar panel array to the charge controller.
- Connect the Battery Bank: Connect the battery bank to the charge controller.
Step 5: Install the Battery Bank
Install the battery bank, following these steps:
- Mount the Batteries: Secure the batteries to a battery rack or shelf.
- Connect the Batteries: Connect the batteries in series and parallel, depending on your system design.
- Install the Battery Monitor: Install a battery monitor to track the state of charge and voltage of the batteries.
Step 6: Install the Inverter
Install the inverter, following these steps:
- Mount the Inverter: Secure the inverter to a wall or mounting plate.
- Connect the Battery Bank: Connect the battery bank to the inverter.
- Connect the AC Load: Connect the AC load (e.g., appliances, lighting) to the inverter.
Step 7: Ground the System
Ground the system to protect against electrical shock, following these steps:
- Install the Grounding Rod: Drive a grounding rod into the earth, ensuring it's in contact with the soil.
- Connect the Grounding Wire: Connect the grounding wire to the grounding rod and the solar panel array, charge controller, battery bank, and inverter.
Step 8: Test the System
Test the system to ensure it's functioning correctly, following these steps:
- Check the Voltage: Verify the voltage output of the solar panel array, charge controller, and inverter.
- Check the Current: Verify the current output of the solar panel array, charge controller, and inverter.
- Monitor the System: Monitor the system's performance, checking for any errors or issues.
Safety Precautions and Considerations
When wiring an off-grid solar system, it's essential to take safety precautions and consider the following:
- Electrical Shock: Ensure proper grounding and insulation to protect against electrical shock.
- Fire Hazard: Keep the system away from flammable materials and ensure proper ventilation.
- Overcharge Protection: Install overcharge protection devices to prevent damage to the batteries.
- Maintenance: Regularly inspect and maintain the system to ensure optimal performance and safety.
Conclusion
Wiring an off-grid solar system requires careful planning, attention to detail, and a thorough understanding of the components and their interactions. By following this step-by-step guide, you'll be able to harness the power of the sun and reduce your reliance on the grid. Remember to always prioritize safety and take necessary precautions to ensure a safe and efficient installation. With the right knowledge and equipment, you can enjoy the benefits of an off-grid solar system and start generating clean, renewable energy.